General Conference is always such a treat. I find that if I prepare myself mentally, I always find something of great value in nearly every talk. Many of the talks will speak to an issue that I am having. A select few might even give me chills as I sit in amazement at the love of a Heavenly Father who sends messages, often very specific to my own questions and concerns, to help me become a better version of myself.
Author: Julie
PUDcakes
When someone at church needs a meal brought to them, I always like to take dessert. I know, I know….we shouldn’t eat so many sweets. But I just can’t help myself. And, as I’m always looking for new recipes to put on the blog, it’s also a good opportunity to taste test some new recipes! This recipe provides a fun new way to enjoy Pineapple Upside Down Cake–in neat, individual servings now affectionately known around my house as PUDcakes!
Ingredients:
2 eggs
2/3 cup sugar
4 Tbsp. pineapple juice (from the can of pineapple slices)
2/3 cup all-purpose flour
1 tsp. baking powder
1/4 tsp. salt
1/4 cup butter (1/2 stick or 4 Tbsp)
2/3 cup brown sugar
1 can pineapple rings/slices
6 maraschino cherries
1. Set oven to 350 degrees. Spray a jumbo muffin tin with non-stick cooking spray.
2. In a mixing bowl combine the eggs, sugar, and pineapple juice. Whisk together for a couple of minutes until smooth and well combined. In another bowl sift together the flour, baking powder, and salt. Add this to the wet ingredients and whisk together until well-blended. (You can also use a hand- or stand-mixer for this step).
3. In a small saucepan melt the butter and brown sugar together on low heat. Stir for one minute on low heat. Spoon enough of this into the bottoms of the jumbo muffin tin to just cover the bottom. Place a pineapple ring in each muffin section and place a cherry in the center of each ring. Now fill each section 3/4 of the way with the cake batter.
4. Bake for 20-25 minutes or until a toothpick inserted into the cake part comes out clean or with just a titch of crumbs. Allow to cool for three minutes, then run a knife around each cake to loosen the sides. Place a cooling rack over the pan and carefully flip the pan/rack over onto a baking sheet (which will catch the drips).
Makes about 6 jumbo muffins
Source: Big Mama’s Home Kitchen
Pumpkin Pie Bites
I love finger food. I guess I’m just too lazy to use a fork or something, I dunno. I just think finger food is way more fun. So finding a way to eat pumpkin pie with my fingers is just cooler than the flip side of my pillow.
Ingredients:
2 refrigerated ready-to roll pie crusts
1 egg white
8 oz. cream cheese, softened
1/2 cup sugar
1 cup canned pumpkin
2 eggs
1 teaspoon vanilla
1 teaspoon pumpkin pie spice
biscuit/round cutter
1/2 cup chocolate morsels
vegetable oil (I used coconut oil)
re-sealable plastic bags or frosting bag
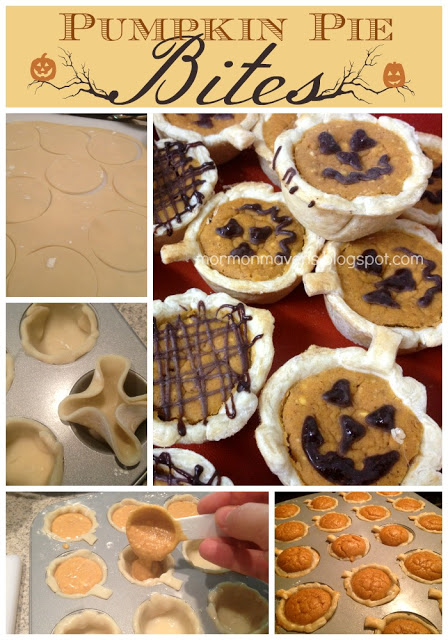
1. Preheat oven to 350 degrees. Roll out pie crust onto lightly floured board and thin it out just a bit with a rolling pin. Cut circles with a biscuit cutter. Easing the fullness in as you go, gently press the circles into the cups of a mini muffin pan. With the scraps on the board, cut little stems and adhere them to the crust in the cups with a tiny bit of water. Brush the tops of the crusts with beaten egg white.
2. Mix cream cheese, sugar, canned pumpkin, 2 eggs, vanilla, and pumpkin pie spice together until well combined. Spoon one tablespoon of this mixture into each of the crusts. (Pumpkin filling should be level with the top of the crust, more or less.)
3. Bake for 15-18 minutes. Remove pie bites from muffin pan and place on cooking rack to allow to cool completely.
4. Melt chocolate (semi or milk, doesn’t matter) in a microwave-safe bowl until melted (30 seconds at a time). Stir until smooth, adding enough vegetable oil to get it to piping consistency. Pour this into a sturdy ziploc bag (or a frosting bag), close, and snip the corner just enough to make a small opening. Decorate the pie bites with a drizzle or with a jack-o-lantern face.
Makes about 2 dozen pie bites
Source: Bakerella
God’s Greatest Creation
DIY Shampoo
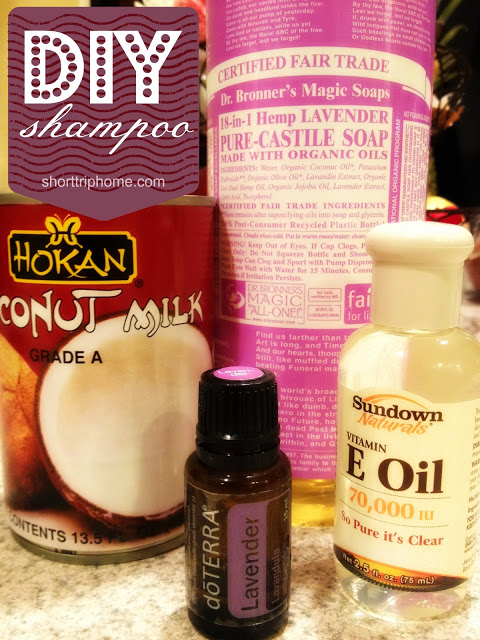
I like to try and find ways to use more natural products, especially when they don’t cost an arm and a leg. I found this shampoo recipe online and thought that, since I had most of the stuff already, it was worth a try. The Dr. Bronner’s was already in my supply as well as the doTERRA Lavender oil. A quick check of the pantry produced the coconut milk so I was left just searching a store for Vitamin E oil. I figured this would be a tough search. I don’t live in a small town, but we don’t have a lot of access to natural products here. I figured that checking my local grocery store while on my regular grocery run would be an exercise in futility but I was pleasantly surprised. They had it in the personal care section! Score. I’ve been using this shampoo for a month or so now and I find it works well. The first time I tried it my hair hadn’t been washed in a couple of days (I’m a daily washer normally) and it didn’t get my hair fully clean. But for daily washing it is great.
 |
| (this recipe is from my personal blog) |
Ingredients
1/4 cup coconut milk
1/3 cup Dr. Bronner’s soap
1/2 tsp. Vitamin E oil
20 drops doTERRA essential oil of your choice
optional: 1/2 tsp. olive or almond oil (for dry hair)
Instructions
Combine the ingredients together in a bowl and whisk well.
Use about 1 Tbsp. per wash, more if washing less often than once a day.
I stored my shampoo in one of those empty bottles you can get in the travel toiletries section at Target. Make a larger recipe and store in an old shampoo bottle. You can use any scent of Dr. Bronner’s soap and of doTERRA essential oil. I used Lavender in both but next time I may try mixing scents, like Lavender and Peppermint. Or, my new favorite doTERRA oil blend, Citrus Bliss. Make sure to shake it up each time before you use it. I squirt about a tablespoon into my hand, rub in and lather, and quickly get my fingers going with the lather on my scalp. The lather has a tendency to “fade” quickly but I find that if I focus on my scalp first it’s just fine.
To order doTERRA Certified Pure Therapeutic Grade Essential Oils, click here.
What Matters Most
Good Morning Bars
I love oats. Must be my Scottish roots coming out in me. These bars were a big hit in my house for breakfast and they were gone pretty dang fast!
 |
| (this recipe post comes from my personal blog) |
Ingredients
1 cup peanut butter
1/2 cup butter, melted (or 1/4 cup mashed banana or applesauce)
1/2 cup packed brown sugar (can reduce or use natural sweetener)
1/2 cup honey or maple syrup (can reduce or use natural sweetener)
3 tsp. vanilla extract
1 tsp. almond extract, optional
3 1/2 cups old fashioned rolled oats
1/2 cup flaked coconut (sweetened or unsweetened)
1/2 cup chopped nuts
1/2 cup dried fruit (raisins, craisins, currants, etc.)
1/2 cup mini semi-sweet chocolate chips
optional: chia seeds, sesame seeds
Instructions
1. Preheat oven to 350 degrees. In large bowl combine the peanut butter, butter, brown sugar, honey, and extracts stirring until well combined. Add in the remaining ingredients and stir well to combine.
2. Press into a greased 9″x13″ baking pan. Bake for 20-25 minutes until they begin to brown around the edge. With a knife, gently cut the bars but do NOT remove. Allow to cool completely or they will fall apart.
Notes–These tasty bars are a little fragile, especially when still warm. So make sure you let them cool completely before eating them. They will firm up some while they cool.
Source: Just a Pinch
DIY Lip Gloss
Do you buy a lipstick in the store only to take it home and realize you hate it? Do you like to take advantage of Bonus Time at your favorite makeup counter but never use the freebie lipstick they give you in the goody bag? What do you do with them, give them away? Well, don’t!! Try this first….you may end up loving that weird shade of lip color.
Ingredients:
lip stick
Vaseline
small jar or pill box
1. Twist the lipstick tube all the way out and cut off the actual lipstick into a microwave-safe bowl. You can combine colors or just do one tube’s worth. It’s up to you.
2. Add the Vaseline to the bowl. Just eyeball it and try to get about the same volume of Vaseline as you have lipstick. Adding more Vaseline will make a more subtle gloss, adding less will make a more vibrant gloss.
3. Place in the microwave and heat in 15-second increments until the mixture can be stirred smooth.
4. Pour into a small container like an old makeup counter sample jar (a good reason to save those suckers) or a small pill box. Cool in fridge.
That’s it!
So when life gives you ugly lipstick, make lip gloss!
Source: Pinterest, of course!
Who You Are: A Message To All Women
Blueberries on Snow
Years ago I came a cross a recipe with this title and it intrigued me. I mean, who doesn’t want to try something called “Blueberries on Snow?” I’m so glad I tried it. Every time I take it to a potluck, it is one of the first things to disappear!
Ingredients
2 cups graham cracker crumbs
1/2 cup butter, softened (8 Tbsp.)
3 Tbsp. powdered sugar
2 packets Dream Whip
1 cup sugar
1 cup cold milk
1 tsp. vanilla
8 ounces cream cheese, softened
1 can blueberry pie filling
Instructions
1. Heat oven to 350 degrees. Combine crumbs, butter, and powdered sugar in a bowl, mixing to combine well. Press into bottom and 1/2″ up the sides of a 9″x13″ baking pan. Bake for 5 minutes. Cool completely. 2. Pour contents of Dream Whip packets into a large mixing bowl. Add sugar, milk, and vanilla. Beat until you get soft peaks. Gradually add the cream cheese, beating well. Spread over cooled crust.
3. Carefully spoon pie filling over cream filling. Chill for several hours.
Dream Whip is a powdered non-dairy whipped topping and can be found in the baking aisle at most grocery stores.


