Vanilla Fondant

Originally posted on March 17, 2014.

When I was looking for a fun recipe to re-post for today, I realized that next month (can’t believe it’s almost September!), among other things is National Breakfast Month.  Okay. Didn’t know that was a thing, but let’s go with it.  Don’t you love this cake?  Yes, it’s a cake and why not make it for your family next month in honor of Breakfast? This is one of my favorite cakes that Julie has made.  I mean, seriously.  How much fun is this?

When I first began decorating cakes in earnest I wanted to try my hand at fondant.  But I had always heard that store-bought fondant tasted, well, icky.  Plus, it was expensive.  So I checked out cakecentral.com to see if I could find a fondant recipe.  I was a little intimidated, but decided to forge ahead anyway.  Well, I hit the jackpot with this recipe because it has turned out every single time and I always get compliments on it’s flavor and texture.  Many people try the popular marshmallow fondant recipe that’s floating around but, to me, that thing is just a messy headache.  This recipe may take longer and have more ingredients but I find it far superior to the marshmallow fondant.  Once you’ve made it a couple of times, it’s a piece of cake!  Get it?

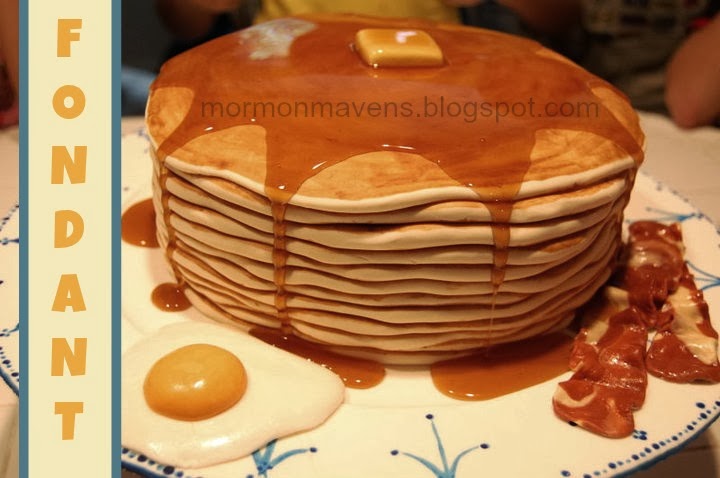
Yes, the pancakes, butter, egg, and bacon are all made out of fondant.  I made this cake for one of my sons’ birthdays.  One of my favorite cakes to date!  So much fun.

Ingredients:
1/2 cup milk
3 pkg. plain gelatin (6 tsp.)
1 cup light corn syrup
3 Tbsp. salted butter
3 Tbsp. glycerin
2 tsp. vanilla
dash salt
3-4 pounds powdered sugar

1.  Combine the milk and gelatin in a double boiler and allow to set until firm.  Then simmer the water and cook gelatin until it is dissolved.
2.  Add the corn syrup, butter, glycerin, vanilla, and salt and cook until the butter is almost completely melted, stirring frequently.  Set aside to cool.
3.  Put TWO pounds of powdered sugar in large mixer bowl.  Strain the gelatin mixture into the powdered sugar.  Mix slowly with a batter blade until just combined.
4.  Change to the dough hook attachment.  Slowly add 1-2 pounds powdered sugar.  The amount will depend on the humidity where you live.  I never get to 2 pounds.  You want the fondant to be firm and barely sticky.
5.  Scrape fondant onto a heavily-powdered-sugared surface and knead it for a few minutes.
6.  Take two pieces of plastic wrap, about 2 feet each, perpendicular to each other.  Spray lightly with nonstick spray.  Place fondant in center and fold wrap over fondant.  Store this in a large Ziploc bag or large airtight container.  Allow to set for 24 hours before using.

Source:  cakecentral.com

Back-to-School Mantelscape

Don’t yell!  I know we are all in full Summer mode right now, but the school bell will be ringing before you know it and we just wanted to share this great idea–originally posted on September 13, 2016–for a back-to-school decorating project that will have you and your kiddos excited for the first day of school! Whether you homeschool or do public school, this is a fun and creative idea.  I might do it myself and my kids are grown–ahh, but I do have grandchildren…

I have never, ever thought much about a mantel-scape.  My house is not brimming with magazine-level decor or “scapes” of any kind, really.

But the thought of having a finite area to decorate kind of appealed to me when I began to mull it over.

And since the hubs and I built a new mantel last year, it really is due for an upgrade in the decor department.  I just threw the look pictured below together quickly to keep it from being naked.  I posted our DIY pic on Facebook and when a former Maven (hi, Kara!) mentioned in a comment that she couldn’t wait to see what I would do with it, I was a little stymied.

ready-old-mantel-1

What would I do with it?

It was only recently that the idea began to form.  Wouldn’t it be fun to do something different each month?  Nothing extravagant, and mostly consisting of items already in the house.

Yes, that could work.

So, as much as I’d love to jump onto the Halloween theme now (I’ve already been playing with some items for it), I figured September is best pigeon-holed as “back to school” month.

And while we are a homeschooling family with no school bus stops by our driveway, we are “back” at it this month!  So, yeah….I’m lovin’ it.

ready-new-6

What you see is mostly items scavenged from around our home.  In fact, why don’t I just list for you the breakdown?

 Found at Home
globe
encyclopedias & books
ruler & pencils in cup
wooden puzzle
chalkboard blocks
clipboard with worksheet
chalkboard
flag
flannel board
 Made for This Project
felt ABC & 123
page bunting
 Purchased for This Project
jute for bunting
artificial apples


Wow!  Just typing it out I’m thinking, “How cool is it that you can pull something together like this with stuff you already have?”  I LOVE IT! 

And really, the basic ideas to keep in mind are:

  • vary the heights of the objects (high and low)
  • balance the colors (sprinkle them throughout and focus on a few colors)
  • balance the “weight” (doesn’t necessarily have to be symmetrical, it should just feel balanced)
  • use pics of other mantelscapes that you like as a guide

ready-new-1

I bought the jute for $4 and a bag of fake apples for  $9.99 (but there were 6 in there–and yes I bought it specifically for the mantel but that’s only because my old fake apples from a Thanksgiving arrangement finally bit the dust after too much hot/cold attic storage!).  Pretty cheap mantel!

ready-new-8

Now, I have to confess that, never having cared about a themed mantelscape before now, I really didn’t know where to start!  Oh, Pinterest…you amazing idea generator, you!  Yes, Pinterest saved the day.  I pretty much used an image on there for my template and just ran with it from there.  And that’s how I roll, really.  I’m not super great at completely original ideas, but I AM super great at taking an existing idea and developing it.  

ready-new-3

The main inspiration image I saw used dictionary pages for the page bunting.  I thought about cutting out pages from a book, but….well, book-lovers just don’t do that!  So, I went online and found images of old pages from dictionaries, school primers, maps, etc., and printed them out.  Then I used a flag bunting template (that I also snagged on Google images) to pencil in the cutting lines on the printed pages.  A quick hole punch through each top corner and they were ready for stringing onto the jute!

ready-paper-bunting-1
ready-paper-bunting-2
ready-paper-bunting-3

ready-new-2

I was unsure if mantelscapes would be something I could get on board with.  But y’all, I am loving this idea and can’t wait for October, November, and December!!!

Happy ‘Scaping, Y’all!


Frosted Marshmallow Brownies

‘Tis the season for all those summer get-togethers and family reunions.  Running out of ideas for what to take? 

Whether you say “dish to pass” or “potluck”, sometimes it’s just hard to come up with something yummy and easy.  Here is a great idea we shared last summer.

And who can resist a recipe post that starts out with Captain Jack Sparrow?  Savvy?


 Yesterday, my kids asked for “you know, those marshmallow brownie things we used to make all the time” and I was like…

jack sparrow brownies

Seriously, I had completely forgotten.  It’s been years!

It’s a recipe out of my husband’s family’s cookbook.  The original recipe has a scratch brownie, but when I’ve got Thrive Life Brownie Mix lying around, why not use it?  It’s a “just add water” mix so I love that.  But you can use your favorite store mix or your favorite basic brownie recipe!  The fun part comes in what you put on top!

Frosted Marshmallow Brownies
Yields 16
A quick and easy brownie makeover!
Write a review
Print
Prep Time
5 min
Cook Time
35 min
Prep Time
5 min
Cook Time
35 min
Ingredients
  1. 3 3/4 c. THRIVE Fudge Brownie Mix
  2. 1/2 c. hot water
  3. 2 c. mini marshmallows
Frosting
  1. 1/4 c. butter, softened
  2. 1/3 c. unsweetened cocoa
  3. 2/3 c. powdered sugar (approximately)
  4. 1/4 c. milk
  5. 1 tsp. Vanilla Extract
Instructions
  1. Preheat oven to 350 degrees.
  2. Add the hot water to the brownie mix in a medium bowl. Stir just until the mix is fully moistened. Allow to sit for 5 minutes. (If not using Thrive mix, just prepare your favorite box mix or brownie recipe as directed.)
  3. Spread brownie batter into a greased 9x9-inch baking pan. Bake for about 35 minutes or until a toothpick inserted into the center comes out almost completely clean.
  4. Turn off the oven, pour the marshmallows out in an even layer on top of the brownies, and return the pan to the oven for 3-5 minutes. Remove and set aside to cool.
  5. Mix the frosting ingredients together, adding more powdered sugar if necessary to make the frosting spreadable. Spread the frosting over the cooled marshmallow layer. Cut into squares and enjoy!
Mormon Mavens https://www.mormonmavens.com/

Peach Cider Sorbet

My husband picked up some Peach Cider at South of the Border a couple of weeks ago, probably because we once had a Peach Cider Slushie at an Amish country store that I still think/talk/drool about.  I decided to try making sorbet out of it but couldn’t find a recipe specifically for peach.  So I looked over a few recipes I found on the internet and combined/tweaked/added to come up with this one.  It was a big hit with the family!  It tastes like fall, but since peaches are a summer fruit it’s best in summer.  Of course, you could always try frozen peaches.  Or you can try it with apple cider and apples, maybe add some whole cloves in with the cinnamon stick.  I’m sure that would be great!

Ingredients:
2 cups peach cider
2 large, ripe peaches (peeled, pitted, and cut into bite sized chunks)
1/4 cup white sugar
1 Tbsp. molasses
1 Tbsp. lemon juice
1 cinnamon stick
1/8 tsp. salt.

1.  Place all ingredients in a medium saucepan and bring to boil.  Reduce heat and simmer for 10 minutes.  Peaches should be soft.  Remove from heat and let the mixture cool for a bit.
2.  Remove the cinnamon stick and discard.  Transfer mixture to a blender and puree until smooth.  Strain mixture through a sieve into a bowl.  Allow to cool to room temp, then cover and refrigerate for at least 2 hours.
3.  Pour chilled mixture into ice cream machine and process until frozen and thick.  Transfer sorbet to a freezer container and freeze for at least 2 hours.

Serve and enjoy!


Originally posted on August 11, 2014.

Soft Caramel Dip


I love this yummy dip.  It reminds me of all things fall, so I’m posting it today in honor of our first day of school which also reminds me of fall (even though technically it’s still summer!).  I usually serve it with cut up apples and bananas, but you could experiment with other fruits as well as pretzels and various types of cookies (I bet Ginger Snaps would be awesome).  It’s normal for small bits of caramel to never quite get mixed in.  Think of those as hidden treasures.


Ingredients:
1 8-oz. pkg cream cheese, softened
1 cup sour cream
50 store-bought caramels, unwrapped

1.  In a mixer, blend the cream cheese and sour cream together until smooth.
2.  Melt caramels in a microwave safe bowl.
3.  Immediately pour caramel into creamed mixture and blend well until smooth.
4.  Eat right away or store in the fridge.  You may need to warm it a bit in the microwave if it is too stiff from refrigeration.

Source:  my recipe box (no clue where it came from, sorry!)

Originally posted on August 22, 2011.

Chocolate Fondue


I recently returned from a wonderful river cruise in Europe with my husband and my parents.  We had a wonderful time!  Our first stop before boarding the boat was Lucerne, Switzerland.  Chocolate everywhere!  My kind of place.  We had lunch one day at a little restaurant on a side street….a fondue house.  We grabbed a table outside and checked out the menu.  We had every intention of having cheese fondue but when we saw the prices (holy cheese!) we quickly decided on the cheapest fondue item for our meal:  chocolate fondue (and that was still really expensive).  

 
It. was. uh. mazing.  (That’s my hubby in the pic above, enjoying a tasty chocolate lunch in the heart of Lucerne.)  Then we found out it was nothing more than melted chocolate bars and cream.  What?!?  I knew as soon as we got home I had to try this with the kids.  So we did.  And it tasted exactly the same!  Well, until our makeshift fondue pot exploded.  Yeah, that wasn’t as tasty.  The next time we made it we didn’t worry about having it on a flame.  It didn’t stay in the bowl long enough to harden up anyway….we ate it too fast!
 
 
Ingredients:
6 small Toblerone bars
heavy cream, about 1/2 cup to start
 
1.  Unwrap the bars of chocolate, break them up, and place the pieces in a saucepan with the cream.  
2.  Stir while it melts and remove from heat when the mixture is smooth.  Add more cream to get your preferred consistency for dipping.
3.  Serve with cut up fruit, pretzels, cubed pound cake, etc.  My personal favorites are strawberries and fresh pineapple.
 
You can use any combination of Toblerone flavors.  We used half-yellow packaged bar, half blue-packaged bar (I believe those are the technical terms).  My local grocery store carries those as well as a dark chocolate and a white chocolate.  Mix and match to your heart’s content!
 
Originally posted on September 30, 2013.

Grandma’s Biscuits


I really love these biscuits….they’re great with butter and jam, butter and honey, or just butter!  (Can you tell I like butter?)  And they remind my of my Grandma.


Ingredients:
2 1/4 tsp. dry active yeast
1 cup warm water
2 cups buttermilk
3/4 cup vegetable oil
1/4 cup sugar
2 Tbsp. baking powder
1/4 tsp. baking soda
1 1/2 tsp. salt
7 cups all-purpose flour

1.  Heat oven to 450 degrees.  Combine yeast and water and stir till dissolved.
2.  Add remaining ingredients and stir until well blended.
3.  Pat/roll out 3/4″ thick and cut with biscuit cutter OR place in greased bowl and place in fridge until needed (will keep a week in the fridge).
4.  Bake for 15-20 minutes.

Makes about 30, depending on your cutter

Notes:

  • If you buy yeast in the little envelopes, then use one envelope for this recipe.
  • If you don’t have buttermilk, put 2 Tbsp. apple cider vinegar in a 2-cup measure.  Fill to the 2-cup line with milk and allow to sit for 5 minutes.  
  • I like my biscuits tall and thick.  If you like yours thinner, roll or pat them out to the thickness you like.

Source:  my Grandma Davis

Originally posted on May 27, 2013.

Pizza Dip


When I found this recipe on–where else?–Pinterest, I figured it would be pretty good.  I didn’t know it would be AWESOME.  I made the original dip but also made a second dip with different toppings.  Both were a hit. But I have some bad news. If you make this for an event or party, you will have no leftovers to enjoy.


Ingredients:
4 ounces cream cheese, softened
1/4 cup sour cream
1/4 cup mayonnaise
1/2 cup shredded mozzarella cheese
1/4 cup grated Parmesan cheese
1 cup pizza or spaghetti sauce
1/2 cup shredded mozzarella cheese
1/4 cup grated Parmesan cheese
pizza toppings of your choice

1.  Mix the cream cheese, sour cream, mayonnaise, 1/2 cup mozzarella, and 1/4 cup parmesan together in a bowl. Spread this into a shallow dish, like pie plate.
2.  Spread the pizza or spaghetti sauce on top. Sprinkle on the remaining cheeses and whatever toppings you like (I chose mini pepperoni slices for one and pineapple tidbits and Canadian bacon for the other).
3.  Bake at 350 degrees for about 20 minutes, or until it all looks deliciously melted and slightly bubbling along the edges.
4.  Serve with crackers of your choice, bread slices, bread sticks, etc.

For serving:  I got baguettes and sliced them diagonally, about 1/2″ thick.  I drizzled them with a little olive oil, sprinkled them with salt and pepper, and baked them for about 8 minutes in a 425 degree oven.
nomorepizzadip.jpg


Originally posted on April 29, 2013.


Buttermilk Cornbread


Cornbread just reminds me of my childhood, of old-fashioned eating, and of my own grandmother.  To me, a chili meal is not complete with out it.


Ingredients:
1 1/2 cups all-purpose flour
1 cup yellow cornmeal
1/3 cup sugar
2 teaspoons baking powder
1 teaspoon salt
1/2 teaspoon baking soda
1/2 cup vegetable shortening
1 1/3 cups buttermilk
2 large eggs


1.  Preheat oven to 375°F.  Grease or spray an 8 1/2 × 4 1/2-inch loaf pan; set aside.
2.  In a large bowl combine the flour, cornmeal, sugar, baking powder, salt and baking soda and stir to combine. Cut in the shortening with a pastry blender until it resembles coarse crumbs or small peas.  Don’t overwork it.
3.  In a small bowl whisk the eggs and buttermilk together. Add the buttermilk-egg mixture to dry ingredients and stir to form a stiff, lumpy batter. Spread evenly in the greased loaf pan.
4.  Bake until a toothpick or knife inserted in center comes out nearly clean, with just a few crumbs on it, 50 to 55 minutes. Cool in the pan for 10 minutes then remove the cornbread from the loaf pan and cool for another 10 minutes before slicing.

Notes:

If you don’t have buttermilk, just put 4 teaspoons of apple cider vinegar into the bottom of your measuring cup; then add enough milk to measure 1 1/3 cups (I use a Pyrex 2-cup glass measure for this).
If you are old school you can use some bacon grease for some of the shortening.  I happened to have some so I used about half bacon grease, half shortening.  It really adds to the flavor!

Source:  Grandma’s Kitchen


Originally posted on May 1, 2013.

Frog Eye Salad

Although this recipe has been around quite a while, it still seems to be unknown to many.  At a recent church function I was asked two questions about it:  “What is this?” and “Can I have the recipe?”  It makes a lot and is a very satisfying side dish or light dessert.

Ingredients:
1 cup sugar
2 Tbsp. flour
1 tsp. salt
1 3/4 cup pineapple juice (reserved from canned pineapple)
2 eggs, beaten
1 tsp. lemon juice
1 16-ounce package Acini de Pepe pasta
2 11-ounce cans mandarin oranges, drained
1 20-ounce can crushed pineapple, drained and juice reserved
2 20-ounce cans pineapple chunks, drained and juice reserved
1 9-ounce carton non-dairy whipped topping
marshmallows
coconut
maraschino cherries, halved

1.  Combine sugar, flour, pineapple juice, and eggs in a medium saucepan stirring well to combine.  Cook over medium heat until thickened stirring often.  Remove from heat, add lemon juice and stir to combine.  Set aside to cool.
2.  Cook Acini de Pepe pasta according to package directions.  Drain, rinse with cool water, and set aside to cool.  (Unless you have a sieve-type large colander, you may have to line your colander with paper towels like I did…..otherwise the pasta will escape through the holes!)
3.  In a large bowl, combine the cooled egg mixture and the cooled pasta.  Cover tightly with plastic wrap (or lid if you have it) and refrigerate until serving time.
4.  When ready to serve add the fruit, whipped topping, marshmallows, coconut, and cherries.

Notes:

  • The amounts for the marshmallows, coconut, and cherries are up to you.  I like a lot of each, so I added almost a whole bag of mallows, about half a bag of coconut, and a large jar of cherries.
  • This salad keeps well in the fridge after the initial serving but is always best right after the last ingredients are added.  To “freshen” it up a bit after it’s been in the fridge, just add some more whipped topping.
  • Acini dep Pepe pasta is not hard to find in most grocery stores.  It’s just with all the other pastas, not in a special section or anything.  It looks like little balls….it’s the “frog eye” in this salad.
Source:  I got it for the first time from my sister, Amy (fellow Maven known as “Amos”)
 
Originally posted on April 1, 2013.