Jezebel Sauce

This was a very popular post from December 17,2015, especially during the holiday season and into the New Year.  Anna served it as part of her Christmas Eve meal appetizer offering this year.  Just can’t tell you how good this is so you will have to experience it for yourself.

Don’t be afraid of the horseradish!  It’s a subtle kick and the sweetness of the preserves and marmalade pair well with it.

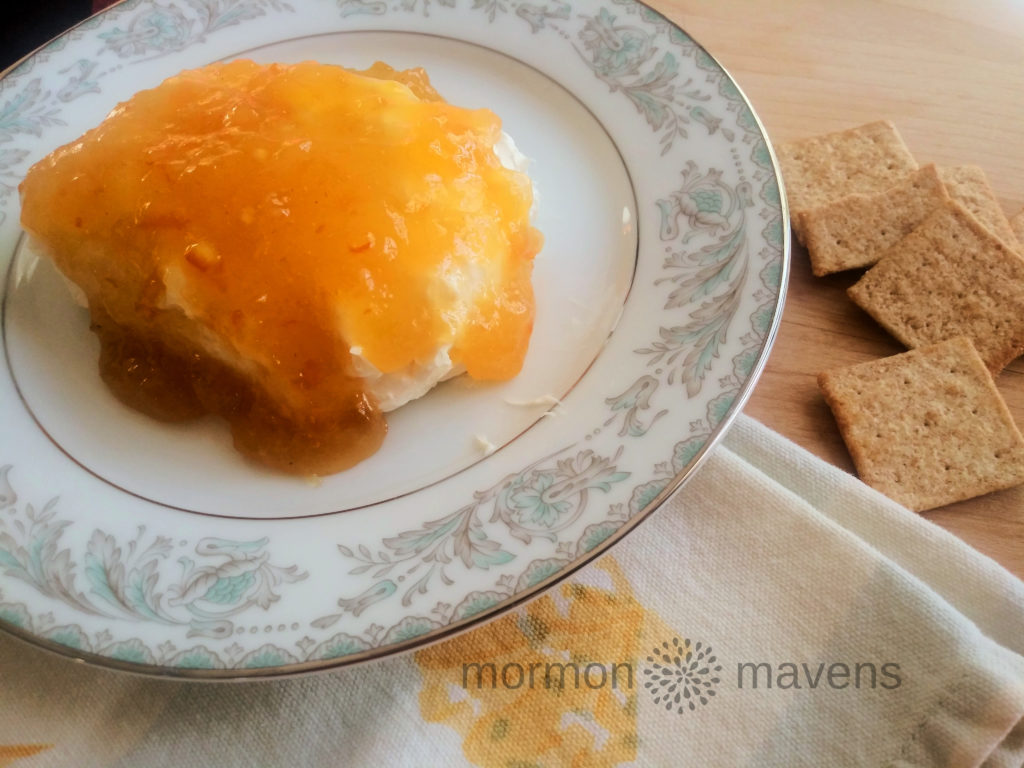
I must apologize for the size of the cream cheese block on the image.  Someone–who shall remain nameless–decided to cut a chunk off for their bagel one morning.  Although the whipped cream cheese container was RIGHT NEXT TO IT.  Just sayin’.  I really need to label my blog recipe ingredients or something.

And a shout out for holding on to your Mom’s wedding china. This is served on a salad plate from her pattern.  I have this and a bread plate.  I try to use these treasured pieces from Mom, and from my grandmothers, to honor their memory and their homemaking.

Jezebel Sauce
Write a review
Print
Ingredients
  1. 18-oz. jar of pineapple preserves
  2. 18-oz. jar of apricot preserves
  3. 1/2 cup orange marmalade
  4. 3.5-oz. jar of prepared horseradish
  5. 1 tablespoon dry mustard
  6. 8-oz. pkg. of cream cheese (I use the lower fat Neufchatel version)
Instructions
  1. Combine all ingredients and store in refrigerator. This will keep well for about 2 weeks. Makes about 3 cups of sauce.
  2. To serve, pour over cream cheese and serve with snack crackers, or use your imagination! But it’s really good on cream cheese. I bet it would be great on a cream cheese bagel.
Adapted from Paula Deen
Mormon Mavens https://www.mormonmavens.com/

Nacho Mama’s Taco Salad Nachos

Taco Salad has been a mainstay in my family of origin for as long as I can remember (nachos ain’t too shabby either!).   It also became a fixture at family beach house get-togethers.  And I love it.  But leftovers don’t keep well.  Like, at. all.  So I decided to start serving it as more of a Taco Salad Bar, where all the ingredients are in separate serving dishes and you just put it together on your own.  And that worked out great.

But recently, as we were having our traditional BYO (Build Your Own) Taco Salad with my own family, I kept wondering if there was an easier way to eat it.  Trying to maneuver taco meat, cheese, tomatoes, lettuce, and Doritos all in the same mouthful is a challenge, to say the least.  Should I just use a spoon?  Should everything be cut super tiny….chopped salad style?

And then it came to me.

Nacho Mama's Taco Salad Nachos

NACHOS.  What if I made them like nachos instead?

And it worked.   Beautifully!

The recipe does not show ingredient amounts, and that’s another great benefit of Taco Salad.  You can just make what you are hungry for!  A regular size bag of Doritos was PLENTY for about 6 people with generous portions.  Adjust accordingly!  We used the classic flavor, but you can use any Doritos flavor you like.  The ingredient list reflects what my own family likes in our Taco Salad, but you may wish to add sliced black olives, avocado, diced green onions, etc.  Whatever you decide to top your Nacho Mama’s Taco Salad Nachos with, I’m sure it will be delicious!


Nacho Mama's Taco Salad Nachos
Serves 6
All the tastiness of your favorite taco salad with a more fun delivery method! The perfect way to enjoy all your favorite taco fixin's!
Write a review
Print
Total Time
30 min
Total Time
30 min
Ingredients
  1. Doritos (any flavor)
  2. shredded cheddar cheese
  3. taco meat
  4. shredded lettuce
  5. chopped tomatoes
  6. Catalina dressing
  7. ranch dressing
  8. salsa
  9. Cholula sauce
Instructions
  1. Prepare the taco meat. Use as much as you need. I typically use one pouch of taco seasoning (or the homemade equivalent) for 1 pound of ground beef.
  2. Drain the taco meat once it's cooked through.
  3. Preheat oven to 425 degrees.
  4. On a sheet pan, arrange the Doritos in a single layer with as little pan showing through between chips as possible. Top with shredded cheese in an even layer.
  5. Add drained taco meat over top of the cheese.;Bake for 8-10 minutes or until cheese is fully melted.
  6. While the nachos are baking get your toppings ready. In our family that's lettuce (must be shredded for nachos), tomatoes, sometimes drained canned kidney beans, Catalina dressing, and ranch dressing.
  7. Once the nachos are done baking, immediately serve onto plates and let your diners customize their nachos with the supplied toppings.
  8. Enjoy!
Notes
  1. If this is served as a main dish, I'd say 6 generous servings is about right.
Mormon Mavens https://www.mormonmavens.com/

Deviled Eggs


Happy 4th of July!! 

I know there are a bazillion recipes for deviled eggs out there, but I hope you try this one for your July 4th festivities or just whenever you want some of these tasty morsels!

Who doesn’t love all things Magnolia? This recipe is adapted from Joanna Gaines’ Magnolia Table cook book. It is the first recipe that I have tried from her and it did not disappoint. I made it for a Linger Longer at church this past Sunday and the platter emptied pretty quickly. Let me add that there were other deviled eggs on the table besides these.

One thing that you will appreciate is that there is BACON on these eggs. Yep. With brown sugar. So, WIN-WIN. Let us proceed…

Deviled Eggs
Serves 8
Write a review
Print
Prep Time
30 min
Cook Time
35 min
Prep Time
30 min
Cook Time
35 min
Ingredients
  1. 12 large eggs
  2. 1/2 lb. bacon
  3. 1/4 c. packed light brown sugar
  4. 1 T. distilled white vinegar
  5. Kosher salt
  6. 1/2 c. mayonnaise (I used Hellmann's because Joanna prefers it)
  7. 2 T. dill weed (if you accidentally pick up sweet instead of DILL relish)
  8. 1 t. dry mustard powder
Instructions
  1. Preheat oven to 375 degrees F and line a rimmed baking sheet with foil. My bacon stuck to the foil so you could also add a cooling rack and lay the bacon on that. I will be doing that next time.
  2. Spread brown sugar on a plate and press both sides of the bacon slices into this to coat them. Lay slices on foil/cooling rack in the pan. Bake until crispy 14-16 minutes. Cool on baking sheet.
  3. While the bacon is cooking, place eggs in a single layer in a large saucepan, cover with water to 2 inches above the eggs. Use whatever trick you know to help the eggs peel easily, like adding baking soda to the water. The recipe uses the vinegar and salt. Bring the water to a full rolling boil, cover the pan, then remove from heat and let stand 10 minutes. The eggs will continue to cook off the heat.
  4. While the eggs are "cooking", prepare a large bowl of ice and water. When the eggs are done, drain them and put them immediately into the ice water. This will stop the cooking process and prevent you from getting egg yolks that are green around the gills. So to speak. Let the eggs stand in the water until completely cooled.
  5. Peel the eggs, rinse, then dry them. Slice in half lengthwise. Gently scoop out the yolks into a medium bowl, setting the whites aside. I put them on a sheet of parchment paper.
  6. Add mayonnaise, dill weed, mustard powder and 1/4 t. salt to the egg yolks. Mix well, mashing the yolks with the back of a fork to completely incorporate them. Use a spoon to gently fill the egg whites. I used a jam spoon which seemed just the right size. You could also place the filling in a small zip-top plastic bag, cut the tip off of one corner and squeeze the filling like a pastry bag, if you like.
  7. Chop the reserved bacon and generously top eggs with it.
  8. Arrange the deviled eggs on a platter, cover lightly, and chill in the refrigerator for at least 1 hour, or up 24 hours before serving.
Notes
  1. If you check out the original recipe you will notice that you can also dust the eggs with paprika or minced fresh dill and chives. I might try that next time myself--because next time I will get DILL relish instead of sweet.
Adapted from Magnolia Table
Mormon Mavens https://www.mormonmavens.com/

Soft Caramel Dip


I love this yummy dip.  It reminds me of all things fall, so I’m posting it today in honor of our first day of school which also reminds me of fall (even though technically it’s still summer!).  I usually serve it with cut up apples and bananas, but you could experiment with other fruits as well as pretzels and various types of cookies (I bet Ginger Snaps would be awesome).  It’s normal for small bits of caramel to never quite get mixed in.  Think of those as hidden treasures.


Ingredients:
1 8-oz. pkg cream cheese, softened
1 cup sour cream
50 store-bought caramels, unwrapped

1.  In a mixer, blend the cream cheese and sour cream together until smooth.
2.  Melt caramels in a microwave safe bowl.
3.  Immediately pour caramel into creamed mixture and blend well until smooth.
4.  Eat right away or store in the fridge.  You may need to warm it a bit in the microwave if it is too stiff from refrigeration.

Source:  my recipe box (no clue where it came from, sorry!)

Originally posted on August 22, 2011.

Chocolate Fondue


I recently returned from a wonderful river cruise in Europe with my husband and my parents.  We had a wonderful time!  Our first stop before boarding the boat was Lucerne, Switzerland.  Chocolate everywhere!  My kind of place.  We had lunch one day at a little restaurant on a side street….a fondue house.  We grabbed a table outside and checked out the menu.  We had every intention of having cheese fondue but when we saw the prices (holy cheese!) we quickly decided on the cheapest fondue item for our meal:  chocolate fondue (and that was still really expensive).  

 
It. was. uh. mazing.  (That’s my hubby in the pic above, enjoying a tasty chocolate lunch in the heart of Lucerne.)  Then we found out it was nothing more than melted chocolate bars and cream.  What?!?  I knew as soon as we got home I had to try this with the kids.  So we did.  And it tasted exactly the same!  Well, until our makeshift fondue pot exploded.  Yeah, that wasn’t as tasty.  The next time we made it we didn’t worry about having it on a flame.  It didn’t stay in the bowl long enough to harden up anyway….we ate it too fast!
 
 
Ingredients:
6 small Toblerone bars
heavy cream, about 1/2 cup to start
 
1.  Unwrap the bars of chocolate, break them up, and place the pieces in a saucepan with the cream.  
2.  Stir while it melts and remove from heat when the mixture is smooth.  Add more cream to get your preferred consistency for dipping.
3.  Serve with cut up fruit, pretzels, cubed pound cake, etc.  My personal favorites are strawberries and fresh pineapple.
 
You can use any combination of Toblerone flavors.  We used half-yellow packaged bar, half blue-packaged bar (I believe those are the technical terms).  My local grocery store carries those as well as a dark chocolate and a white chocolate.  Mix and match to your heart’s content!
 
Originally posted on September 30, 2013.

Pizza Dip


When I found this recipe on–where else?–Pinterest, I figured it would be pretty good.  I didn’t know it would be AWESOME.  I made the original dip but also made a second dip with different toppings.  Both were a hit. But I have some bad news. If you make this for an event or party, you will have no leftovers to enjoy.


Ingredients:
4 ounces cream cheese, softened
1/4 cup sour cream
1/4 cup mayonnaise
1/2 cup shredded mozzarella cheese
1/4 cup grated Parmesan cheese
1 cup pizza or spaghetti sauce
1/2 cup shredded mozzarella cheese
1/4 cup grated Parmesan cheese
pizza toppings of your choice

1.  Mix the cream cheese, sour cream, mayonnaise, 1/2 cup mozzarella, and 1/4 cup parmesan together in a bowl. Spread this into a shallow dish, like pie plate.
2.  Spread the pizza or spaghetti sauce on top. Sprinkle on the remaining cheeses and whatever toppings you like (I chose mini pepperoni slices for one and pineapple tidbits and Canadian bacon for the other).
3.  Bake at 350 degrees for about 20 minutes, or until it all looks deliciously melted and slightly bubbling along the edges.
4.  Serve with crackers of your choice, bread slices, bread sticks, etc.

For serving:  I got baguettes and sliced them diagonally, about 1/2″ thick.  I drizzled them with a little olive oil, sprinkled them with salt and pepper, and baked them for about 8 minutes in a 425 degree oven.
nomorepizzadip.jpg


Originally posted on April 29, 2013.


Bruschetta

Though this simple but satisfying snacketizer is best served with homegrown tomatoes, store-bought and out of season tomatoes still produce good results.  I don’t have any amounts listed….hope that’s copacetic with you.  Just adjust the amounts according to what YOU like.

Ingredients:
fresh tomatoes, diced
onion, diced (optional…I don’t like raw onion so I leave it out)
basil (fresh or dried)
garlic powder
salt
pepper
olive oil
red wine vinegar
baguettes, sliced 1/2-3/4″ thick
fresh parmesan cheese, grated

1.  Preheat oven to 400 degrees.  Place baguette slices on cookie sheet.  Drizzle lightly with olive oil.  Sprinkle with salt and pepper.  Bake for 8 to 12 minutes, or until edges are golden and middles feel like they’re starting to get crunchy.
2.  In a bowl, combine tomatoes and onions.  Add your basil (see notes below), garlic powder, and salt to taste (don’t over salt…you can always add more later).  Drizzle a little olive oil over it.  Then sprinkle on the red wine vinegar. Stir to combine.

How I Like to Eat It:
Okay….here we go.  Grab a toasted baguette slice.  Sprinkle on the grated cheese that I insisted you grate by hand.  Spoon the tomato mixture on top (yes, it is messy and you had better be doing this over a plate).  Sprinkle a little bit of salt over the top.  Now, take a crunchy bite and enjoy!

Notes:

    • Tomatoes–use whatever tomatoes look the most ripe and tasty.  
    • Basil–if you have fresh that’s great…simply chiffonade to get the right amount (use more with fresh).  If using dry, sprinkle in a bit at a time until you get the right taste.  Here’s a video on how to chiffonade fresh basil:

  • Garlic Powder–yes, you can use fresh, but I don’t like to bite into raw garlic so I use the powder. 
  • Olive Oil–I just put in enough so that I can tell each piece of tomato is bathed but not swimming in it.
  • Red Wine Vinegar–I love this!  I put in more vinegar than oil, but I still don’t have the whole thing swimming in it.
  • Baguettes–if you can help it, don’t buy the ones that are really flat on top.  When you slice it, you are creating a little bread plate for your tomatoes so a flat baguette will make for a narrow plate.  Find the roundest ones you can.
  • Parmesan Cheese–I really must insist <wink> that you buy the lovely triangular cheese and grate it on the large holes using your cheese grater.  The powdered stuff in a can will NOT give you the same tasty results.
Source:  Honestly, I have no idea.  I’ve been making this for years!  But I have no idea where I got it from.
 
Originally posted on April 15, 2013.

Stuffed Cherry Tomatoes

 
There are days when you just can’t think of a recipe to post, so you hit your trusty family cookbook to see if anything strikes your fancy–and if you already have most of the ingredients.  Today was that day.  After a quick trip to the store before work to pick up chives and cherry tomatoes, I was ready to prepare your post for the day.  This is actually a recipe that I taped into my cookbook without even trying it.  I have quite a few of those, from back in pre-Pinterest days, pre-save it to your computer days.  Yes, that long ago.  This one is clipped from a magazine.  I would guess at Better Homes & Gardens.  This is actually quite good and any leftover filling makes a great egg salad sandwich.
 
Ingredients:
36 large cherry tomatoes 
1/3 cup mayonnaise
1 T. Dijon mustard (I used regular because I forgot to get some at the store)
1/2 t. curry powder
2 T. chopped fresh chives
10 whole chives for garnish
 
1.  Cut a slice off the top of each tomato and use a spoon to remove the meat and seeds.  I actually cut off the bottom end so that the tomatoes would sit level on the platter.
 
2.  Set the tomatoes upside down on paper towels to drain.
 
3.  Put the peeled eggs in a bowl along with the mustard and mayo and mash with a fork until fairly smooth.  Add the remaining ingredients, mix well and taste so you can add spices if you need to.  I added a little bit of salt.
 
4.  About 1 hour before serving, fill each tomato with egg salad, garnish with several 2″ chive spears standing up in the middle of the tomato.  Makes a lovely appetizer, don’t you think?
 
 
Originally posted on March 12, 2015.

Santa Hat Party Mix

This recipe was originally published on December 16, 2014.  It is such a fun and tasty looking Christmas treat that we thought we would bring it back.  Hats off to Amy for sharing it! (pun intended)

This is so yummy and fun to make and to eat!  You’ll definitely want to take it to one of the many Christmas parties of the season.

Ingredients:

Santa Hats

  • Bugles
  • Red melting disks
  • mini marshmallows
  • white sprinkles (nonpareils)

Snack Mix

  • 3 c. mini pretzels
  • 1/2 c. craisins
  • 1 c. salted dry roasted peanuts
  • 2 c. Rice Chex
  • 2 c. holiday colored M&M’s
  • 8 oz. white chocolate for metling

How to Make

 
Santa Hats
 
1.  Melt the candy melts, along with a tablespoon of shortening (to help thin the melted candy), in 30 second intervals on half power in your microwave until melted.
2.  Immediately start dipping.
3.  Let them set up for 10 minutes or so on parchment or wax paper.
4.  When they are set, remelt the red candy disks (if necessary) and dip just the bottoms (the large part of the Bugle) into the white sprinkles.
5.  Then flip it over and dip the top in the melted candy and press a mini marshmallow on top.
6.  Let dry on wax paper.
 
Snack Mix
1.  Spread all your ingredients, EXCEPT M&M’s and Santa Hats, out on a baking sheet lined with parchment or wax paper.
2.  Melt your white chocolate according to package directions and drizzle over the pretzel mix.  Transfer to a large bowl.
3.  When chocolate is set, sprinkle M&M’s and Bugle Santa Hats over the mix.
 
Source:  cookiesandcups.com


Quick Bean Dip


It was one of those nights when I needed a really quick meal because it had been a busy day of Body Pump, Yoga, a couple of errands–one out of town–finishing up the mowing, paying bills, updating files…  Oh sorry.  I guess you didn’t need all those details, but you get my point.

I just wanted to relax and not have to go out to eat (yes I really said that) or spend a lot of time in the kitchen.

Have you tried any of the Delimex Taquitos? They used to be a good back-up entree back when the girls were little, before we were all freaking out about processed foods, and when we lived in a predominantly Hispanic city and anything Mexican was where we went.

Usually I just put these guys in a baking dish, sprinkle grated Mexican cheese blend on them and top them with green enchilada sauce.  Pop them in the oven for 14 minutes and there you go. 

Today I just wanted them a little crunchier so I actually followed the directions on the box and laid them out on a cookie sheet NAKED (the taquitos not the cook!) and baked them.  Well of course I would need some kind of sauce or dip, so I whipped up (literally in like 4 or 5 minutes) a small batch of Thrive Refried Beans, added sour cream, the shredded Mexican blend cheese and some spicy, tasty salsa.

SCORE!!

Quick Bean Dip
Write a review
Print
Ingredients
  1. 1 3/4 c. Thrive Instant Refried Beans
  2. 1 c. water (I added about 2 T. to thin them out a little)
  3. 1/4 c. sour cream
  4. 1/3 c. shredded Mexican Blend cheese
  5. 2-3 T. Herdez Guacamole Salsa
  6. salt to taste
Instructions
  1. Whisk water into beans in a medium saucepan. Bring to a simmer over medium heat for about 3-4 minutes.
  2. Add sour cream, cheese, and salsa and stir to combine.
  3. You're done!
  4. Serve with taquitos or tostadas, whatever your little heart desires.
Mormon Mavens https://www.mormonmavens.com/