Strawberry Lemonade Cupcakes

These little babies will add a kick to any party this summer! They are tangy, sweet, and (let’s just face it) SUPER cute! The best part is, they really do taste like strawberry lemonade! I frosted them with a lemon mousse buttercream, but you could also change it up a bit and try a strawberry frosting.

Strawberry Lemonade Cupcakes

4 T. unsalted butter, at room temperature
1 C. all-purpose flour
1/2 C. buttermilk
1/4 tsp. baking soda
2 egg yolks, at room temperature
1 tsp. pure vanilla extract
3/4 C. plus 1 T. sugar
1/4 tsp. salt
1 tsp. Instant Pink Lemonade Mix (like Crystal Lite or Country Time)
3 or 4 large, fresh strawberries, diced to 1/4″ pieces

1-Preheat the oven to 350 degrees F and line 10 muffin cups with baking liners and set aside.

2-Cream butter, sugar, and lemonade mix together. Add vanilla, soda, salt, and egg yolks. Mix in buttermilk. Gradually add the flour.

3-Clean berries, remove stem. With a sharp knife, slice dice the berries into 1/4″ pieces, being careful not to crush the berries. If the berries are crushed or mushy there will be too much moisture and your cupcakes will not bake properly.

4-Fill each cup with about a Tablespoon of batter. Then place 4 or 5 pieces of fresh strawberry in the middle of the batter (try to to get them on the edges, it will leave a gap in your cupcake when baked). Then add more batter per cup filling each to about 2/3 full.

5-Bake at 350 degrees F. for about 20 minutes or until a toothpick comes out clean.

*If baking mini-cupcakes (as shown in the photo) line 24 mini-muffin cups with liners. Use only 2 or 3 strawberry pieces in the middle, and bake for about 15 minutes.

Source: Thanks to Michelle from www.bigblackdogs.net for creating this awesome cupcake!!!!

Lemon Mousse Buttercream


First, you need to make a lemon curd:

1/3 C. granulated sugar
1 egg
1/3 C. fresh lemon juice
zest of 1 lemon
2 T. plus 2 tsp. butter, melted

1-In a microwave-safe bowl, whisk together the sugar and eggs until smooth. Stir in lemon juice, zest, and butter.

2- Cook for 1 minute intervals on high, stirring after each minute until the mixture is thick enough to coat the back of a metal spoon. (it usually takes about 3 minutes for me)

3- Cover the curd with cling wrap placed directly on the surface of the curd and refrigerate until set. (When I need it fast I put it in the freezer for like 15 or 20 min).

Buttercream Frosting:

1 pound bag of powdered sugar
1/2 C. milk
1/8 to 1/4 tsp. salt
1/2 tsp. pure vanilla extract
2 sticks butter, cut into 1/2 in. slices
1/2 C. shortening

1-using a whisk attachment on your electric mixer, mix the pwd. sugar, salt, vanilla and milk a low speed until smooth.  Add butter, one slice at a time, until incorporated.

2-Add shortening and whip at highest speed about 10 minutes or until volume increases by 50%.

When the curd is set and buttercream mixed, fold the lemon curd into the buttercream with a spatula until incorporated.


Cajun Shrimp Skewers

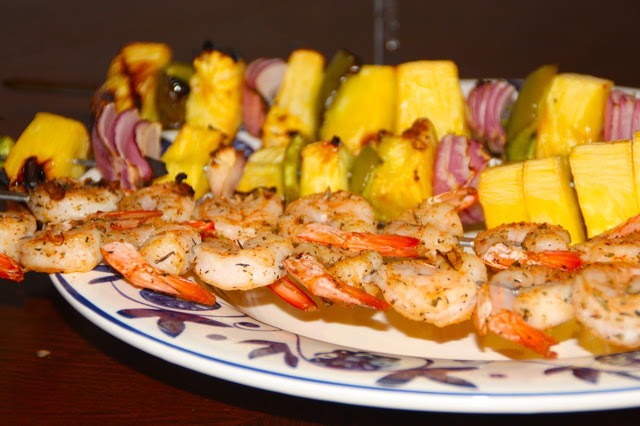
Grilling season is in full swing at our house.  It’s so nice not to heat the house up with the oven every night. Especially when it’s 90 degrees outside. I am trying to think beyond my regular grilling go-to meals,  and these cajun shrimp added a little excitement–and spice–to our dinner table.  They are great served up with fruit and veggie skewers and some rice.  Keep these in mind for your next backyard BBQ!

Cajun Seasoning:
1/2 tsp kosher salt
1 tsp garlic powder
1/2 tsp black pepper
1/2 tsp onion powder
1/2 tsp cayenne pepper
1/2 tsp oregano
1/2 tsp thyme

Mix all the seasonings together in a seasoning shaker or a ziploc bag. Feel free to double/triple the recipe to save for later in your spice cupboard.

Shrimp Skewers: 
1- Oil the bars of your grill. Preheat gas grill to medium heat.
2- Place desired amount of raw, uncooked shrimp (I used peeled, de-veined, tail-on shrimp) in a gallon size ziploc bag.
3- Add enough cajun seasoning to lightly coat all the shrimp (it will take more or less depending on the size of your shrimp and the amount you are going to cook). Close and shake the bag to coat.
4-Skewer* the shrimp through the body and the tail so that they will lay flat on the grill.
5-Place skewers on the grill and cook for 2 min. each side, or until the shrimp are opaque.
Enjoy!!

*Remember if you are using wood skewers to soak them in water for a few minutes so that they don’t burn on the grill. Also, if you are using metal skewers…..don’t touch them with your bare hands!!! They are HOT!!!

Source: seasoning is an adaptation from allrecipes.com

BBQ Pork Spare Ribs (Country Style Ribs)

This is one of those family “meat n’ potato” recipes that makes me really happy.  Nothing says Sunday dinner like the smell of this wafting through the house when you walk in the door after church.

5-6 servings

Ingredients:
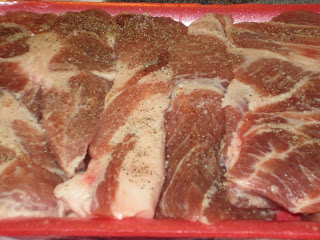
2 – 3lbs of pork spare ribs (aka country style ribs)
5 medium russet potatoes, peeled and cut into 1-2-inch pieces
16 oz. bag baby carrots
1 T. vegetable oil
1 1/2 C. T Ketchup
1 tsp. Tabasco sauce
1 T. brown sugar
1 tsp. dry mustard
1/4 C. water
Kosher salt
pepper

Directions:
1. Preheat the oven to 325 degrees F.
2. In a medium bowl mix the ketchup, Tabasco, brown sugar, mustard, and water. Salt and pepper to taste. Set aside.

3. Add oil to a ceramic or cast iron dutch oven, and heat on stove (med-high).

4. Season ribs with salt and pepper on all sides.

5. Add ribs to hot dutch oven and quickly seer them on all sides (ends included) to lock in the juices.

6. You have 2 options at this point. You can throw the potatoes and carrots in now and pour the sauce over everything, or let the meat and sauce cook for an hour and then mix in the veggies. The difference is that when the potatoes and carrots cook for 3 hours, they get quite soft and mushy (which some people like), but when they cook for 2 hours, they are more firm and stay together better. I personally like to let the meat cook an hour before I put the veggies in.  

7. Cover with lid and place in 325 degree oven for 3 hours. Don’t forget to add your veggies after 1 hour of cooking if you reserved them- Take the dutch oven all the way out of the oven, place veggies inside and gently stir to get them down into the BBQ sauce.

Mini Berry Tarts

I really love spring. A fresh start in so many ways! One of my favorite spring activities is going to the strawberry patch and picking big, juicy fruit right off the bush. Most of the strawberries make it into our basket, but I will admit that a fair share go from vine to mouth in one swift motion.

 
Once we get the berries home, it’s a race to see how may ways we can use them before they spoil. Among many of the strawberry dishes we have had over the past week were these little babies:
 
I bet you are glad you stopped by, because I am going to tell you how to make them!!! And once you do, share them at your spring brunch, or take some to a neighbor!
 
You will need some sort of tart pan, which looks a lot like a regular sized muffin tin, but with shallower pockets.
 

You could attempt to make the tart shells in a muffin tin, but I am not taking responsibility for stuck and broken shells. Just be sure to grease and flour the pan before you place your pastry in the cups.
 
Tart Shells:
6 T. sugar
2/3 cup margarine
1 1/2 T. cream
1 egg yolk
1/2 tsp. vanilla or almond extract
1 1/4 C. cake flour, plus extra if your dough seems too sticky
 
Directions:
1. Cream sugar and margarine together in a medium bowl. Add cream, egg yolk, and vanilla/almond extract and mix until well blended. Add the 1 1/4 cups of cake flour. If the dough is really sticky, and doesn’t come together or leave the sides of the bowl, add more flour in small increments until it does.
2. Remove dough from bowl and wrap it in plastic wrap. Refrigerate 30 min. to 1 hour.
3. Roll chilled dough out on a floured surface and use a cookie cutter or glass to cut circles about an inch larger than the tart pan cups. Transfer circles of dough to each cup, easing them into the bottom and up the sides. Press gently around the sides and cut away the excess dough on top. Cover the pan with foil and bake at 350 degrees F. for 10 minutes. Remove the foil and bake for 5-10 minutes more or until golden brown (watch them carefully for the color you want, they can over-brown quickly). You want the shells to be crunchy though, not soft.
Allow to cool before filling.
Makes 24 mini tart shells or one 9-inch tart shell*
 
* If you would like to make one large tart shell, roll out dough to 1 inch larger than the pan and gently lay the dough into the bottom and up the sides. Roll the rolling pin over the top of the pan to seal the edges and cut away excess. Lay foil over the dough, gently pressing it against the bottom and sides. Pour 1 1/2 cups baking beads, dry beans, or rice on top of the foil (this is to prevent the dough from rising during baking) Bake this way at 350 degrees F. for 15 min. Remove foil and return the crust to the oven for 10 minutes until golden brown.
 
Tart Filling:
1 C. strawberries
1 C. blueberries (*if you are making a 9-inch tart add another cup of berries)
3 oz. cream cheese, room temperature
4 T. sugar, divided
4 oz. frozen whipped topping, thawed in the refrigerator (that’s 1/2 of an 8 oz. container)
 
Directions:
1. Rinse the berries and dry on paper towels. Cut the strawberries into quarters.
2. Beat cream cheese and 1 T. sugar until smooth. Add whipped topping and mix until well blended.
3. Spread filling into tart shells, and arrange berries on top of filling.
4. Sprinkle with the remaining 3 T. of sugar.
 
Source: adapted from a Lion House Pies recipe.

Chicken Teriyaki Rice Bowl

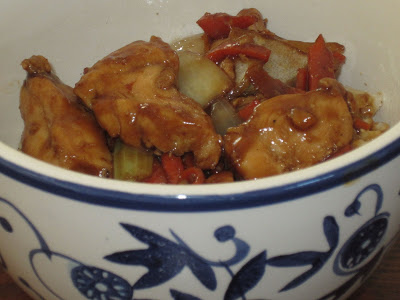
Mmmmmmmm…..Oh! Hello. I was dreaming of eating this bowl of Teriyaki Chicken. Tender, stir-fried chicken, crunchy veggies, and a to-die-for homemade teriyaki sauce all on top of a scoop of brown rice. Pass the chopsticks please!!
Serves 5
Ingredients:
3 T. low sodium soy sauce
1 T. honey
1 T. brown sugar
2 tsp. corn starch
2 chicken breast halves, cut into bite size pieces or thin strips and lightly coated with corn starch
2 cups assorted vegetables (I used carrots, celery, and onion, but you could add broccoli or red bell pepper instead)
1 T. freshly minced ginger (if you don’t have fresh ginger mix 1/4 tsp. of ground ginger into the sauce)
2 cloves garlic minced
3 cups cooked brown rice
Peanut or canola oil
Directions:
1. In a small bowl combine soy sauce, honey, brown sugar, and corn starch. Whisk together and set aside.
2. Heat a large wok or skillet on the stove. Add just enough oil to lightly coat the wok (about 2 tsp.-1 tbsp).
3. Saute chicken in the wok until completely cooked. Remove and place on paper towel to absorb any excess grease.
4. Transfer the freshly minced garlic, ginger, and vegetables to the wok and saute for about 1 minute.
5. Transfer chicken back to the wok and saute until hot. Add the soy sauce mixture and cook to thicken, about 1 or 2 minutes.
6. Serve over brown rice.
Source: Chef Bryan Woolley

Stuffed Peppers

This stuffed pepper recipe is adapted from an America’s Test Kitchen recipe. Who can resist Christopher Kimball with his tiny round glasses, bow tie, and apron….*wink, *wink!
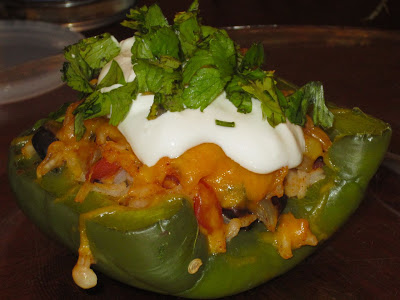
At any rate, these southwestern gems pack tons of flavor and texture. A great vegetarian option, and the filling and be frozen for another meal down the road!

Ingredients:

4 large sweet bell peppers (green is pictured, but I would recommend using red, yellow or orange)

1 T. salt
1/2 C. white rice
2 T. olive oil
1 onion, diced
3 cloves garlic, minced
1/2- 1 jalapeno, minced (or you could use a 3 oz. can of mild green chilies)
1 14 oz. can black beans, drained and rinsed.
1 C. corn (canned or frozen, whichever you prefer)
2 green onions, sliced
1/2- 1 tsp chipotle chili powder (start with less and add more to taste)
1 tsp. kosher salt
1/4 tsp. black pepper
1 14.5 oz. can diced tomatoes
1 1/4 C. cheddar or pepperjack cheese, divided
3-4 T. chopped fresh cilantro
Directions:
1. Preheat oven to 350 degrees F.
2. Prepare peppers by washing, slicing tops off and removing insides. Bring 4 quarts of water to a boil and add 1 T. salt. Boil whole peppers for 3-4 minutes, until they begin to soften. Remove from water with tongs and place on paper towels to drain.
3. Add rice to the already boiling water and cook until tender, about 13 minutes. Drain carefully and throughly.
4. Heat oil in a 12-inch skillet over medium-high heat. Add onions, garlic, and jalapeno (or chilies) and cook until softened, about 5 minutes.
5. Add corn, beans, green onions, chili powder, kosher salt, and pepper. Stir until corn and beans are heated through, about 5 minutes.
6.Remove skillet from heat and add rice, tomatoes, 1 cup cheese, and cilantro. Stir to combine. Taste the mixture and add any salt, pepper, or more chili powder as desired.
7. Place peppers in a baking dish whole and upright, or slice them in half (pictured) and lay them in the baking dish. Evenly divide mixture between the peppers.
8. Top peppers with remaining 1/4 C. cheese.
9. Bake at 350 for about 30 minutes.
Serve with sour cream and fresh chopped cilantro, you could also add some crispy tortilla strips.

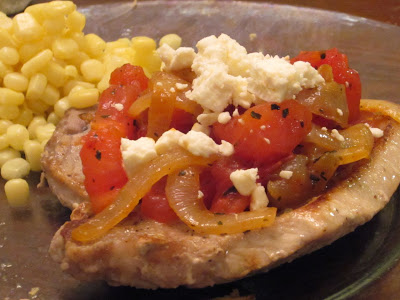
Tuscan Pork Chops


Let’s be honest with each other, ok? Pork chops don’t always turn out that great. They can be tough, easily overcooked and bland. Today I am rescuing the pork chop. This recipe has amazing flavor and texture, and put pork chops back on the dinner menu at our house. Before I get to the recipe, here is a link to a tutorial on how to finger test the doneness of meat:

Remember that pork needs to be cooked all the way through. I would recommend cooking on a cast iron skillet if you have one because it retains it’s heat well and allows you to turn the stove off completely and still have warmth for your pork chop to finish cooking through.
4 Servings
Ingredients:
2 tablespoons olive oil, divided
1 large onion, halved and thinly sliced
4 pork loin chops, 1 inch thick
salt to taste
black pepper to taste
garlic powder to taste
1 large tomato, sliced into chunks, OR pint of grape tomatoes, halved
3 cloves garlic, diced
1 T dried basil
2 tsp. of italian salad dressing OR balsamic vinegar
4 oz. feta cheese, crumbled
Directions:
1. Heat 1 tablespoon of oil in a skillet over medium heat. Stir in onion and cook until golden brown. Remove onions from pan and set aside.
2. Add 1/2 tablespoon oil to the hot skillet. Season pork chops with salt, pepper, and garlic powder, and place in skillet. Seer about 2 -3 minutes on first side until browned. Turn and seer on second side for about 2-3 minutes, then turn the temperature down to medium-low or (off if using cast iron) Test for doneness and cover for about 2-4 minutes more (testing for doneness often). When the meat is done, remove from pan and keep warm under some foil.
3. Return the heat to medium. Heat remaining oil in the skillet. Return onions to skillet, and stir in tomatoes, garlic, and basil. Cook and stir about 3 minutes, until the tomatoes are tender. Mix in dressing or balsamic vinegar, and season with salt and pepper.
4. Top chops with the onion and tomato mixture, and sprinkle with feta cheese to serve.
Source: adapted from an allrecipes.com recipe

Chocolate Chip Sea Salt Cookies

My husband and I are head over heals for each other, AND for these cookies!!! Go ahead and jump on the sea salt bandwagon, it’s so worth it! If you are not a fan of the salty/sweet trend, then skip the sea salt and enjoy these cookies the old fashioned way.
Ingredients:

2 1/4 C. cake flour

1 1/2 C. all purpose flour
1 1/2 tsp baking soda
1 1/2 tsp baking powder
1 tsp salt
2 1/2 sticks (1 1/4 cup) unsalted butter, softened
1 1/2 C brown sugar
3/4 C granulated sugar
2 large eggs, room temperature
2 tsp vanilla
20 oz. semisweet chocolate chips or chunks
Sea salt
Directions:
1. Sift flours, baking soda, baking powder and salt into a medium sized bowl.
2. Using a mixer fitted with the paddle attachment, cream butter and sugars together until fluffy, about 3-4 minutes.
3. Add vanilla and eggs, one at a time, mixing well after each addition.
4. Reduce speed to low, add dry ingredients and mix until just combined.
5. Drop chocolate chips in and incorporate by hand.
6. Press plastic wrap against the dough and refrigerate 1 hour (dough can be refrigerated up to 48 hours if making ahead of time).
7. Pre-heat oven to 350°F. Line a natural aluminum baking sheet with parchment paper or nonstick baking mat.
8. Roll cookie dough by hand into golf ball sized pieces, arrange on baking sheet. Sprinkle lightly with coarse sea salt and bake until golden brown and to desired level of doneness. –10 to 12 min. for soft chewy cookies, 12 to 15 min. for crisp cookies.
9. Cool cookies 10 min. on baking sheet before removing. Repeat with remaining dough, or reserve dough, refrigerated, for baking remaining batches the next day. Makes approximately 36 cookies.
TIP: If a recipe asks for softened or room temperature butter, you should also have room temperature eggs. To bring your eggs to room temperature, fill a glass with warm water and submerge the eggs for a few minutes.

Creamy Potato-Cheese Soup


Does winter have you chilled to the bone? A bowl of this easy soup will warm you right up!

Ingredients:
6 to 8 large baking potatoes
4 celery stalks, chopped (optional)
1 onion, chopped (optional)
2/3 C. flour
2/3 C. butter
2 C. milk
4 C. chicken broth
8- 12 strips of bacon, cooked and crumbled
1 C. sour cream
8 oz. shredded cheddar cheese
salt and pepper to taste
1/2 C. chopped green onion to garnish
Directions:
1. Peel and cube potatoes to desired size for soup. Bring a large pot of water to a boil. Add potatoes, celery and onion (if desired) to the boiling water and cook until tender (about 10-15 minutes depending on the size of the potato cubes).
2. Using a colander, drain the water from the vegetables.
3. Place the empty pot on the stove at medium heat and combine butter and flour to make a roux. Cook for 1 minute, roux will be bubbly and thick.
4. Slowly whisk in milk, and chicken broth. Salt and pepper to taste.
5. Add the potatoes (and celery/onion if using), bacon, and cheese to the soup. Mix well.
6. When the cheese is melted, stir in the sour cream. Add more salt and pepper to taste.
7. Garnish bowls of soup with chopped green onion and any leftover bacon pieces and cheese.
The soup will be thick. Add a touch of milk to reheat leftovers.

Leftover Cranberry Sauce Muffins


Christmas is creeping ever nearer, and I am sure you are planning the menu. But what about all the leftovers? Here’s a great recipe for all that cranberry sauce you will have left over. I have to give big credit to www.twopeasandtheirpod.com for this recipe. If you want to see the original post check out their site. When all the family went home after Thanksgiving all that was left in my fridge was homemade cranberry sauce. I had no idea what to do with it! It was a delicious sauce, but without turkey to pile it on, it wasn’t going anywhere. Then I found this recipe and it was amazing! Save this one for a post-Christmas breakfast!

Yield: 6 large muffins
Ingredients:
1 1/2 C. flour
1/2 tsp. salt
2 tsp. baking powder
1/4 tsp. cinnamon
1/2 C. sugar
1 T. orange zest
1/4 C. canola oil
1 large egg
1/3 C. milk
1 tsp. vanilla extract
3/4 C. fresh cranberry sauce (about 2 tablespoons per muffin)
Directions:
1. Preheat oven to 400 degrees. Line a muffin tin with paper liners or grease well. Set aside.
2. In a medium bowl, whisk together the flour, salt, baking powder, and cinnamon. Rub in sugar and orange zest together; whisk into dry ingredients.
3. In a separate bowl, whisk canola oil, egg, milk, and vanilla together.
4. Incorporate the wet ingredients into flour mixture. Add slowly and gently stir. The batter will be thick.
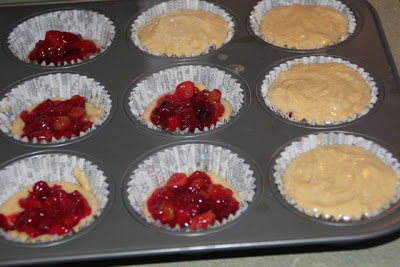
5. Place half the batter a the bottom of six muffin cups. Spoon about 2 T. of fresh cranberry sauce on top of the muffin batter. Top muffins evenly with remaining muffin batter.


6. Bake muffins for 15-17 minutes, or until muffins are golden brown and a toothpick comes out clean. Remove the muffins from the pan and let cool on a rack.