Chocolate & Coconut Cashew Bars

cashew-bars-2

If you haven’t met me before, allow me to introduce myself.   I’m the girl who wants dessert after every meal.  Every meal.

And also after snacks.

And also after watching TV commercials about meals and snacks.

And that’s a problem.

But luckily I’ve found a way to combat this.  

And I have to be honest.  I really had no faith in this recipe because I am a dessert snob.  If it’s described as a healthy dessert my mind immediately puts it into the “Yeah, right!” category.  And so I wasn’t expecting much.  

I distinctly remember my first bite.  I think I said something like, “Well, it’s okay, I guess.  But I doubt I would make it again.”  Which was followed by multiple bites that impressed me more and more.

A month later and I’m still making them!  

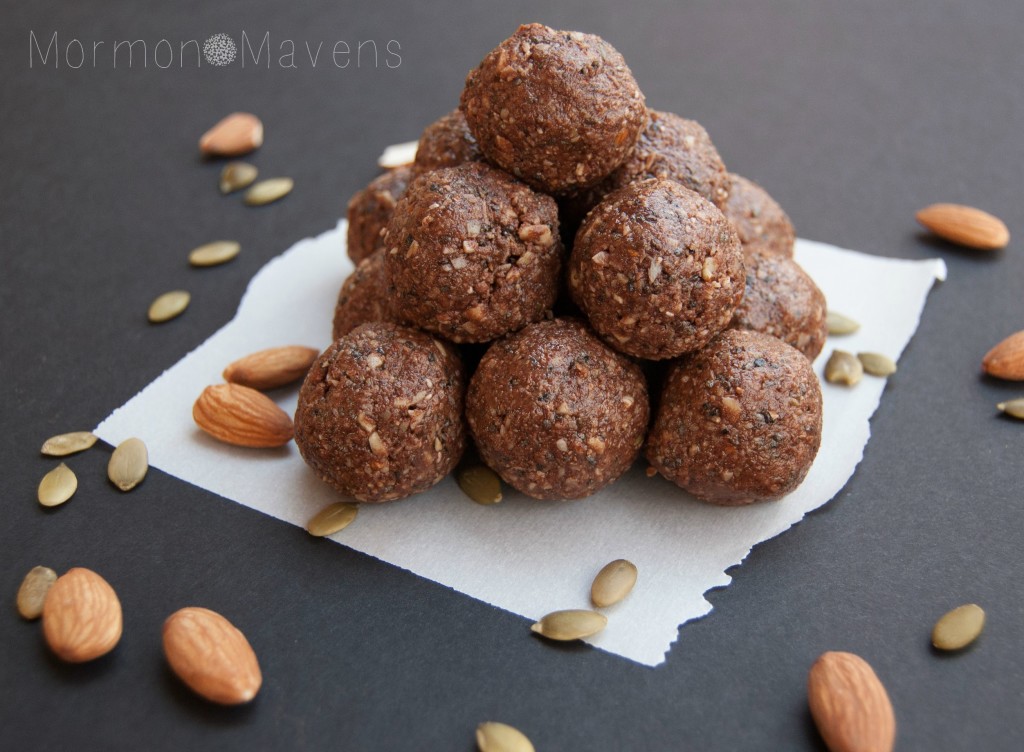
And you know what I love most about this recipe?  The bars taste so rich to me that it only takes one to satisfy!  So they last a long time!  And this has been so helpful for me in my quest to eat healthier and lose weight.  Vegan if you don’t use the honey.

I did tweak the recipe a bit.  It can be gluten free if you make sure that your oats are as well! 

cashew-bars-1


Chocolate & Coconut Cashew Bars
Yields 25
A healthy bar treat that is rich and satisfying! Great combo of a little sweetness and a little salt and a little chocolate and a little nut!
Write a review
Print
Prep Time
15 min
Prep Time
15 min
Ingredients
  1. 1 1/2 cups lightly roasted cashews (I used Planter's)
  2. 1 cup old fashioned oats
  3. 1/4 cup almond butter
  4. 1/4 cup melted coconut oil
  5. 1/4 cup + 2-3 tsp. liquid sweetener*
Topping
  1. 1/4 cup liquid sweetener
  2. 1/4 cup melted coconut oil
  3. 1/2 cup unsweetened cocoa powder
  4. 2-3 Tbsp. unsweetened coconut flakes
  5. sea salt to taste
Instructions
  1. In a food processor, process the cashews for a couple of minutes. Scrape down the sides if you need to. They will start to clump together a little, and that's good.
  2. Add the oats, almond butter, and sweetener and blend for another couple of minutes, scraping the sides down if necessary. This should form a sort of dough.
  3. Line an 8x8 pan with parchment paper and lightly coat it with some non-stick cooking spray. Make sure the edges of the parchment come out over the edge so you can lift out the bars later.
  4. Spread out the dough and press it evenly to the edges.
  5. Make the chocolate topping by whisking together the liquid sweetener, coconut oil, and cocoa powder until smooth. Pour this over the top of the bars.
  6. Sprinkle with coconut and sea salt.
  7. Freeze for an hour or refrigerate for several. Then lift out the bars and cut them carefully into squares. I did 5 slices in each direction which gave me 25 bars.
  8. Store the bars in an airtight container in the fridge.
Notes
  1. *You can use agave nectar (although not actually healthy), honey, brown rice syrup, or maple syrup. I had some agave to use up and that was tasty, but like I said, not really healthy the way it's made today. I was worried that the maple syrup would be too strong, but it was perfect. Gotta be REAL maple syrup though!
Adapted from Dishing Out Health
Mormon Mavens https://www.mormonmavens.com/

Fudgy Banana Skillet Cake

fudgy banana skillet cake 2

I gotta put a disclaimer on this one.

You may not like this.

No, don’t run away!  Just hear me out for a little bit.

It’s Vegan.  

It’s Paleo.

Okay, if you are a die-hard, flour-filled cake lover you can run now.  (Honestly, my kids did, but they don’t have the evolved taste buds that I do.)

Here’s my situation:  I have Leaky Gut.  And while I do make stuff for the family that has wheat and dairy (two foods I’m not supposed to have anymore) I do try an occasional alternative recipe in an attempt to find treats that might be “legal” for me.  And I’ve found that you have to make a taste adjustment most of the time–that’s something I’ve started to get used to.  

So I actually like this recipe!

What does it have going for it–besides being wheat and dairy free?

It mixes up IN the skillet.  Less dishes.

It’s ready pretty quickly.  Cravings kept at bay while it bakes.

It uses ingredients I already have on hand.  Yes!

It’s rich and fudgy.  Oh, yesssssss!

Is it my favorite cake in the world?  No.  That’d be one o’ them there flour-filled cakes of my yesteryear.  <sigh>

But I think it does fit the bill if you are someone who has to or wants to eat treats without grains or animal products and want something rich and chocolate-y.

I would recommend adding some dairy-free ice cream or whipped topping when serving, though.  It just needs a little creamy loveliness to balance out the fudgy!

fudgy banana skillet cake 1

Fudgy Banana Skillet Cake
A fudgy flourless, vegan "cake".
Write a review
Print
Prep Time
10 min
Prep Time
10 min
Ingredients
  1. 1/4 cup coconut oil
  2. 1/2 cup unsweetened cocoa powder
  3. 1 cup mashed banana (I used 3 small bananas)
  4. 1/4 cup pure maple syrup
  5. 1 cup almond butter
  6. 1/2 tsp. baking powder
  7. 1/4 tsp. salt
  8. 1 tsp. vanilla
Instructions
  1. Preheat oven to 325 degrees.
  2. In a large cast iron skillet set over low heat, melt the coconut oil completely.
  3. Turn off burner and add remaining ingredients, whisking well to combine.
  4. Run a rubber spatula around the edge of the skillet to get the batter down with the rest of the ingredients.
  5. Bake for 15-20 minutes or until the center is mostly set.
Notes
  1. It should be pretty moist still so don't bake it until a knife comes out clean--that's too done. It took 20 minutes in my oven. Cast iron retains heat well, so this will continue to cook a little when you take it out of the oven.
  2. Serve with ice cream or whipped topping (dairy or not--you decide).
Adapted from Happy Healthy Mama
Mormon Mavens https://www.mormonmavens.com/


Chocolate Bombs

It’s the afternoon.  You’re dragging.  And you’re hungry.  “Is there still ice cream in the freezer?” you think to yourself.  “Wait, no, there’s a bag of chips in the pantry!”  Or maybe you’re at the office and there’s leftover birthday cake in the break room.  Or donuts.  Or both!

Let me introduce you to my secret weapon against those junk food temptations.  I wage war on those moments with this recipe in my arsenal.  I call them….(pause for dramatic effect)…..Chocolate Bombs!

Ever since I found this recipe from The Gabriel Method E-Cookbook, it’s been my go-to for fighting hunger and snack attacks with a healthy and filling alternative.  One of my most vulnerable times for hunger is Sundays.  I try to eat something right before I leave, but by the time I get home after church (which is three hours long) I am ready to eat the front door!  Armed with a few of these tucked away in my purse or waiting for me in the car, I soothe the hunger beast during the twenty minute drive home.

You could make a breakfast of these if you like; or just snack on them when you need a pick me up or have an afternoon snack attack.  I always have a big glass of water (or water bottle) on hand with these as they are quite the mouthful!

It’s the afternoon.  You’re dragging.  And you’re hungry.  “Chocolate bombs to the rescue!” you shout triumphantly.

chocolate bombs 2

Chocolate Bombs
Yields 10
Tasty, filling, healthy snack treats
Write a review
Print
Prep Time
10 min
Prep Time
10 min
Ingredients
  1. 1/3 cup almonds
  2. 1 Tbsp chia seeds
  3. 1 Tbsp pumpkin seeds
  4. unsweetened coconut (to taste)
  5. 1 tsp. sesame seeds
  6. 4 tsp raw cacao
  7. 3 Tbsp almond butter
  8. 2 Tbsp coconut palm sugar
  9. 1 Tbsp raw cashew butter
  10. 5-10 drops liquid stevia
  11. 1 tsp cinnamon
Instructions
  1. Place all the ingredients in a food processor and process until the almonds are in very small pieces.
  2. Check the consistency by taking a small amount of the mixture and forming it into a ball. If it's too crumbly, add more almond or cashew butter in small amounts and process again. Once it will form a ball, you've gotten it right!
  3. Using your hand or a small cookie scoop, take out tablespoonfuls of the mixture, squeeze if necessary, and roll into a ball in your hands.
  4. Eat immediately or store in the fridge in an airtight container.
Notes
  1. The original recipe calls for Tahini in place of cashew butter. Not a Tahini fan, so I subbed. The original also called for a teaspoon of stevia but I only had liquid. For the cacao I increased the amount from 3 teaspoons in the original, to 4.
  2. How much coconut you say? I'm a coconut lover, so I would guess I add 1/4 cup. This will affect how much extra nut butter you need to add at the end (if any).
  3. I love these. So when I make them, I triple the batch. Tripling just fits the mixture in my Ninja food processor
Adapted from The Gabriel Method E-Cookbook
Mormon Mavens https://www.mormonmavens.com/

Fried Corn Cakes


I made these corny, crispy critters to go with some Sausage Okra Gumbo--a perfect pairing with the snow and brisk temperatures provided to us by Winter Storm Jonas.  I am sure you experienced some of the same weather if you are on the East Coast.  So, next time you are snowed in, hunker down with some of these and a nice hot stew or soup.  Or not.  They are good all by themselves.
 

Ingredients:

1 cup fine cornmeal
1 cup water
oil for frying–I used coconut oil
salt to taste
Add-ins (use your imagination) : chopped bacon,  minced onion, chopped green chilies, shredded cheese, etc.

1.  Add water to cornmeal and whatever you decide to throw in there, and stir to combine. You don’t even need to add anything.  These are yummy on their own.

2.  Heat about 1/4 inch of oil in a skillet to medium-high.

3. Drop corn mixture by tablespoonfuls into hot oil.  Fry until golden brown and flip to brown other side.

4.  Remove from skillet and place on paper towels to drain excess oil.  Lightly salt each side.  You can also add the salt to the mixture before frying, if desired.

These will be crispy on the outer edge and chewy in the middle.  What?!
   

Fried Corn Cakes
Write a review
Print
Ingredients
  1. 1 cup fine cornmeal
  2. 1 cup water
  3. oil for frying–I used coconut oil
  4. salt to taste
  5. Add-ins (use your imagination) : chopped bacon, minced onion, chopped green chilies, shredded cheese, etc.
Instructions
  1. 1. Add water to cornmeal and whatever you decide to throw in there, and stir to combine. You don’t even need to add anything. These are yummy on their own.
  2. 2. Heat about 1/4 inch of oil in a skillet to medium-high.
  3. 3. Drop corn mixture by tablespoonfuls into hot oil. Fry until golden brown and flip to brown other side.
  4. 4. Remove from skillet and place on paper towels to drain excess oil. Lightly salt each side. You can also add the salt to the mixture before frying, if desired.
Notes
  1. These will be crispy on the outer edge and chewy in the middle. What?!
Mormon Mavens https://www.mormonmavens.com/

Fudgy Flourless Chocolate Cake

fudgy flourless chocolate cake
 

I have a couple of dinner guests tonight–sweet missionaries from my church–and there is some gluten and dairy intolerance.  Makes for a lot of fun figuring out something to prepare for dinner. Fortunately (or not) the world seems to be going gluten- and dairy-free so there is a plethora of recipes out there.  I found this one via Facebook and thought I would give it a whirl.  It’s a little bitter for my taste, but I am going to use a berry compote to sweeten it up.  Hope it works!  By the way, that is not a giant fork on the plate, but I did serve small wedges of the cake.


Ingredients:


1 15-oz. can black beans, drained & rinsed

1/2 c. unsweetened cocoa powder

1/2 c. (about 4-5 large) egg whites

1/3 c. unsweetened applesauce (I used regular Cinnamon applesauce because that is what I had in my pantry)

1/3 c. canned pure pumpkin (I used fresh from my freezer)

1/4 c. Truvia spoonable calorie-free sweetener

1 1/2 t. baking powder

1 t. vanilla extract

1/4 t. salt

3 T. mini semi-sweet chocolate chips

 
  1. Preheat oven to 350 degrees. line a 9″ round cake pan with foil and generously spray with nonstick spray.
  2. Place all ingredients, except chocolate chips, in a food processor.  Puree until completely smooth and uniform.
  3. Fold in 1 T. chocolate chips (hmm…this could be why mine wasn’t sweet enough.  I dumped 2 T. before I looked back at my recipe.)
  4. Spread mixture into the baking pan and smooth out the top.
  5. Evenly distribute the remaining chocolate chips over the top and lightly press into the batter.
  6. Bake until a toothpick inserted in the center comes out clean, about 35-40 minutes.  I used convection bake for about 28 minutes.
  7. Let cool completely, about 1 hour.
  8. Makes 8 servings.  Top with fresh fruit, compote, whipped cream–use your imagination.
  9. Refrigerate leftover cake.  I will be serving mine chilled.  I think it will taste better.
 
SOURCE:  Hungry Girl via Facebook.
 
Fudgy Flourless Chocolate Cake
Write a review
Print
Ingredients
  1. 1 15-oz. can black beans, drained & rinsed
  2. 1/2 c. unsweetened cocoa powder
  3. 1/2 c. (about 4-5 large) egg whites
  4. 1/3 c. unsweetened applesauce (I used regular Cinnamon applesauce because that is what I had in my pantry)
  5. 1/3 c. canned pure pumpkin (I used fresh from my freezer)
  6. 1/4 c. Truvia spoonable calorie-free sweetener
  7. 1 1/2 t. baking powder
  8. 1 t. vanilla extract
  9. 1/4 t. salt
  10. 3 T. mini semi-sweet chocolate chips
Instructions
  1. Preheat oven to 350 degrees. line a 9″ round cake pan with foil and generously spray with nonstick spray.
  2. Place all ingredients, except chocolate chips, in a food processor. Puree until completely smooth and uniform.
  3. Fold in 1 T. chocolate chips (hmm…this could be why mine wasn’t sweet enough. I dumped 2 T. before I looked back at my recipe.)
  4. Spread mixture into the baking pan and smooth out the top.
  5. Evenly distribute the remaining chocolate chips over the top and lightly press into the batter.
  6. Bake until a toothpick inserted in the center comes out clean, about 35-40 minutes. I used convection bake for about 28 minutes.
  7. Let cool completely, about 1 hour.
  8. Makes 8 servings.
Notes
  1. Top with fresh fruit, compote, whipped cream–use your imagination.
  2. Refrigerate leftover cake. I will be serving mine chilled. I think it will taste better.
Mormon Mavens https://www.mormonmavens.com/

Gluten-free and Dairy-Free Blueberry Muffins

Are you gluten-free?  Do you find that you are sometimes less than thrilled to try new gluten-free recipes because they often don’t satisfy?  Maybe it’s just me.  I guess I’m jaded now.  Nevertheless, I decided to try this one for breakfast today because, well, I suppose I haven’t lost all hope.

I wasn’t expecting much.  Actually, I was expecting a slightly sweet blob of cardboard.  But I was really happy with the result.  Happy, as in, I will make these again.  And that’s saying a lot….for me, anyway.


Gluten-Free and Dairy-Free Blueberry Muffins

2 large eggs, at room temp
2 Tbsp. lemon juice
1/3 cup palm shortening, softened
1 tsp. vanilla extract
1/3 cup honey
1/2 cup warm water
1 3/4 cup Pancake Mix (see recipe below)
1/2 tsp. ground cinnamon
1/2 cup fresh blueberries (or reconstituted freeze-dried blueberries–what I used)

Topping
1/3 cup pecan halves
1 Tbsp. unsweetened shredded coconut
1 Tbsp. solid coconut oil
1 Tbsp. blanched almond flour
1 Tbsp. honey
3/4 tsp. ground cinnamon
1 large date, pit removed
pinch of sea salt

1.  Preheat oven to 350 degrees.  Place an oven-safe dish filled with 2 cups of water on the bottom oven rack.  Place a rack in the middle–this is where the muffins will bake.
2.  Place all the muffin ingredients, except the blueberries, in a blender.  Process for half a minute, scrape down, and process again until smooth.  Pour mixture into a bowl and stir in the blueberries.
3.  In a muffin tin, place 10 paper liners.  Fill each liner 2/3 full.
4.  In a food processor, combine all the topping ingredients.  Pulse them together until like coarse crumbs.  Sprinkle atop each muffin.
5.  Bake for 20-25 minutes.  Test with a toothpick by inserting into the middle of a muffin; if it comes out clean, it should be ready.  Remove the baked muffins to a wire rack to cool for a bit.

Pancake Mix
3 cups blanched almond flour
1 cup coconut flour
1 Tbsp. baking soda
2 tsp. cream of tartar
3/4 tsp. sea salt
Whisk together and store in airtight container in fridge (will last for 6 months).

Source:  Against All Grain by Danielle Walker

Cauliflower Pizza Crust

One of the things I have a hard time resisting is pizza.  Even when I’m not trying to eat wheat- and dairy-free, pizza is a huge temptation.  I just love it.  But it doesn’t love me.  I didn’t think there would be an alternative that I would enjoy.

I’ve seen pics for this crust all over Pinterest but never really had the gumption to try it until now.  While it doesn’t rival Domino’s or Pizza Hut or Whatever-Your-Favorite-Pizza-Place-Is, it’s good enough that I will be making it again.  And that’s sayin’ somethin’.

Ingredients:
2 cups shredded cauliflower
1 egg, slightly beaten
1 cup mozzarella Veggie Shreds
1 tsp. dry oregano
1/2 tsp. finely minced garlic
1/2 tsp. onion salt

1.  Remove leaves from cauliflower and cut head into pieces.  In a food processor with a grater blade, process the cauliflower.
2.  Place 2 cups of cauliflower in a microwave-safe bowl and cook on full power for 5 minutes.
3.  Cool to room temp.  Add remaining ingredients and stir until combined.
4.  Grease a cookie sheet or pizza pan.  Form pizza crust into desired shape.
5.  Bake at 375 degrees for 20 minutes.  Remove from oven and top with desired toppings.  Return pizza to oven for a few minutes, or broil to melt additional cheese.

Notes:

  • The head of cauliflower I used yielded about 3 1/3 cups of shredded.  
  • You can use regular cheese, but I’m trying to go dairy-free so I used a cheese substitute.  If you want to give it a try, you can find it in the produce section at the grocery store.
  • I didn’t add extra cheese since there is some in the crust already.  I just topped with a bit of pizza sauce and some pepperoni.  If you are adding veggies, you may want to saute them a bit first since they won’t spend long in the oven.
Makes 6 pieces of pizza crust

Whole Grain Buckwheat Pancakes

I love breakfast.  Love it!  But when you’re trying to go dairy- and gluten-free, breakfast can be hard.  Well, hard if you’re like me and love carbs for breakfast.  Pancakes weren’t something I ate every morning but when they were gone, they were missed.  In the few months that I’ve been eating this way I’ve tried a few pancake recipes;  and they were okay.  When I found this recipe I really didn’t have high expectations.  And when I saw the batter, my expectations dropped even lower.  (Seriously, it looks like mud.  And don’t the pancakes look more like hamburger patties from a distance?)  But I was pleasantly surprised when I took my first bite.  So happy I decided to try these!

Ingredients:
1 cup whole grain buckwheat flour
1 tsp. baking powder
1/4 tsp. baking soda
1/4 tsp. salt
1/2 tsp. cinnamon
1 cup unsweetened almond milk
1 egg, separated
1 Tbsp. pure maple syrup
1/2 tsp. vanilla extract
2 Tbsp. melted ghee
coconut oil for cooking

1.  In a medium bowl combine the dry ingredients (flour through cinnamon).  Whisk and set aside.
2.  In a smaller bowl, combine the milk, egg yolk, maple syrup, vanilla, and ghee.  Whisk well to combine.  Add this to the dry ingredients and stir well until just combined.
3.  In a small bowl, whisk the egg white until soft peaks form.  Fold this into the batter gently.
4.  Coat griddle at medium heat with coconut oil.  Pour batter onto griddle, forming 4″ cakes.  Cook until bubbles form on top and the edges are no longer shiny.  Then flip and cook on the other side until done.

Serve with maple syrup.  Like, the real stuff!

Makes 8 four-inch pancakes

Source:  mountainmamacooks.com (very slighly adapted)

Wheat-Free, Dairy-Free Pancakes

About three months ago I was diagnosed with Leaky Gut Syndrome and was taken off of a HUGE list of foods that my body is sensitive to.  Sadly, wheat is on that list as well as all dairy.  Hopefully my gut will heal soon and I can reintroduce some of the “illegal” foods back into my diet in moderation.  For now though, I have to find ways to make do without them.  My naturopathic doctor gave me this pancake recipe when I told her I was struggling with breakfast choices and it has been very helpful.

Ingredients:
2 Tbsp. coconut flour
1 to 1 1/2 cups almond flour
1/4 cup ground flax seed
5-6 eggs
2 Tbsp. melted coconut oil or ghee
1 Tbsp. honey
1/2 tsp. baking soda
1 banana or 1 apple or 1 cup applesauce*

1.  Combine the flours and flax seed.  Combine the wet ingredients and add to the dry.
2.  Sprinkle the baking soda onto the mixture and stir to combine.
3.  Add the fruit and stir to combine.
4.  Drop by 1/4-cupfuls onto hot griddle (grease if necessary) and cook on both sides until done.

Makes about a dozen pancakes.
*Mash banana.  Finely dice apple.

Source: my doctor

Coconut Sorbet

After being nagged by annoying health problems, I finally found out through some testing that I have some temporary (hopefully) food sensitivities.  The biggies among them are wheat, dairy, and vanilla.  For 90 days I am to go without a big ol’ long list of foods.  This has been a big challenge, especially when it comes to dessert.

A little research on Pinterest quickly unearthed this easy recipe for Coconut Sorbet.  My only complaint with this recipe is that it doesn’t scoop well and that it makes more than my ice cream freezer can handle in one batch.  But the taste is great!  It was a real treat to be able to enjoy a real dessert for a change!

Ingredients:
2 (13.5 oz.) cans coconut milk
1 (15 oz.) can cream of coconut
1 1/2 cup. water
1/2 cup shredded coconut

1.  Combine coconut milk and cream of coconut in a blender.  Blend for 1 minute.
2.  Combine blended mixture, water, and coconut in a container and stir together.  Refrigerate to chill until very cold.
3.  Process in ice cream/sorbet freezer according to your freezer’s directions.  Store in freezer.

Source: Goya