Apple Cobbler

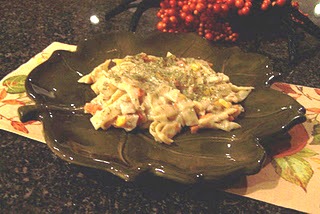
Back in 1992 we moved from Winterville to Wilson, NC so that Mike wouldn’t have a 45 minute commute to work before the crack of dawn.  We had the most wonderful real estate agent helping us find a home.  Talk about service after the sale!  We moved into our  home in the summer and come Fall she brought several beautiful mums for me to put on my front steps.  Not long after that, she brought me the best apple cobbler I have ever had–she had made several for a church function and just thought I would like one–oh yeah!.  I called her and got the recipe and have used it all these years as a go-to, quick, yummy dessert for when I am in a hurry or when the family begs for this dish.  Sometimes I call this Apple Crisp, but Bea Newton–my realtor and friend–calls it a cobbler.  Whatever you call it, I call it scrumptious!  You will probably have everything on hand except maybe the apples.  Go out right now and buy some Fujis or Galas or Honeycrisps.  Just make this and enjoy!  And if you are ever in Wilson, run over to First Wilson Properties and say hey to Bea for me, if she hasn’t retired or isn’t on one of her many mission trips to a Third World country.  What a lady!

INGREDIENTS:
4 large apples, peeled and sliced
Cinnamon, to taste
Brown sugar, to taste
1 cup sugar
1 cup flour
1 tsp. baking powder
1/2 tsp. salt
1 large egg
1/2 cup chopped nuts
1 stick (1/2 cup) butter, melted

1.  Preheat oven to 375.
2.  Spray a 9×13 (or square) pan with cooking spray.  Add the apples and sprinkle generously with cinnamon and brown sugar (I get pretty heavy-handed here).
3.  Combine sugar, flour, baking powder, and salt in a medium bowl–this will be your crust.  Break the egg into this mixture and stir with a fork until crumbly.  Stir in nuts.
4.  Sprinkle crust mixture on top of apples.  Pour melted butter over crust.
5.  Bake for approximately 30 minutes or until lightly browned.

SOURCE:  Bea Newton, realtor extraordinaire!

Cooking Pasta

I was hanging out at my good friend Susan’s house and we were, of  course, in the kitchen.  I was looking through a pasta cookbook that she has and found these instructions for cooking pasta.  This is the only way I will cook pasta now!  So easy and you don’t have to throw those noodles up against the wall to see if they will stick–who still does that?  Come on, ‘fess up!
Photo by Suat Eman/FreeDigitalPhotos.net

1.  Bring 4 quarts of water to a rolling boil.
2.  Add desired amount of salt and pasta (you could put a little olive oil in if you are worried that it will stick).
3.  Stir pasta, constantly, for 2 minutes.
4.  Put lid on pot and remove from heat. 
5.  Set your timer for 10 minutes and go work on the rest of your meal.
6. After 10 minutes, drain your pasta and it is ready to rock and roll!
Here’s another tip:  get a pasta pot with the removable strainer.  It is well worth it and can be used for other things like boiling potatoes, corn, just about anything that you would need to drain water off of.  Seriously…I love mine.

Chicken Vegetable Casserole

 
Tonight for supper I decided to try a meal from food storage.  I get automatic shipments of foods from THRIVE.  I really want to make this work for our family. I have the THRIVE cookbook so that I can use and rotate the foods in normal use.  This recipe is from that cookbook.  


Sprinkle a little dill weed on it for color and flavor!
 
 
Ingredients:
I cup THRIVE Chopped Chicken (freeze dried)
4 cups THRIVE Egg Noodle Pasta
1/2 cup THRIVE Sweet Corn (freeze dried–I don’t have this yet so I used canned corn on hand)
1/2 cup THRIVE Celery (freeze dried)
1/2 cup THRIVE Carrot Dices (I used dehydrated carrot dices canned previously)
1 tablespoon THRIVE Chopped Onions (freeze dried–I used dehydrated minced onions canned previously) 
1 teaspoon THRIVE Iodized Salt (I used salt on hand)
1 teaspoon garlic powder
1 teaspoon dried thyme
2 cups THRIVE Classic Gravy (see recipe below)
1/4 cup THRIVE Powdered Milk, rehydrated (3/4 tablespoon powder + 1/4 cup water–I used previously canned non-fat dehydrated powdered milk)
1 cup Parmesan, shredded
 
 
1.  In a small bowl, cover chicken dices with warm water.  Let sit for 5-10 minutes or until softened and rehydrated.  Drain.
 
2.  Preheat oven to 350 F.
 
3.  In a large pot of salted boiling water, cook egg noodle pasta according to directions on can.  Drain noodles, then toss with gravy and milk in a large bowl with the vegetables and onion until completely coated.  Add salt, garlic powder, and thyme.
 
4.  Toss mixture with chicken and stir to combine.  Pour into casserole dish (I used a 9 x 13) and top with 1/2 cup Parmesan cheese.
 
5.  Cover casserole with foil and bake at 350 F for 20 minutes, or until bubbly.  Take off foil and top with remaining 1/2 cup Parmesan cheese.  Bake an additional 15 minutes.
 
 
THRIVE Classic Gravy
Ingredients:
4 tablespoons butter (I used 5 tablespoons from two partial sticks so that I could use them up)
1 cup THRIVE Powdered Milk,dry (I used non-fat powdered milk on hand)
1/4 cup THRIVE White Flour (I used all-purpose flour on hand)
3 cups water 
3 teaspoons THRIVE Chicken Bouillon
3/4 teaspoon THRIVE Iodized Salt (I used salt on hand)
3/4 teaspoon pepper
 
Th
1.  In a medium saucepan, melt butter.  Whisk in powdered milk and flour.  
 
2.  Gradually add the water to the powdered milk mixture and whisk in the chicken bouillon.
 
3.  Add salt and pepper and cook over medium heat, stirring constantly until gravy is thickened and smooth.  Remove from heat.


Source:  Shelf Reliance THRIVE Cookbook

Apple Annie Coffee Cake

We wanted to take a General Conference invitation to our neighbor across the street a couple of Sundays ago so I thought I would sweeten the deal with something homemade from the kitchen.  I quickly checked out the recipes for coffee cake in a cool Bed & Breakfast cookbook that I picked up at a Scholastic Book Fair years ago when the girls were at Helen Ball Elementary School in El Paso, Texas.  This is the recipe I chose because, well, I had all the ingredients and it looked quick and easy.  It was.  I took it right out of the oven and we headed over to Annette and Rodney’s farmhouse.  She brought the empty pan back the next day, raving about how good it was and that she and Rodney were fighting over who got the last of it. Thought I had better fix some and see for myself.  I might take this to our Relief Society Fall Activity this month–it’s going to have to be a double batch, or I might have a one-man mutiny at my house.

Ingredients:
2 cups all-purpose flour
1/2 cup sugar
2 teaspoons baking powder
1/2 teaspoon salt
1/4 cup vegetable shortening (I used Crisco)
1 egg
1/2 cup milk
1 teaspoon vanilla
2 cups peeled, thinly-sliced apples (I used Galas)
1/2 cup firmly packed brown sugar
1/2 teaspoon ground cinnamon
1/4 teaspoon grated nutmeg (I used ground)
1/3 cup melted butter

1.  Preheat oven to 400.
2.  In a medium bowl, sift together flour, sugar, baking powder, and salt, then cut in shortening.
3.  Combine the egg, milk and vanilla, and beat lightly until well mixed.
4.  Add to the dry ingredients and mix until moistened–batter will be stiff.
5.  Spread the batter into a well-greased 8-inch square pan.  
6.  Arrange the sliced apples evenly over the top of the batter.
7.  Combine the cinnamon, nutmeg and brown sugar and sprinkle over the apples.
8.  Drizzle the melted butter over the sugar and spices.
9.  Bake about 25 minutes.
10.  Serve warm.  MAKES ABOUT 6 SERVINGS.
Source:  Angel Arbor Bed & Breakfast Inn, Houston, TX, as published in “Rise & Dine America.”

Rice Pudding

Ahhh…the ultimate in comfort foods and my go-to recipe for using leftover cooked white rice.  Last week’s recipe called for rice and then I used the leftovers for this week’s recipe.  Got this one from my Mom years and years ago.  It is published in our yellow Brew Family Cookbook.  Enjoy…

Ingredients:
3 cups cooked rice
2 cups sugar
4 eggs
2 cups milk
1 tsp. vanilla
  Nutmeg


1.  Combine all ingredients, except nutmeg, and mix well.
2.  Pour into buttered baking dish and sprinkle with nutmeg.
3.  Bake 1 hour at 350.
4.  Stir 2-3 times during baking.

Source:  Brew Family Cookbook

Chili Con Turkey

Have any of you tried The Abs Diet for Men? Well, my husband swears by it so I sometimes HAVE to use recipes from there so that we can eat healthier.  I tell him we can just use the principles and food list but he insists it must be the recipes.  Whatever…with names like Mas Macho Meatballs and Chicken a la King Kong, these recipes are meant to appeal to guys.  We like the recipes, though, and this is one of them. There is an Abs Diet for Women, but do I dare use one of those recipes?  We shall see…
Ingredients:
1 pound ground turkey
1 can (14-oz.) Mexican-style diced tomatoes
1 can (15-oz.) black beans, rinsed and drained
1 can (14-oz.) whole kernel sweet corn, drained
1 package (1.5 oz.) dried chili mix
1 tablespoon ground flax seed
1/4 cup water
1 cup cooked rice

1.  In a large nonstick skillet over medium-high heat, brown the turkey.
2.  Add remaining ingredients, except the rice.  Cook over low heat for 10 minutes.
3.  Serve over rice, if desired.
4.  This recipe states that it makes 4 servings, but really you can get a couple more.
Source: “The Abs Diet for Men,” David Zinczenko with Ted Spiker

Window Cleaner–334 views

Back in the 70’s when I was at Ricks College (you know it as BYU-Idaho) I had to make a presentation in one of my classes.  This was videotaped so that we could see ourselves in action, teaching something.  Complete with a flip mirror above my head so that the camera and audience could get a better view of what I was doing, I demonstrated how to make homemade window cleaner.  That was a fun assignment and I, of course, aced it!  In another class we all contributed tips, articles, ideas, etc. to help build each other’s Personal File.  That is where I got this “recipe” and no I do not remember who it came from.  I have used this cleaner, off and on, for years.
Ingredients:
2 tablespoons NON-sudsing ammonia
1 teaspoon liquid detergent
1 pint rubbing alcohol
1 gallon container
   water
   food coloring

1.  Add the first 3 ingredient to the gallon container, then fill with water. 
2.  Color to preference.
TIP–I would be careful with which color you choose.  Blue would be an obvious choice.  Pink or Purple might be too enticing for a little child who doesn’t know better and wants to check out the pretty water…Mine is light purple but I don’t have small ones at home, until the grandson comes over and then I just make sure he doesn’t have access.

English Muffin French Toast

I have no idea which magazine this recipe came out of–Better Homes & Gardens?  Southern Living? Popular Mechanics?   Don’t have the foggiest.  Didn’t know I would need that information when I clipped it for my “Someday I Will Make This” folder.  So, if the ‘owner’ of this recipe ever reads this blog and recognizes this recipe–props to you sista!  I promise to never make this and call it my own.  You will always be a part of this dish…By the way, I put raspberries on mine because that is what I had in my pantry (Thrive product).  I would like it better with the suggested fruit toppings, I think.  They would be sweeter.  Just sayin’…

Ingredients:
4 large eggs
1 cup nonfat buttermilk
2 tsp. orange zest
1 tsp. vanilla extract
6 English muffins, split
   Vegetable cooking spray
1 cup fat-free Greek yogurt
2 Tbsp. maple syrup
   Toppings:  chopped fresh strawberries or nectarines.
1.  Whisk together first 4 ingredients in a bowl.  Place English muffins in a 13″ x 9″ baking dish, overlapping edges.  Pour egg mixture over muffins.  Cover and chill 8-12 hours.
2.  Remove muffins from remaining liquid, discarding liquid.
3.  Cook muffins, in batches, in a large skilllet coated with cooking spray over medium-high heat 2-3 minutes on each side or until golden.  Stir together yogurt and syrup until blended (I would add more syrup to your taste.  I did.); serve with the muffin French toast and toppings.
Source:  There really is one somewhere in a magazine.

Fudgy Bonbons

I can’t really remember the year that I got this recipe.  I think maybe the first Christmas that we flew home from El Paso, Texas–maybe 1996 or 1997.  Anyway, we were at my mother-in-law’s house and I was trying to find something sweet to eat.  There were some holiday cookies and stuff over on top of her chest freezer and so I picked up something chocolate.  I thought it tasted pretty good, although it was dry from sitting out a long time. I asked Verna where they came from and she said her sister, Gertie Sutton, had brought them over.  So I contacted Gertie and she sent me the recipe.  The first time I made them I thought I was in Chocolate Heaven!  These have wowed my friends and family for years.  This recipe, from Mary Anne Tyndall of North Carolina, won $50,000 in the 1994 Pillsbury Bake-Off.
WARNING: Side effects of this product include addiction and sheer pleasure!

Ingredients:
60 milk chocolate Hershey’s Kisses or Hershey’s Hugs, unwrapped
1 (12-oz.) pkg. semi-sweet chocolate chips
1/4 cup butter or margarine
1 (14-oz.) can sweetened condensed milk
2 cups all-purpose flour
1 tsp. vanilla extract
1/3 cup white chocolate chips

1.  Heat oven to 350.  In medium saucepan combine Hugs and butter.  Cook and stir over very low heat until chips are melted and smooth.
2.  Add sweetened condensed milk to chocolate mixture and mix well.  Remove from heat.
3.  Lightly spoon flour into measuring cup and level off before putting in stand mixer bowl.  Add chocolate mixture and vanilla.  Mix well on medium speed.
4.  Shape 1 tablespoon of dough around each Hug, covering completely.  Place bonbons 1 inch apart on UNGREASED cookie sheet (I use parchment for ease of release from pan for cooling).
5.  Bake for 6-8 minutes.  DO NOT OVER BAKE.  Cookies will be soft and shiny but will become firm as they cool.  
6.  Cool bonbons completely on cooling racks.
7.  Melt the white chocolate chips in the microwave according to package directions.  You can add a little shortening to thin, if necessary.
8.  Dip the tip of each bonbon into the white chocolate or drizzle over .  Get creative.  You can even color the white chocolate to go with your event. 
SECRETS TO SUCCESS:
  • This is an easy recipe, but time-consuming.  
  • Try to work quickly as the dough will become harder to form around the Hugs toward the end of the batch.  
  • I just pinch off about a tablespoon of dough, roll it into a ball and then flatten in the palm of my hand, then place the Hug in the middle and fold the dough up and over the Hug.
  • The parchment I use is actually a reusable sheet and “shimmies” easily off of the cookie sheet.
  • The original recipe included nuts and used white baking bar/white candy coating melted in a saucepan with the shortening or oil.  I find using the chips and microwave more efficient and just as good.
  • Store the bonbons in an air-tight container to prevent drying out.
  • When I first tasted the bonbons, Hugs were used so they are my preference.  I did try Hershey’s Kisses with Almonds and those were really good.  Experiment with your candies.  I bet caramel would be interesting…
Source:  Mary Anne Tyndall, Pillsbury Bake-Off Winner, 1994.

Mexican Mac & Cheese

I needed an easy dish to make for our local Masonic Picnic–they have had this picnic for 131 years here in Davie County–and that would also be easy to double for dinner guests that evening at the house.  This was my pick.  Found it in Better Homes & Gardens magazine under prize-tested recipes–this recipe was a $500 prize winner in the New Ways with Sausage category.

Ingredients:
12 oz. dried mostaccioli or rigatoni pasta (3 cups)
1 lb. bulk pork sausage
1 cup chopped onion
1 16-oz. jar green medium-hot salsa
2 8-oz. pkg. shredded Monterey Jack cheese (4 cups)
    Tomato wedges, sliced jalapeno peppers, and chopped fresh cilantro.
    Salsa (optional)


1.  Preheat oven to 350.  Lightly grease 13 x 9 inch baking dish; set aside.

2.  Cook pasta according to package directions.  Drain; set aside.

3.  Meanwhile, in large skillet cook sausage and onion until meat is browned and onion is tender.  Drain fat. Stir in green salsa.

4.  In prepared baking dish layer half of the cooked pasta, half the sausage mixture, and half the cheese.  Repeat layers.

5.  Bake, uncovered for 35 minutes or until bubbly.  Let stand 10 minutes.  Top with tomato, jalapeno, and cilantro.  Makes 12 servings.

NOTE–Next time I make this I will use a smaller pasta.  The rigatoni seemed too big.  Farfalle might be fun!

Source: Better Homes & Gardens Magazine