Sticky-Buns in Cast Iron

sticky buns in cast iron

Buns of Iron?

Okay, that was pretty lame.  But I couldn’t help it.

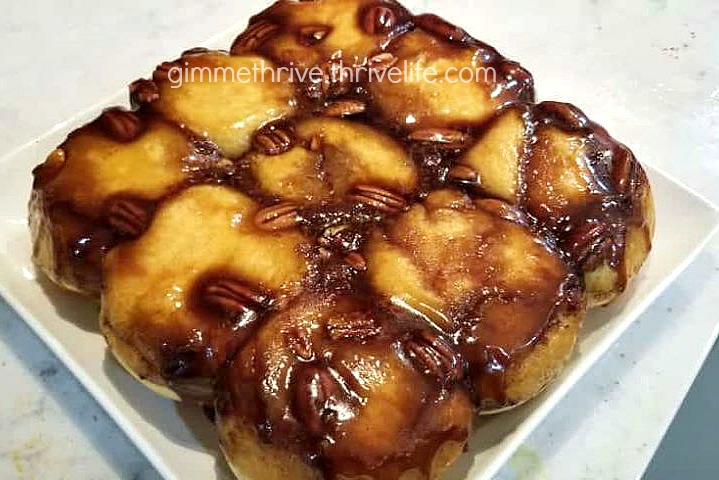
I’ve never made sticky buns before but when I saw a recipe making them in a cast iron skillet I knew I had to try it.  I love my cast iron cookware and use it all the time.  I especially love finding recipes where I can bake with it.

I followed the original recipe directions and made 9 large buns, but next time I will make smaller ones.  I think the sticky-to-bun ratio is better that way.  I also used my Thrive Life Country White Dough Mix for the bread.  Use any basic bread dough recipe you like.  Or maybe you love the frozen roll dough!  That’s even easier than using a mix.  Whatever works for you!  My dough mix recipe is for one loaf’s worth of dough.

I used a 9″ square cast iron skillet (my grandmother’s).  So to make it mathematically easy, I’ll divide the dough into 16 equal pieces and do a 4×4 arrangement.

Do you like cast iron?  If so, what’s your favorite piece?

Sticky Buns in Cast Iron
Bread, butter, sugar.....like seriously....do I need to say more?
Write a review
Print
Prep Time
1 hr 20 min
Cook Time
25 min
Prep Time
1 hr 20 min
Cook Time
25 min
Ingredients
  1. The Bun Dough
  2. 1 c. warm water
  3. 2 tbsp. warm water
  4. 2 1/4 tsp. Active Dry Baker's Yeast
  5. 2 tbsp. honey
  6. 3 3/4 c. THRIVE Country White Dough Mix
  7. The Sticky Stuff
  8. 1/2 c. butter, softened
  9. 1/2 c. brown sugar
  10. 1 tsp. Ground Cinnamon
  11. 3 tbsp. honey
  12. 1 pn. salt
  13. 1/4 c. pecan halves
Instructions
  1. Prep the Dough
  2. Add the water, yeast, and honey to the bowl of a stand mixer equipped with the dough hook. Slowly add in the dough mix. Once it's all incorporated, knead in mixer for about 5 minutes.
  3. Spray a medium bowl with cooking spray. Form the dough into a ball and place in the bowl, turning to coat it with the cooking spray. Cover and allow to rise for about 40 minutes.
  4. When dough has doubled in size, punch it down and divide it into 9 pieces (or 16 as mentioned in the description). Set aside while you prep the sticky stuff.
  5. Prep the Sticky Stuff
  6. Combine all but the pecans in a medium bowl and stir well to combine everything.
  7. Spread this onto the bottom and up the sides of the cast iron skillet.
  8. Place the pecan halves evenly over the sticky stuff. (If you want it to be pretty, make sure you have the flatter side of the pecan facing up.)
  9. Dough + Sticky Stuff
  10. Take the dough pieces and roll into balls. Place these evenly over the sticky stuff. Cover and allow to rise about 30 minutes.
  11. Preheat oven to 375 degrees.
  12. Bake the skillet, uncovered, for 20-30 minutes or until rolls are golden and dough is cooked through. Allow to sit for 15 minutes once you remove it from the oven.
  13. Place a large plate upside-down over the skillet and carefully flip so that the rolls release onto the plate. Enjoy!
Notes
  1. Makes 9 large rolls, but you could make smaller rolls. I would make 16 for my square skillet.
Adapted from Rie McClenny
Mormon Mavens https://www.mormonmavens.com/

Tater Tot Breakfast Casserole


It was one of those days when I felt the urge to serve breakfast for supper.  

And so I did.  

Fortunately, I was watching Pioneer Woman while ironing a million white shirts earlier in the day and she was preparing a brunch which looked mighty delicious. I went to the Food Network site and found her show…and this recipe.

Now, she was prepping for a brunch with friends for “the next day” and so she put the recipe together, covered it, and then put it in the fridge overnight.  I didn’t do that, but I did have it in the fridge for about 4 or 5 hours, so it still worked.

It was delicious and it is gone now.  We ate it up pretty quickly.


Due to technical difficulties today, we are using the older format for our recipe.  


Ingredients:

1 16-oz. bag frozen tater tots
Butter for your baking dish
1 T. olive oil
1 lb. spicy bulk breakfast sausage (I used 1 cup Thrive)
1 medium onion, finely diced (who wants to do that?  I used Thrive)
1 cup milk
1/2 cup half-and-half
1/4 t. seasoned salt
1/4 t. cayenne 
4 large eggs
1 red bell pepper, finely diced
1 green bell pepper, finely diced
2 cups grated Cheddar cheese (I used Mexican blend, on hand)
1 cup grated pepper jack cheese (I used regular jack, on hand)
Kosher salt and freshly ground black pepper

Instructions:

  1.  Line up the tater tots in a buttered 9 x 13 baking dish.
  2. Add the olive oil to a large skillet over medium heat.  Add the sausage and onion and cook, breaking the sausage up with a wooden spoon , until browned and cooked through, 8-10 minutes. OR…do what I did and use Thrive foods.  Scoop 2 cups of Sausage Crumbles and about 1/4 cup of already refreshed Thrive chopped onion.  Toast up for a few minutes–seriously, like 4 minutes– in the olive oil.
  3. Set meat aside and let cool a little, then sprinkle over tots.
  4. In a large bowl, mix the milk, half-and-half, seasoned salt, cayenne, eggs, bell peppers and half of each cheese and salt and pepper to taste.  Pour over the tots/sausage mixture, then top with the rest of the cheeses.  Cover with foil and refrigerate overnight or until you need to cook it.
  5. Preheat oven to 350 degrees F.
  6. Bake, covered, for about 25 minutes.  Remove foil and continue to bake until the cheese is brown and bubbly and the casserole is cooked through–about 20-35 minutes.
  7. Cut into squares and serve with sliced tomatoes, grapes or other appropriate sides.


SOURCE:  Ree Drummond, The Pioneer Woman on FoodNetwork.


Bagel Quiches

bagel quicheIt’s a new look for bagels…and quiches!

If you’re bored with the same-old, same-old for breakfast, give this a shot.  We’re always using Thrive Life ingredients in our home, but you could easily sub your own ingredients; Thrive Life just makes prep easier. 

Try some different combinations of flavors!  I think a Caprese combo would be great, and it’s next on my list to try:  basil, tomato dices, and mozzarella!


Bagel Quiches
Serves 1
Quiche in a bagel!
Write a review
Print
Prep Time
10 min
Cook Time
25 min
Prep Time
10 min
Cook Time
25 min
Ingredients
  1. 1 bagel, sliced in half
  2. 2 eggs
  3. 1 pn. salt and pepper to taste
  4. 2 tbsp. THRIVE Red Bell Peppers - Freeze Dried
  5. 2 tbsp. THRIVE Mushroom Pieces - Freeze Dried
  6. 2 tbsp. THRIVE Shredded Cheddar Cheese - Freeze Dried
Instructions
  1. Preheat oven to 375 degrees.
  2. Measure out your Thrive Life veggies/cheeses/meats and place them in a small container with a tight-fitting lid. Add in about a Tablespoon of water and close the lid. Toss every couple of minutes to refresh the ingredients while you prep the other items. (If using non-freeze dried, prep and chop ingredients and set aside.)
  3. Cut a trench into each bagel half by cutting about 1/4" away from the outside edge and the inside hole. Use your fingers to carefully remove the bagel bread from between the cuts; again, being careful not to tear all the way through the bottom.
  4. Cradle each bagel half in foil and place on a baking sheet.
  5. Whisk the eggs in a small bowl or glass measuring cup. Add in the salt and pepper while whisking. Pour enough of the egg into each bagel half to cover the bottom of the trench.
  6. Drain the container with the Thrive Life veggies/cheeses/meats if needed. Using your fingers, sprinkle these ingredients over the egg in your bagel halves. Add more whisked egg over top but do not overfill the bagel (just fill to the top).
  7. Bake for 20-30 minutes or until egg is set (25 minutes in my oven at home). Serve!
Notes
  1. Depending on the size of your bagel, you will use anywhere from 4-8 Tablespoons of Thrive Life ingredients (or your non-freeze dried ingredients).
  2. Try adding Thrive Life's Chef Choice Seasoning or our delicious freeze dried herbs (or whatever herbs you have on hand)!
  3. Use any combo of ingredients you like.
  4. Could be a great way to use up those leftover veggies from dinner!
  5. I used presliced bagels, but would have preferred bakery bagels that are unsliced. Too often, presliced bagels are uneven--the top is thinner than the bottom. Still, it worked. 🙂
  6. You can also use our Thrive's Scrambled Egg Mix! It comes in handy if you're out of eggs, and I promise it is delicious. Even my pickiest eater eats it!
Adapted from Recipe Girl
Mormon Mavens https://www.mormonmavens.com/

Southern Cole Slaw


If you haven’t tried Southern Cole Slaw, you are missing out on the perfect pairing for hot dogs, barbeque (beef or pork), steak or whatever!. This recipe is from my Mom and I have used it for years–now I am sharing it with you.

I am also going to share a shortcut that I just picked up today at our local grocery store.  It will save you a LOT of time and probably some finger skin (gross, right?)–if you use a box grater, then you know what I’m talkin’ about.  You can also grate your cabbage in a food processor.  Here is the link to Chef Buddys Southern Slaw.  This is the already diced cabbage, green bell pepper, and onion.  

You will notice that my recipe does not have bell pepper or onion.  These were ingredients in the packaged slaw mix.  Personally, I prefer not to have those two ingredients but you might like it. My recipe includes carrots so I used Thrive Freeze-Dried Carrots to save time and my fingers.

Southern Cole Slaw
Write a review
Print
Ingredients
  1. 1 head of cabbage, grated*
  2. 2 medium carrots or about 1/3 cup of Thrive Freeze-Dried Carrots
  3. 2/3 cup mayonnaise
  4. 1 1/2 T. apple cider vinegar
  5. 4 t. sugar
  6. 1 t. salt
  7. 3/4 t. celery seed
Instructions
  1. Combine cabbage and carrots in a large bowl and set aside.
  2. Combine remaining ingredients in a small bowl and mix well. Add to the cabbage and carrots and toss until well-blended.
  3. Refrigerate for at least an hour to let the flavors combine.
Notes
  1. * Here is where you substitute the Chef Buddys Southern Slaw pre-diced package.
Adapted from Patricia D. Brew
Mormon Mavens https://www.mormonmavens.com/

Frittata in a Flash


Well this just happened–Frittata in a Flash!  I am visiting in my sister’s home for a few days and today I was put in charge of throwing together some lunch.  We were trying for something kind of Keto and kind of Abs Diet-y and I thought this would do well.  I think it is totally Keto, by the way.  Keto aficionados, please let me know if I am wrong.

So, I just kind of threw this together.  Someone wanted omelettes and this was just quicker since there were 5 of us eating and it was a busy day of errands, odd jobs around the house, and homeschooling.  A huge time-saver was using Thrive freeze-dried vegetables

This was a big hit!  And super easy.

Frittata in a Flash
Write a review
Print
Ingredients
  1. 10 eggs,
  2. Turkey sausage (about 1/4 or so of a bulk package)
  3. 2 Roma Tomatoes, chopped
  4. 1/2 cup Thrive freeze-dried asparagus
  5. 1/4 cup Thrive freeze-dried green onions
  6. 2 T. sour cream
  7. 1 1/2 cups shredded cheddar cheese (shred your own from a brick of cheese)
  8. Salt and pepper to taste
  9. Olive oil or spray
Instructions
  1. Preheat oven to 350 degrees Fahrenheit.
  2. Refresh the asparagus and onions in a little bit of water in a container with a lid. Shake a few times while you prepare the rest of the ingredients. Drain off excess water before adding to the sausage.
  3. Spray a large oven-proof skillet with olive oil spray and heat on medium-high heat.
  4. Add the turkey sausage and brown it as you chop it into small pieces.
  5. Add the tomatoes, onions, and asparagus and saute for a few minutes to bring out the flavor. Add salt and pepper to taste.
  6. Whisk the eggs to blend well, adding sour cream and cheese. Pour egg mixture into skillet and stir to incorporate the vegetables and sausage.
  7. Cook for a few minutes and then reduce to medium and cook until almost firm. Check the bottom of the frittata to make sure you aren't over browning it, since you will be putting it in the oven.
  8. Put the skillet in the oven for about 8 minutes to complete the cooking.
  9. You're done! Eat it!
Notes
  1. An afterthought: mushrooms would have been a great addition!
Mormon Mavens https://www.mormonmavens.com/

Crazy Leftover Soup


It was one of those days when I just could not think of anything to fix for supper, it was Sunday so I wasn’t going to the store, so I checked my “home store” and found a couple of packages of frozen Vegetables for Stew (I don’t know why I bought these and don’t even know WHEN I bought them), I had one leftover cooked chicken breast, and of course, I had plenty of Thrive Foods to add to any dish.  And that, my friends, is how you end up with some crazy soup made from leftovers.  And guess what?  It tasted really good!  

Crazy Leftover Soup
Write a review
Print
Ingredients
  1. 2 bags frozen Vegetables for Stew Mix
  2. 3-5 T. of chopped fresh cilantro
  3. 1 15-oz. can of Cannelini Beans
  4. 1 15-oz. can chopped tomatoes with juice
  5. 1 cup cooked brown rice
  6. 1 cooked chicken breast, cut in bite size pieces
  7. 1/2 c. THRIVE cooked ground beef
  8. 1 c. THRIVE Sweet Corn
  9. 1 c. THRIVE Green Peas
  10. 1 c. THRIVE Zucchini
  11. 2 T. Bacon grease
  12. THRIVE Chef's Choice Blend Seasoning to taste
  13. Salt to taste
  14. 4 cups of water or more, as needed
Instructions
  1. Dump all the ingredients in a large pot.
  2. Bring to a boil and then reduce heat and simmer as long as you would like to. I did mine until the house started smelling yummy.
Mormon Mavens https://www.mormonmavens.com/

Chicken & Wild Rice Pilaf

Chicken & Wild Rice Pilaf

I am all about quick and easy and this recipe is, as well.  I used one of our Thrive Life Express Meals–Wild Rice Pilaf–and added chicken to give it a little protein boost.  So delicious, so easy, so quick, so also goes well in a flour tortilla.  You could use your own pilaf recipe or boxed rice pilaf and leftover chopped chicken.  I tend to go to my Thrive Foods because I like to find ways to incorporate these items from my Home Store on a regular basis.  Either way, this is yummy and your family will enjoy it, especially if it keeps your kitchen time down during a laid back or busy summer.  Well, any season for that matter.

Chicken & Wild Rice Pilaf
Quick & easy side or main dish!
Write a review
Print
Ingredients
  1. 1 pkg. Thrive Life Wild Rice Pilaf Express Meal (or your choice of pilaf)
  2. 1 - 2 cups Thrive Chopped Chicken, rehydrated
  3. Butter
Instructions
  1. Mix contents of package with 2 1/2 cups boiling water.
  2. Add 2 T. butter to the rice. Simmer for 5 minutes, covered.
  3. Let stand for 5 minutes, then add the chicken. Stir to mix well.
  4. Serve.
Adapted from Thrive Life Express Meals
Mormon Mavens https://www.mormonmavens.com/

Tomato & Corn Salad

Corn & Tomato Salad 2


Isn’t it fun to be creative with your leftovers?  Recently I served Slow Cooker Roast Beef, garden peas, sweet corn, and mashed potatoes for dinner when two of our missionaries from church joined us for supper.  Comfort food.  Real food.  Surprisingly, there were some leftovers of the vegetables so I used them for sides with my next meal which was a Thrive Express Meal of Fettuccine Alfredo.  (future post, so stay tuned).  I put the peas in with the Fettuccine.  That was yummy.  For the corn, I decided to combine that with some grape tomatoes that I needed to use up and added a few more things to dress it up.  So that is how we get this recipe.

Tomato & Corn Salad
Great way to use leftover veggies!
Write a review
Print
Ingredients
  1. grape tomatoes, as many as you want
  2. Thrive Sweet Corn
  3. Thrive Green Peas
  4. Mozarella cheese, shredded
  5. Red Wine Vinegar
  6. Thrive Chef's Choice All-Purpose Seasoning
  7. Salt to taste
Instructions
  1. Combine all ingredients except the salt, and toss. Taste and then add salt as needed and toss again.
  2. Serve cold.
Mormon Mavens https://www.mormonmavens.com/

Sweet & Sour Meatballs

sweet and sour meatballs

Sometimes I like to share recipes that help me use my Thrive foods from my Home Store.  It is always a good idea to “store what you eat and eat what you store.”  I threw together this meal in record time thanks to the cooked ground beef and some other Thrive ingredients that I had on hand.  This recipe was a huge hit.  I had one serving left, only because I had taken some out to get a picture for the blog.  I didn’t use that one and used my filled plate instead.  

Sweet & Sour Meatballs
Quick and delicious version of a classic recipe.
Write a review
Print
Ingredients
  1. 2 cups THRIVE Cooked Beef, Ground
  2. 1/2 cup seasoned dry bread crumbs
  3. 1/4 cup THRIVE Instant Milk, re-hydrated (3/4 T. powder + 1/4 cup water)
  4. 2 T. THRIVE Chopped Onions (FD--freeze-dried)
  5. 1 t. THRIVE Iodized Salt
  6. 1/2 t. Worcestershire sauce
  7. 1 THRIVE Whole Egg, re-hydrated (1 T. powder + 2 T. water)
  8. 1/2 cup THRIVE Brown Sugar, packed (I just used brown sugar from the store)
  9. 1 T. cornstarch
  10. 1 20-oz. can pineapple tidbits with juice
  11. 1/3 cup apple cider vinegar
  12. 1 T. soy sauce
  13. 1/8 cup THRIVE Mixed Bell Peppers
  14. 5 cups THRIVE White Rice, prepared (I used rice from the store)
Instructions
  1. Re-hydrate freeze-dried meat by bringing 4 cups water to a boil. Add beef and boil for 5 minutes. Drain excess water.
  2. Mix meat, dry bread crumbs, milk, onions, salt, Worcestershire sauce, and egg together; shape into twenty 1 1/2 inch sized balls.*
  3. Place in skillet and cook over medium heat, turning occasionally until brown (about 20 minutes) OR (and this is what I did, so I could be working on something else like setting the table) Bake in an ungreased 9 X 13 pan at 400 degrees F for 20-25 minutes, until light brown.
  4. Mix brown sugar and cornstarch in a skillet. stir in pineapple with juice, vinegar, and soy sauce.
  5. Heat to boiling, stirring occasionally. Reduce heat to medium, then add meatballs and peppers.
  6. Cover and let simmer, stirring occasionally, for 10-15 minutes. Serve over cooked rice.
Notes
  1. I made my meatballs ahead of time, put them in the fridge, and then baked them when I got home from work. They are quick to come together anyway, because the ground beef comes precooked, but any little thing I can do ahead of time is good when you work until 5:00 and your guests are coming at 6:00, you know?
Adapted from Thrive Cookbook
Mormon Mavens https://www.mormonmavens.com/

Chicken Vegetable Casserole

 
Tonight for supper I decided to try a meal from food storage.  I get automatic shipments of foods from THRIVE.  I really want to make this work for our family. I have the THRIVE cookbook so that I can use and rotate the foods in normal use.  This recipe is from that cookbook.  


Sprinkle a little dill weed on it for color and flavor!
 
 
Ingredients:
I cup THRIVE Chopped Chicken (freeze dried)
4 cups THRIVE Egg Noodle Pasta
1/2 cup THRIVE Sweet Corn (freeze dried–I don’t have this yet so I used canned corn on hand)
1/2 cup THRIVE Celery (freeze dried)
1/2 cup THRIVE Carrot Dices (I used dehydrated carrot dices canned previously)
1 tablespoon THRIVE Chopped Onions (freeze dried–I used dehydrated minced onions canned previously) 
1 teaspoon THRIVE Iodized Salt (I used salt on hand)
1 teaspoon garlic powder
1 teaspoon dried thyme
2 cups THRIVE Classic Gravy (see recipe below)
1/4 cup THRIVE Powdered Milk, rehydrated (3/4 tablespoon powder + 1/4 cup water–I used previously canned non-fat dehydrated powdered milk)
1 cup Parmesan, shredded
 
 
1.  In a small bowl, cover chicken dices with warm water.  Let sit for 5-10 minutes or until softened and rehydrated.  Drain.
 
2.  Preheat oven to 350 F.
 
3.  In a large pot of salted boiling water, cook egg noodle pasta according to directions on can.  Drain noodles, then toss with gravy and milk in a large bowl with the vegetables and onion until completely coated.  Add salt, garlic powder, and thyme.
 
4.  Toss mixture with chicken and stir to combine.  Pour into casserole dish (I used a 9 x 13) and top with 1/2 cup Parmesan cheese.
 
5.  Cover casserole with foil and bake at 350 F for 20 minutes, or until bubbly.  Take off foil and top with remaining 1/2 cup Parmesan cheese.  Bake an additional 15 minutes.
 
 
THRIVE Classic Gravy
Ingredients:
4 tablespoons butter (I used 5 tablespoons from two partial sticks so that I could use them up)
1 cup THRIVE Powdered Milk,dry (I used non-fat powdered milk on hand)
1/4 cup THRIVE White Flour (I used all-purpose flour on hand)
3 cups water 
3 teaspoons THRIVE Chicken Bouillon
3/4 teaspoon THRIVE Iodized Salt (I used salt on hand)
3/4 teaspoon pepper
 
Th
1.  In a medium saucepan, melt butter.  Whisk in powdered milk and flour.  
 
2.  Gradually add the water to the powdered milk mixture and whisk in the chicken bouillon.
 
3.  Add salt and pepper and cook over medium heat, stirring constantly until gravy is thickened and smooth.  Remove from heat.


Source:  Shelf Reliance THRIVE Cookbook