Breakfast PLT


What are some of your favorite cooking shows on TV?  I have several and one of them is Giada at Home . First of all, she lives at the beach and being able to see the ocean from the window behind her is awesome.  Second, she whips up some of the most delicious looking dishes I have ever seen on television and she makes it look so easy.  

Don’t even get me started on the episodes she films in her outdoor kitchen in Italy.  Oh my!

One day I happened on her show and she was in that outdoor Italian kitchen and making items that she likes to prepare for herself and her daughter for breakfast.  Her daughter isn’t much of a breakfast gal, but Giada always manages to make something she is willing to eat.  

Like, who is not going to eat something Giada makes–plus she is the mom.

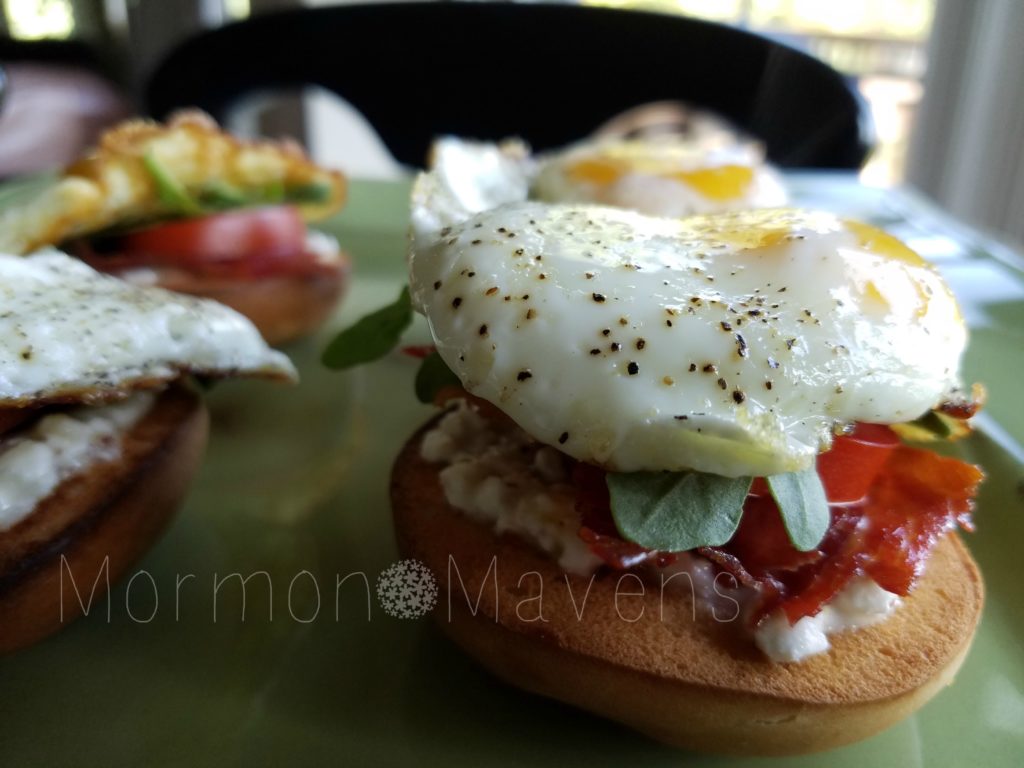
The Breakfast PLT (Pancetta, Lettuce & Tomato) is one of the coolest looking dishes that I have seen on the show.  It’s a crazy take on the tradition BLT sandwich we all know and love, but this one is served at breakfast.    

I made these this morning before church, and honestly it was so easy to prepare.  I don’t know why I waited so long to share the recipe.  I even bought the pancetta way long ago.  Let me tell you, that “Italian bacon” has a long out-date!  I still have a couple of weeks to use it up.

Breakfast PLT
Write a review
Print
Ingredients
  1. 1 T. whole-grain mustard
  2. 1/4 cup water
  3. 1/2 cup small curd cottage cheese (original recipe calls for 4 oz. fresh goat cheese at room temperature)
  4. 4 mini bagels, split
  5. 2 t. extra-virgin olive oil
  6. 8 thin slices pancetta
  7. 8 small eggs, room temperature (original recipe says quail eggs)
  8. kosher salt and freshly ground black pepper
  9. 2 Roma tomatoes, cut into 1/2-inch slices
  10. 1 cup baby arugula (or romaine or butter lettuce would be good)
Instructions
  1. In a small saucepan over medium heat, bring the mustard and 1/4 cup water to a simmer. Whisk in the cottage or goat cheese until combined. Set aside; it will thicken as it cools.
  2. Toast the bagels until golden brown and crispy. Set aside.
  3. In a medium nonstick skillet, heat 1 t. of the olive oil over medium heat. Add 4 slices of the pancetta and cook until golden brown and crispy on both sides, about 2-3 minutes per side. Drain the pancetta on paper towels. Repeat with remaining pancetta.
  4. Heat the remaining 1 t. of olive oil in a small frying pan over medium-low heat. Crack the eggs, into the pan. If using small eggs, two at a time works. Quail eggs, 4 at a time. Sprinkle with salt and pepper and cook until the whites are set but the yolks are still runny, 2-3 minutes. If you are not using quail eggs you will need to "train" your egg whites so that they won't be too big for the PLT. I just use my spatula and try to corral the whites closer to the yolk. Remove to a plate and repeat with the remaining eggs.
  5. To build the PLT: Spread each bagel half with 1 T. of the cheese sauce. Layer with a slice of pancetta, slice of tomato, and some arugula. Top with the fried egg and a grind of freshly ground black pepper. Serve.
Notes
  1. This makes 8 servings and that is fine if you are serving other foods along with these. If not, this would be more like 4 servings--2 per person.
Adapted from Giada at Home
Mormon Mavens https://www.mormonmavens.com/

Pesto Grilled Cheese


Pesto Grilled Cheese. <sigh>

So my son came back from a recent trip to visit his girlfriend in Utah, and mentioned that he’d had a grilled cheese with pesto. 

“Mom, can we make pesto?”

Duh.  Thrive Life has freeze dried basil, and why have I not tried that before and why am I drooling right now typing this?

Cuz I stinkin’ love basil, that’s why.

So, shaking my head in wonder as to why I’d never thought to make homemade pesto before, I pulled out my phone and searched the Thrive Life recipe site because I just knew our Chef Todd had a recipe for it.  He did.  Yay! 

I told my son he could make it.  (You gotta make them do the things, right?)

IT. WAS. AMAZING.

So of course, I have to share it with you!  The pesto is exactly the same as Chef Todd’s recipe, we just smeared it on our grilled cheese.  We’ve used Gouda, Provolone, Cheddar, and Colby Jack so far.  My fave is Cheddar.  Experiment with your fave cheeses and let me know which turned out best for you!

Pesto Grilled Cheese
Serves 4
This is by far my favorite way to eat a grilled cheese sandwich! If you love pesto.....well, you're welcome.
Write a review
Print
Prep Time
5 min
Cook Time
5 min
Total Time
10 min
Prep Time
5 min
Cook Time
5 min
Total Time
10 min
Ingredients
  1. 1/4 c. pine nuts
  2. 1/4 c. Grated Parmesan Cheese
  3. 1/2 tsp. minced garlic
  4. 2 tbsp. water
  5. 1/4 c. THRIVE Basil
  6. 1 tbsp. THRIVE Parsley
  7. 1/4 tsp. Salt, Table
  8. 1/8 tsp. THRIVE Peppercorn
  9. 1/4 c. really good olive oil
  10. The Sandwich
  11. 8 sli. bread of your choice
  12. 16 sli. cheese of your choice (thin sliced is what we used)
  13. 8 tbsp. butter
Instructions
  1. Using a food processor, pulse together the pine nuts, parmesan, and garlic until well-combined. Add in water, herbs, and salt & peppercorn and pulse again until combined.
  2. Add in the olive oil slowly through the chute while the processor is running. Once combined, remove pesto to a bowl and stir by hand to incorporate all the oil.
  3. Heat a griddle or skillet to medium heat.
  4. Butter one side of each slice of bread. Have your pesto and cheese slices at the ready.
  5. When cook surface is at temperature, place one slice of bread (butter side down) on the griddle, add 2 slices of cheese and spread a heaping tablespoon of pesto over the cheese. Top with a slice of bread, butter side up.
  6. Cook on both sides until golden brown. Enjoy!
Notes
  1. Make up the pesto and keep it in the fridge. Then you can have a pesto grilled cheese anytime you want!
  2. I like my pesto with just a little more salt than Chef Todd's recipe. Adjust according to your tastes.
  3. We've tried Cheddar, Colby Jack, Gouda, and Provolone in these. I think Cheddar is my favorite!
  4. We actually used our George Foreman grill for this at home. An advantage to using this, if you have one, is that you can use much thicker bread and it will compress. We were able to use up some thick sandwich rolls this way!
  5. Really good olive oil? I use a Picual from Beaufort Olive Oil Company. It makes a difference, in my opinion. But use what you have.
Mormon Mavens https://www.mormonmavens.com/

Sticky-Buns in Cast Iron

sticky buns in cast iron

Buns of Iron?

Okay, that was pretty lame.  But I couldn’t help it.

I’ve never made sticky buns before but when I saw a recipe making them in a cast iron skillet I knew I had to try it.  I love my cast iron cookware and use it all the time.  I especially love finding recipes where I can bake with it.

I followed the original recipe directions and made 9 large buns, but next time I will make smaller ones.  I think the sticky-to-bun ratio is better that way.  I also used my Thrive Life Country White Dough Mix for the bread.  Use any basic bread dough recipe you like.  Or maybe you love the frozen roll dough!  That’s even easier than using a mix.  Whatever works for you!  My dough mix recipe is for one loaf’s worth of dough.

I used a 9″ square cast iron skillet (my grandmother’s).  So to make it mathematically easy, I’ll divide the dough into 16 equal pieces and do a 4×4 arrangement.

Do you like cast iron?  If so, what’s your favorite piece?

Sticky Buns in Cast Iron
Bread, butter, sugar.....like seriously....do I need to say more?
Write a review
Print
Prep Time
1 hr 20 min
Cook Time
25 min
Prep Time
1 hr 20 min
Cook Time
25 min
Ingredients
  1. The Bun Dough
  2. 1 c. warm water
  3. 2 tbsp. warm water
  4. 2 1/4 tsp. Active Dry Baker's Yeast
  5. 2 tbsp. honey
  6. 3 3/4 c. THRIVE Country White Dough Mix
  7. The Sticky Stuff
  8. 1/2 c. butter, softened
  9. 1/2 c. brown sugar
  10. 1 tsp. Ground Cinnamon
  11. 3 tbsp. honey
  12. 1 pn. salt
  13. 1/4 c. pecan halves
Instructions
  1. Prep the Dough
  2. Add the water, yeast, and honey to the bowl of a stand mixer equipped with the dough hook. Slowly add in the dough mix. Once it's all incorporated, knead in mixer for about 5 minutes.
  3. Spray a medium bowl with cooking spray. Form the dough into a ball and place in the bowl, turning to coat it with the cooking spray. Cover and allow to rise for about 40 minutes.
  4. When dough has doubled in size, punch it down and divide it into 9 pieces (or 16 as mentioned in the description). Set aside while you prep the sticky stuff.
  5. Prep the Sticky Stuff
  6. Combine all but the pecans in a medium bowl and stir well to combine everything.
  7. Spread this onto the bottom and up the sides of the cast iron skillet.
  8. Place the pecan halves evenly over the sticky stuff. (If you want it to be pretty, make sure you have the flatter side of the pecan facing up.)
  9. Dough + Sticky Stuff
  10. Take the dough pieces and roll into balls. Place these evenly over the sticky stuff. Cover and allow to rise about 30 minutes.
  11. Preheat oven to 375 degrees.
  12. Bake the skillet, uncovered, for 20-30 minutes or until rolls are golden and dough is cooked through. Allow to sit for 15 minutes once you remove it from the oven.
  13. Place a large plate upside-down over the skillet and carefully flip so that the rolls release onto the plate. Enjoy!
Notes
  1. Makes 9 large rolls, but you could make smaller rolls. I would make 16 for my square skillet.
Adapted from Rie McClenny
Mormon Mavens https://www.mormonmavens.com/

Tater Tot Breakfast Casserole


It was one of those days when I felt the urge to serve breakfast for supper.  

And so I did.  

Fortunately, I was watching Pioneer Woman while ironing a million white shirts earlier in the day and she was preparing a brunch which looked mighty delicious. I went to the Food Network site and found her show…and this recipe.

Now, she was prepping for a brunch with friends for “the next day” and so she put the recipe together, covered it, and then put it in the fridge overnight.  I didn’t do that, but I did have it in the fridge for about 4 or 5 hours, so it still worked.

It was delicious and it is gone now.  We ate it up pretty quickly.


Due to technical difficulties today, we are using the older format for our recipe.  


Ingredients:

1 16-oz. bag frozen tater tots
Butter for your baking dish
1 T. olive oil
1 lb. spicy bulk breakfast sausage (I used 1 cup Thrive)
1 medium onion, finely diced (who wants to do that?  I used Thrive)
1 cup milk
1/2 cup half-and-half
1/4 t. seasoned salt
1/4 t. cayenne 
4 large eggs
1 red bell pepper, finely diced
1 green bell pepper, finely diced
2 cups grated Cheddar cheese (I used Mexican blend, on hand)
1 cup grated pepper jack cheese (I used regular jack, on hand)
Kosher salt and freshly ground black pepper

Instructions:

  1.  Line up the tater tots in a buttered 9 x 13 baking dish.
  2. Add the olive oil to a large skillet over medium heat.  Add the sausage and onion and cook, breaking the sausage up with a wooden spoon , until browned and cooked through, 8-10 minutes. OR…do what I did and use Thrive foods.  Scoop 2 cups of Sausage Crumbles and about 1/4 cup of already refreshed Thrive chopped onion.  Toast up for a few minutes–seriously, like 4 minutes– in the olive oil.
  3. Set meat aside and let cool a little, then sprinkle over tots.
  4. In a large bowl, mix the milk, half-and-half, seasoned salt, cayenne, eggs, bell peppers and half of each cheese and salt and pepper to taste.  Pour over the tots/sausage mixture, then top with the rest of the cheeses.  Cover with foil and refrigerate overnight or until you need to cook it.
  5. Preheat oven to 350 degrees F.
  6. Bake, covered, for about 25 minutes.  Remove foil and continue to bake until the cheese is brown and bubbly and the casserole is cooked through–about 20-35 minutes.
  7. Cut into squares and serve with sliced tomatoes, grapes or other appropriate sides.


SOURCE:  Ree Drummond, The Pioneer Woman on FoodNetwork.


Bagel Quiches

bagel quicheIt’s a new look for bagels…and quiches!

If you’re bored with the same-old, same-old for breakfast, give this a shot.  We’re always using Thrive Life ingredients in our home, but you could easily sub your own ingredients; Thrive Life just makes prep easier. 

Try some different combinations of flavors!  I think a Caprese combo would be great, and it’s next on my list to try:  basil, tomato dices, and mozzarella!


Bagel Quiches
Serves 1
Quiche in a bagel!
Write a review
Print
Prep Time
10 min
Cook Time
25 min
Prep Time
10 min
Cook Time
25 min
Ingredients
  1. 1 bagel, sliced in half
  2. 2 eggs
  3. 1 pn. salt and pepper to taste
  4. 2 tbsp. THRIVE Red Bell Peppers - Freeze Dried
  5. 2 tbsp. THRIVE Mushroom Pieces - Freeze Dried
  6. 2 tbsp. THRIVE Shredded Cheddar Cheese - Freeze Dried
Instructions
  1. Preheat oven to 375 degrees.
  2. Measure out your Thrive Life veggies/cheeses/meats and place them in a small container with a tight-fitting lid. Add in about a Tablespoon of water and close the lid. Toss every couple of minutes to refresh the ingredients while you prep the other items. (If using non-freeze dried, prep and chop ingredients and set aside.)
  3. Cut a trench into each bagel half by cutting about 1/4" away from the outside edge and the inside hole. Use your fingers to carefully remove the bagel bread from between the cuts; again, being careful not to tear all the way through the bottom.
  4. Cradle each bagel half in foil and place on a baking sheet.
  5. Whisk the eggs in a small bowl or glass measuring cup. Add in the salt and pepper while whisking. Pour enough of the egg into each bagel half to cover the bottom of the trench.
  6. Drain the container with the Thrive Life veggies/cheeses/meats if needed. Using your fingers, sprinkle these ingredients over the egg in your bagel halves. Add more whisked egg over top but do not overfill the bagel (just fill to the top).
  7. Bake for 20-30 minutes or until egg is set (25 minutes in my oven at home). Serve!
Notes
  1. Depending on the size of your bagel, you will use anywhere from 4-8 Tablespoons of Thrive Life ingredients (or your non-freeze dried ingredients).
  2. Try adding Thrive Life's Chef Choice Seasoning or our delicious freeze dried herbs (or whatever herbs you have on hand)!
  3. Use any combo of ingredients you like.
  4. Could be a great way to use up those leftover veggies from dinner!
  5. I used presliced bagels, but would have preferred bakery bagels that are unsliced. Too often, presliced bagels are uneven--the top is thinner than the bottom. Still, it worked. 🙂
  6. You can also use our Thrive's Scrambled Egg Mix! It comes in handy if you're out of eggs, and I promise it is delicious. Even my pickiest eater eats it!
Adapted from Recipe Girl
Mormon Mavens https://www.mormonmavens.com/

Fresh Basil


Have you ever grown your own fresh Basil? There is something so fulfilling and productive about going outside and picking your own food.  This is the closest I have gotten to doing that in over a decade.

We had fresh Caprese Salad the other night for supper–one of our favorite summer dishes. Oh my goodness, it smelled so fresh and tasted so delicious.  

Not quite sure how my Basil fared the hail storm yesterday.  We will just have to wait and see…