Banana Bread

I am back…I have been so sick but am finally feeling better.  It feels good to cook again.  This is my favorite Banana Bread recipe.  It is moist, cuts without crumbling, and has the yummiest crust (as shown in the picture).  Enjoy!

6 ripe mashed bananas
3 1/2 c. sugar
4 beaten eggs
1 c. oil
1/2 c. sour cream
2 t. vanilla

Mix above ingredients together well.  In another bowl mix together the following ingredients:

4 c. flour
1 1/2 t. salt
2 1/2 t. soda

Mix together the dry and wet ingredients and pour into 3 greased regular size loaf pans.  Bake at 325 for 1 hour.

Source: Katie Palmer

3 Layer Ice Cream Cake

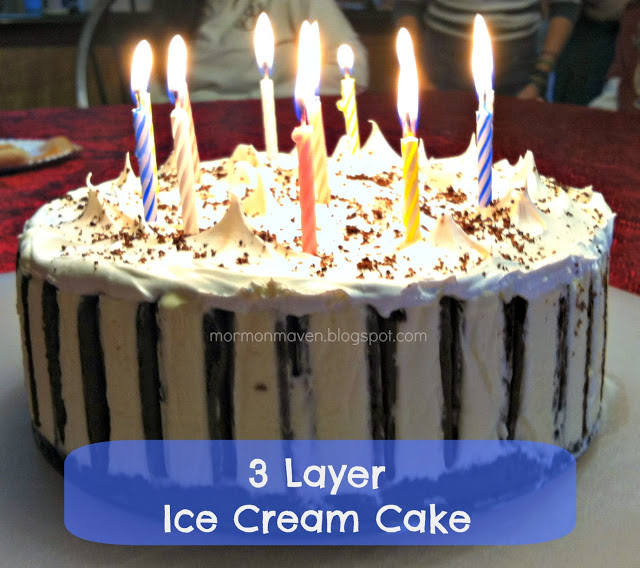
This is the most awesome ice cream cake, and it’s so easy to make! You have to try this!

Ingredients:
1 pack of Oreos
3 quarts of your favorite ice cream
1 box ice cream sandwiches – keep in freezer until ready to use
Cool Whip

Instructions:
1. You will need a springform pan. Spray the pan with non-stick cooking spray. Cut strips of wax paper to line the pan. The spray will help the wax paper stick to the pan.

2.. Put about half of the Oreos in a blender and blend to make fine crumbs, or small chunks, whichever you prefer. (You can also put the Oreos in a bowl or zip lock bag and crush with a wooden mallet. Sometimes I use the bottom of a drinking glass and gently tap to break the cookies into small pieces.) Save a tablespoon of crumbs or chunks to sprinkle on top of the final layer. Add a little water to your crushed Oreos so that they stick together a bit and you can press them into the bottom of your springform pan. I used a little too much water by accident and made almost an Oreo brownie. : )  It was good, but I prefer the bottom more crumbly instead of gooey.


3. Cut several ice cream sandwiches into 4ths like the picture shows. You will need enough to line the whole pan. That will depend on the size of your springform pan. I used about 8 ice cream sandwiches for mine. I personally like the WalMart brand better than some of the name brands I have tried.They have a good shape and texture for this. It’s a messy job, so be prepared to ruin a few and eat them.

4. Line the pan with the pieces of ice cream sandwich. Make sure the outside rounded edge of the icecream sandwich is facing up and against the pan. This will be what everyone sees when you take off the springform pan, so try to make it pretty.

5. Scoop out about 3/4 of the ice cream for your first layer and put into a bowl. The whole quart would be too much. If you have a smaller springform pan, then maybe half of it would do…I have bought the fancy pints of ice cream for making these in a smaller springform pan. Stir the ice cream until soft and smooth. We have been known to add chunks of brownie, nuts, huge Oreo chunks, or whatever we are craving in each layer! Yum! Pour into pan. You may want to put it in the freezer for 15-30 minutes or so to let that layer get firm. if you don’t, your layers will not be straight.


6. Repeat step 5 for the 2nd layer.

7. Repeat step 5 for the 3rd layer. 

8. Spread Cool Whip over the top. Try to make it look pretty. I make little peaks on mine by using the back of the spoon. I can’t explain that…just try to make it look pretty. : )

 9. Sprinkle some Oreo crumbs on the top. This is as creative as I get, but I’m sure you could add some special touches to make it look really pretty. 

10. Put it in the freezer and let it freeze hard for 24 hours. Every time I have made it in the morning and tried to serve it that night, it was not frozen enough and it was more of a blob than beautiful layers. Take out of freezer and remove the outside of the springform pan and the wax paper. Cut and serve! Everyone will love it! : )

Notes: 

1. I did not freeze each layer before I added the next because I was trying to hurry, and I ended up with waves of color and not exact layers. (See picture below.) No one cared though and we ate every last bite of this! 

2. My favorite one I have made had pink, white and green layers. The colors were beautiful with the Oreo bottom and the Cool Whip topping. I used a strawberry ice cream, but the ice cream was white, so we added a drop or two of red food coloring to make it pink. Then we used a vanilla bean vanilla ice cream for the middle. For the 3rd layer, we used a mint chocolate chip ice cream, but the ice cream was white, so we added a few drops of green food coloring. It was stunning and the flavors were amazing!

3. Feel free to add cookie pieces, brownie chunks, nuts, mini marshmallows, or whatever you like in your ice cream! 

Creamy White Queso Dip

I admit that this is not the most appealing picture, but let me tell you, this is the BEST home made queso dip I have ever had! I have tried a few and I love this one. I also love that it is made with real cheese, not cheese product. 
Creamy White Queso Dip
1 lb. White American Cheese (I get it in the deli section of my grocery store. You may need to get it sliced at the deli)
1-4 oz. can green chilies
1/2 (or so) can Rotel
1 C. plus a bit of heavy cream 
In a medium sauce pan, combine all ingredients (break up or chop the cheese into small chunks.) Cook over medium heat, whisking occasionally until cheese is melted and creamy. Add more cream to get the consistency you want. 
Serve with chips, or, as we like it, with home made pretzel bites! 
Recipe source: my sis in law, Sami.
 

Pumpkin Pie Bites

I love finger food.  I guess I’m just too lazy to use a fork or something, I dunno.  I just think finger food is way more fun.  So finding a way to eat pumpkin pie with my fingers is just cooler than the flip side of my pillow.

Ingredients:
2 refrigerated ready-to roll pie crusts
1 egg white
8 oz. cream cheese, softened
1/2 cup sugar
1 cup canned pumpkin
2 eggs
1 teaspoon vanilla
1 teaspoon pumpkin pie spice
biscuit/round cutter
1/2 cup chocolate morsels
vegetable oil (I used coconut oil)
re-sealable plastic bags or frosting bag

1.  Preheat oven to 350 degrees.  Roll out pie crust onto lightly floured board and thin it out just a bit with a rolling pin.  Cut circles with a biscuit cutter.  Easing the fullness in as you go, gently press the circles into the cups of a mini muffin pan.  With the scraps on the board, cut little stems and adhere them to the crust in the cups with a tiny bit of water.  Brush the tops of the crusts with beaten egg white.
2.  Mix cream cheese, sugar, canned pumpkin, 2 eggs, vanilla, and pumpkin pie spice together until well combined.  Spoon one tablespoon of this mixture into each of the crusts.  (Pumpkin filling should be level with the top of the crust, more or less.)
3.  Bake for 15-18 minutes.  Remove pie bites from muffin pan and place on cooking rack to allow to cool completely.
4.  Melt chocolate (semi or milk, doesn’t matter) in a microwave-safe bowl until melted (30 seconds at a time).  Stir until smooth, adding enough vegetable oil to get it to piping consistency.  Pour this into a sturdy ziploc bag (or a frosting bag), close, and snip the corner just enough to make a small opening.  Decorate the pie bites with a drizzle or with a jack-o-lantern face.

Makes about 2 dozen pie bites

Source:  Bakerella

Homemade Playdough


I love this recipe! It makes the BEST playdough! And it’s is safe for little ones, has a nice texture to play with, and it comes out of clothes and carpet with just a moist rag. Such a fun, cheap easy activity for kids! 

Homemade Playdough

Ingredients:
1 cup all purpose flour
2 tsp cream of tartar
1 cup water
1/2 cup salt
1 TBSP oil
food coloring (I have used liquid drops and gel. Either one works great!)

Directions:
1. Mix flour, cream of tartar and salt together in a saucepot (no heat yet!). Add water, oil and food coloring. 

2. Stir mixture together. Make sure you have the right amount of food coloring so that it is the color you want. This is the only chance you have to add more coloring!

3. Turn heat on high and stir constantly until it forms a ball. This happens really fast! 

4. As soon as it has formed a ball and most of the wetness is gone, dump playdough onto a counter or cutting board. Let cool for a few minutes, and knead to until smooth. If you overcook it, the dough will be a little dry. I like to take it off the heat with a little wetness still showing in the dough, and then knead it until smooth. (See picture and explanation below.)

5. Store in a plastic bag. Have fun! (I put it in a plastic bag while still warm, so it keeps the moisture and does not dry out.)

Note: I always make a double batch, or a few batches with different colors. One batch will not be quite enough to share happily with 2 or 3 children. More is better!

Source: Adapted from Cookin’ With Home Storage by Vicki Tate

This is what it looks like as it starts forming a ball. See how it is still wet? At this stage, I would flip the dough over and let the wet part touch the hot pan and then take it out with just a few wet spots on the dough. Once you make your first batch, you’ll understand how fast it forms a ball, and when to take it out of the pan! 

Raspberry Cheese Dip

When I first saw this dish and asked what was in it, I was expecting…well…gross.  It just sounded nasty to me.  And then I tasted it.  Heaven!   This recipe is one of the most-requested recipes among my own collection of favorites and I have gotten several people addicted to it!  My oldest son, who is pickier than anyone else I know, loves this dip.  It gets eaten up in no time whenever I make it.

Ingredients:
4 cups shredded sharp cheddar cheese
1 cup mayo
2 green onions, chopped
12 ounces raspberry preserves
Ritz crackers

1.  Combine cheese, mayo, and onions in mixing bowl.  Fold together until well blended and spread in a shallow dish (pie plate works well).
2.  Spread raspberry preserves across the top of the cheese mixture.  Refrigerate until ready to serve.

Serve with Ritz crackers.

Source:  fellow Maven (and sister!) Amy

HEALTHY Deep Dish Cookie Pie

This recipe is going to SHOCK you!

I’ve been trying to eat better so I can drop a few pounds and improve my health. BUT I LOVE A WARM HOMEMADE CHOCOLATE CHIP COOKIE!!! I have to get my cookie fix, so I searched and found this healthy alternative.

How can a deep dish cookie pie be healthy? BEANS! You might be skeptical, but just read it and try it! It will take the guilt out of your guilty pleasure!

Deep Dish Cookie Pie

Ingredients:

2 cans white beans or garbanzos (drained and rinsed) 
1 cup quick oats
1/4 cup unsweetened applesauce
3 tbsp oil (canola, vegetable, or coconut)
2 tsp vanilla extract
1/2 tsp baking soda
2 tsp baking powder
1/2 tsp salt
1 and 1/2 cups brown sugar (I only used 1 cup) *see notes for sugar free
1 cup chocolate chips (maybe not truly healthy, but definitely yummy!)

Directions:

1. Blend all of the ingredients in a food processor,  except the chocolate chips. If you do not have a food processor, mash the beans as well as you can first, and then use a hand mixer or Bosch or Kitchen Aid (or something like it) to mix the batter. 

2. Mix in chips, and pour into an oiled pan. I used a deep dish pie pan, but you can use a small casserole dish, a springform pan, etc.  

3. Cook at 350 degrees for about 35-40 minutes. Let it cool for 10 minutes or so before cutting and removing from the pan. 

4. Serve with ice cream, chocolate syrup, nuts and whipped cream….or whatever your heart desires. YUM!

Notes: 
* If you want to go sugarless, you can omit the brown sugar and use 4 packets of Stevia, and/or 2 cups of pitted dates, blended up in a food processor. You might want to half the recipe and play around with it a bit to suit your tastes and dietary needs. This definitely has the potential to be an amazing treat that is gluten free and sugar free! I don’t mind having a little sugar, and I thought it was great with 1 cup of brown sugar, but my children would have preferred it to be a little sweeter. I’m making it with dates next time!

Source: Chocolate Covered Katie


Cowboy Caviar

I love my summer garden, and Cowboy Caviar is one of my favorite recipes that I make from the delicious goodies I get from it. I make huge bowls of this at a time. I’ve even lost a few pounds while eating this all week. Delicious and healthy!


Cowboy Caviar


Here is the original recipe I had:

1 15 oz can of black-eyed peas, rinsed and drained
1/4 cup thinly sliced green onion
1/4 cup diced red or orange sweet pepper
2 TBSP olive oil
2 TBSP cider vinegar
1 or 2 fresh jalapeno peppers, seeded and chopped
1/4 tsp cracked black pepper
dash of salt
2 cloves garlic, minced

1. Combine all ingredients in a bowl, cover and chill for several hours or overnight. Serve with crackers or tortilla chips.

Here’s how I really make it:

1. Go out to the garden and pick a bunch of vegetables – cucumbers, tomatoes, bell peppers (green, red, yellow, orange), banana peppers, jalapenos, vidalia onions, fresh garlic, etc.

2. Bring them in the house and wash them, then start chopping them up and put them in a bowl. 

3. Add some olive oil, black pepper, a little salt, plenty of apple cider vinegar, and a can or two of drained black-eyed peas. You can throw in chopped avocado, fresh cut corn, fresh parsley, or anything else that makes you happy.

4. If you can, let it sit for at least 30 minutes (or overnight) before devouring it. The longer it sits, the stronger the vinegar flavor becomes, which I love. Enjoy with tortilla chips or your favorite crackers.

Source: Someone made this at a church activity many years ago, and I have been making my own version ever since.


Black Bean Lime Salad

This is a DELICIOUS black bean salad that I had to share with you! It’s light, and fresh, and perfect for summer parties or barbecues. The lime juice makes it extra tasty. You can serve this with chips, as a topping for a taco/burrito bar, or as a side for hamburgers or grilled chicken. Great recipe!!

Black Bean Lime Salad

Ingredients:
3 cans black beans, rinsed
2 colored peppers, diced (or a mixture of red, yellow, orange, green – whatever you like!)
1/3 cup red onions, diced small
A large handful of chopped cilantro
Zest of 1 lime
Juice of 2 limes
1/4 cup of olive oil
A little salt to taste
Optional – diced avocado – add right before serving

Instructions:
Add all ingredients together in a bowl, gently toss until mixed, cover and put in fridge for at least an hour to let flavors blend. If you are adding avocado, add right before serving. Enjoy!

Notes:  
To add a different kick, you can add 1/4 cup of apple cider vinegar instead of the lime juice. Or you can add both if you would like.

Source: My amazing sweet friend, Liz Zimmerman.

Mustard Dip

There’s a reason I don’t make this very often.  Once I start popping this stuff in my mouth, I can’t seem to stop!  It’s one of my favorite party-type foods to serve and I always get asked for the recipe.

Ingredients:
1 cup mayo
1 cup yellow mustard
1 cup sour cream
1/2 cup sugar
1/4 cup dried minced onion
1 envelope ranch dressing mix
1 Tbsp. prepared horseradish sauce

1.  Combine all ingredients in a medium-sized bowl until well-combined.  Chill for at least 30 minutes to allow the flavors to meld (a few hours is better).
2.  Serve with sourdough pretzel nuggets.

Makes about 3 1/2  cups of dip, enough for 2 bags of pretzel nuggets (I use Snyder’s brand)

Source:  my sister, Amy….a fellow Maven