Grilled Pizza

Last summer I decided to try making my pizza on the grill. I think I saw some chef on the Food Network make some grilled pizza years ago. I didn’t look up a recipe. I just used my favorite dough recipe and added the toppings I liked. I made it again this summer and realized that I really really love it. You might just find me firing up my grill come January and going out in my winter clothes to grill my pizza! 

Start with your dough. Here is the recipe I use (makes about two thin crust pizzas)

Easy Pizza Dough

1 Tbsp. Yeast
1 C. warm water
2 Tbsp. olive oil
1 1/2 tsp. salt
1 1/2 tsp. sugar
2 1/2 C. flour

Dissolve the yeast in water and oil. Stir in salt, sugar and flour. Mix until ball forms. Allow to rise for 5 or 10 minutes. 
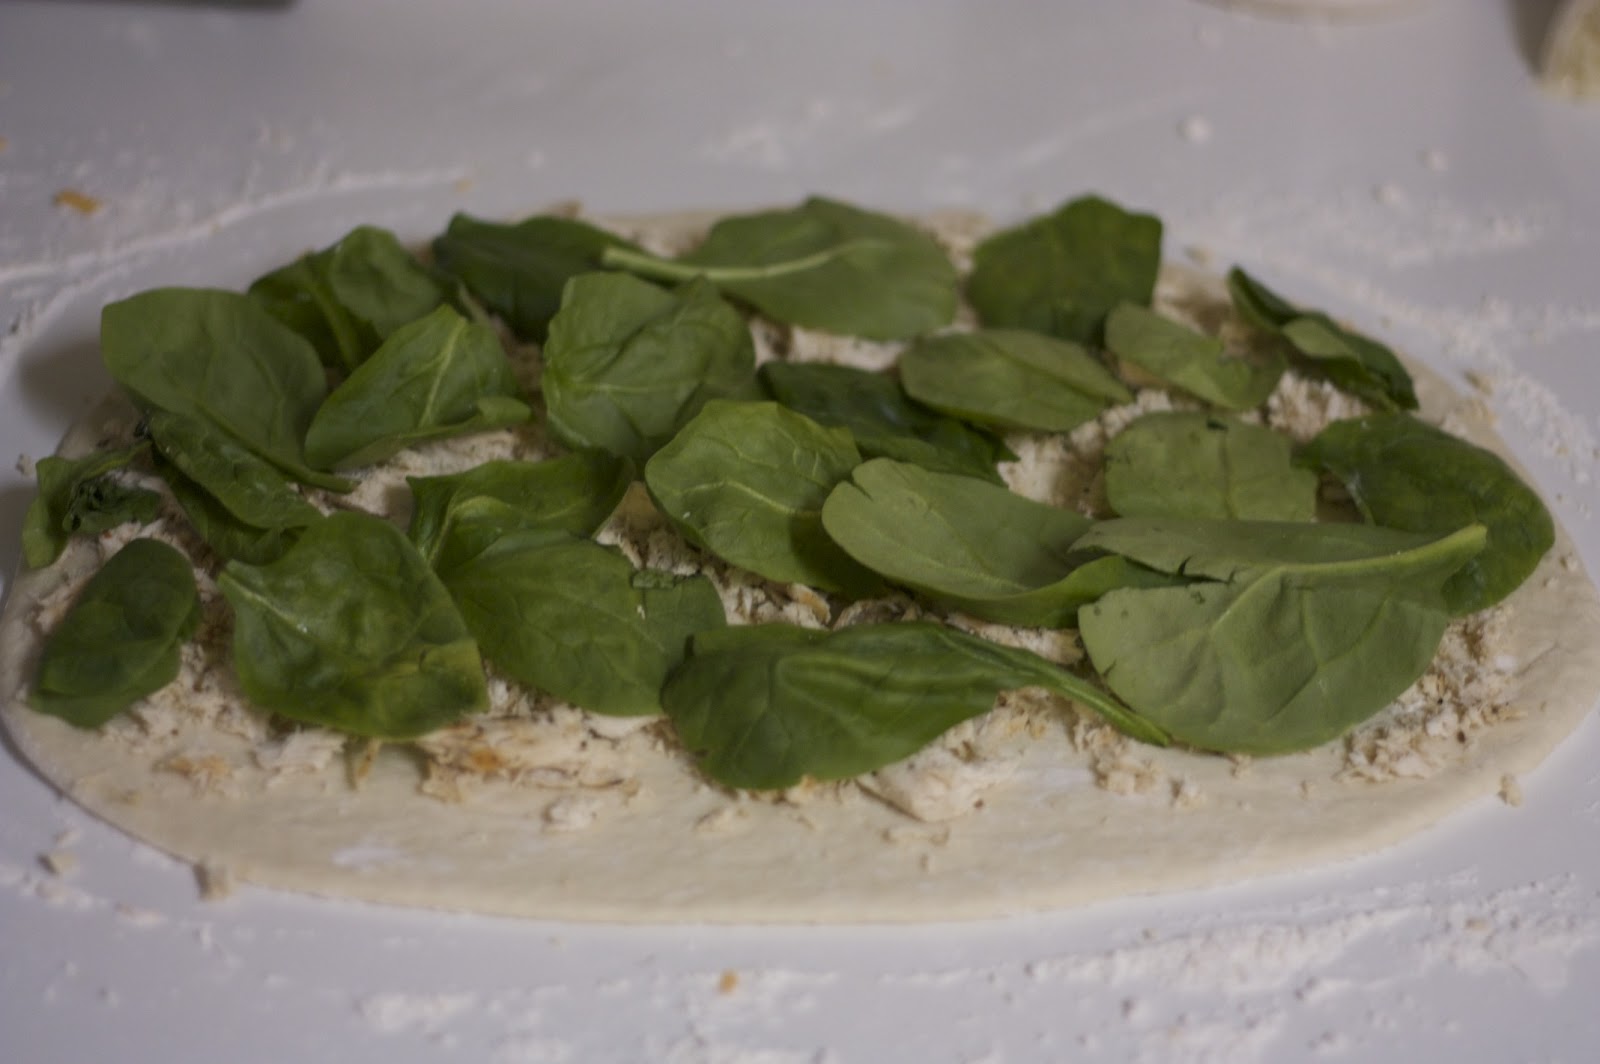
Get all your favorite pizza toppings ready (our favorite pizza was the olive oil, tomato, sauteed onion, mozzarella and fresh basil pizza.) 
Meanwhile heat your grill to med.high heat.

At this point I spread my dough out on a greased cookie sheet (normally I would use corn meal, but this is going on the grill)


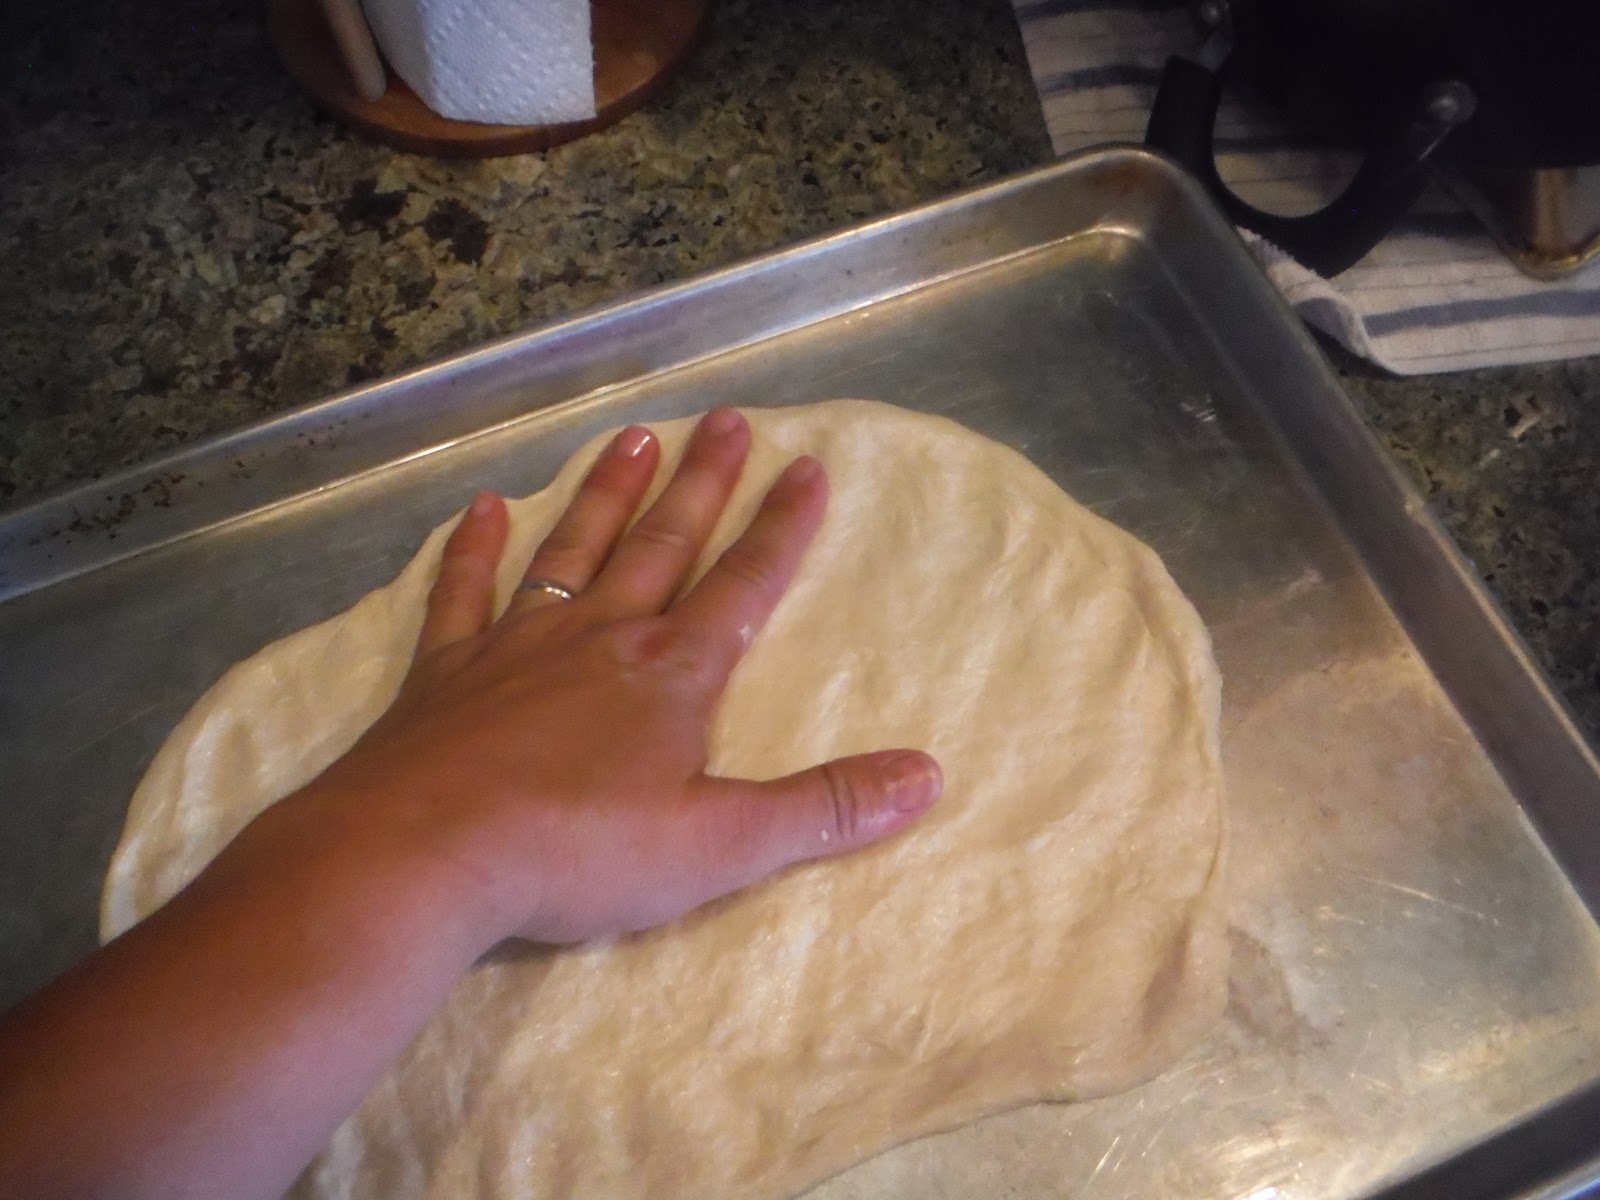
Take your dough out to your hot grill and throw it on there. I just made a rustic rectangle dough shape.
 After just a few short minutes you will want to turn your crust over.
 Then, working quickly, add your desired toppings. Also, sprinkle a bit of kosher salt over the top of your pizzas. It just boosts the flavor. Close the lid to your grill and give your pizzas 3-7 minutes or until the cheese melts. If you think your crust is going to burn, go ahead and lower the grill heat.


Remove from the grill, cut up and enjoy!


Itsa Pizza!

My friend, Saren, posted a recipe for Southwestern Pizza that got me motivated to throw one together myself.  She just used ingredients she had on hand and that is pretty much what I did except I did pick up some black beans and Queso Fresco at the store since I had to go anyway.  This is a great, easy, quick dinner and pretty healthy as well.  You can find Saren’s recipe HERE, but I will show you what I used to make mine.  Enjoy!

Ingredients:
Tomato sauce
Cholula sauce
Minced garlic
Green chilies, chopped
Black beans, drained well
Canned corn, drained well
Green bell pepper, chopped
Jalapeno, seeded and sliced thin
Pulled pork (because I had some left over  from supper earlier in the week)
Queso Fresco
Onion Salt, to taste
Salt, to taste (balance with the onion salt
Crescent Roll Dough (you can use homemade or ready-made pizza dough, pita bread, whatever…)

1.  Open 2 cans of Crescent Rolls. Keep the dough together for the eight rolls in the first can.  Spread out on your pizza stone or rectangular cookie sheet.  Pinch the dough together at the perforations to form one crust.  Take half of the second can and add to the dough you have already formed, so that you have a pan-size pizza.

2.  Mix tomato sauce, Cholula Sauce, and minced garlic (I would have used salsa instead, but we were out).  Spread evenly over dough.

3.  Add all of your toppings in layers, as desired.  Top with the cheese.

4.  Sprinkle with salt and onion salt.

5.  Bake at 425 degrees for 12-15 minutes or until dough is done in middle.  Watch your exposed crust so it doesn’t get too brown.

Source:  Original recipe idea from Saren Loosli, Five Kids in Five Years.

Halibut Burgers

 So, part of my life was spent in Alaska and my parents still live there. One of the perks to having them there is having an abundance of wild caught halibut, salmon, rock fish, etc. So delicious! Here is one of our favorite and simple recipes for halibut.

Halibut Burgers (or HALIBURGERS)
Ingredients
1-2 lbs. halibut
Salt and Pepper
Montreal Steak Seasoning
Olive oil 
Butter 
Sesame buns (or buns of your choice)
Mayonnaise
Tomato
Lettuce 
Avocado 
1. Cut your halibut into pieces (butterfly them if necessary) Season with salt, pepper and a bit of Montreal steak seasoning 
2. In a frying pan, add a little bit of olive oil and a little bit of butter (about 1 Tbsp each) Cook the fish on both sides, til cooked through.
3. Toast your hamburger buns. You can pop them under the broiler (or if you have an obnoxious broiler that has to heat up for 20 minutes like mine, you can cheat and toast them over your gas burner.)
 4. Then build your burger. Mayo, lettuce, tomato, avocado and halibut. Enjoy!

Pepperoni Bites


This recipe was so easy to make! My 9 year old daughter actually made these one afternoon for everyone to have as a snack!  Delicious! We like deli pepperoni better than the ones you can get pre-packaged, but you can use whatever you want.  Enjoy!
 
1 cup AP Flour
1 teaspoon Baking Powder
1 cup Milk
1 egg
1 cup Cheddar Cheese, shredded
1-1/2 cup pepperoni, diced
Pam
Marina sauce
 
Preheat your oven to 350 degrees.
Into a big mixing bowl add the flour, baking powder and stir. Next add the milk and the egg and blend well with mixer. Then add the cheese and the pepperoni and blend well. Spray the mini muffin tin well and then spoon in the mixture. Be sure not to over fill the mini muffin tin cups.  Bake at 350 degrees for about 25- 30 minutes, or until they are golden brown.  This makes approximately 2 dozen pepperoni bites. 


adapted from a Goose Berry Patch recipe. 


Grilled Caprese Sandwiches

Grilled Caprese Sandwiches

    My hubby and I were lucky enough to go to Europe a few years back and while we were there, we absolutely feel in love with all things Caprese. The combination of fresh tomatoes, fresh mozarella, and fresh basil is absolute perfection. This sandwich is a great, fast way to get a caprese fix. Enjoy!

Ingredients:

8 slices of your favorite bread 
One ball of fresh mozarella, cut into 1/4 inch slices
4 Roma or Plum tomatoes, cut into 1/4 inch slices
Traditional Basil Pesto
Extra Virgin Olive Oil
Freshly ground black pepper


Directions:

Heat skillet to medium. Spread one slice of bread with a thin to moderate layer of pesto to taste, put tomato slices on top of pesto. Grind pepper over tomatoes. Top with layer of mozarella and another piece of bread. Drizzle olive oil on skillet, place sandwiches on skillet with another heavy skillet on top to form a press (or use a panini maker). Cook for 2 or 3 minutes, flip and repeat until golden brown and mozarella is melty and gooey.

Notes: I used homemade bread and that always takes any sandwich over the top. You could also make your own pesto, which I have never tried but intend to someday…..I also find that it helps to drain the tomato slices a bit to take out some of the extra water. 

Source: anediblesymphony.blogspot.com

Chicken Salad with Grapes

This recipe comes from my sister-in-law who got it from an old roommate’s dad or something like that. I have tweaked it a bit over the years, as is usual for most recipes I use. It uses sour cream as well as mayonnaise to lighten it up a bit. The other secret ingredient is fresh lime juice. It adds some brightness to the salad.
Please feel free to add or omit ingredients. And a lot of the measurements are approximations. I do not measure when I make this. I just add as I go. 
4 Chicken breasts cooked and cut into small cubes
3-5 Cups seedless red grapes cut in half
3-4 Green onions, chopped
1/2-1 Cup sliced almonds
1/2 Cup mayonnaise
1/2 Cup sour cream
Juice of 1 or 2 limes
1/2-1 tsp. dried thyme
Sprinkle of seasoned salt
S&P to taste
Combine chicken, grapes, green onion and almonds in a large bowl. 
In a separate bowl, combine the mayo, sour cream, lime juice, thyme, seasoned salt and S&P. 
Pour dressing over the chicken mixture and stir to combine. Taste and adjust seasoning and lime juice as desired. 
Serve with your choice of bread, rolls or crackers.

Cloud Bread

Though I found this recipe intriguing while browsing Pinterest, I never really felt a need to give it a try.  I mean, why should I try to make a nearly carb-less bread?  I’m perfectly happy with the carb-laden kind!  Well, it wasn’t long before I found out that I’m prediabetic and need to drop some weight and get my carb intake under control.  At present time, I’m still working on it.

I won’t say this recipe fulfilled any deep bread cravings, but it was nice to have SOMETHING to make a breakfast sandwich out of.  I’ve also toasted it and used it as a sort of tostada.  If you decide to give it a try, make sure to follow the directions very closely.

Ingredients:
3 eggs (separated)
3 Tbsp. cream cheese
1/4 tsp. cream of tartar
2 tsp. stevia

1.  Preheat the oven to 300 degrees.  Separate the whites of the eggs into a mixer bowl and the yolks into a small mixing bowl.
2.  Into the YOLKS, whisk in the stevia until smooth and well-combined.  Into the WHITES, add the cream of tartar and mix until you get stiff peaks.
3.  Add a little of the whites mixture (maybe 1/4 c.) into the yolks mixture and stir together until combined.  This will lighten up the yolks mixture a bit before folding it into the whites.  Carefully fold in the yolks mixture into the egg whites.  Fold only!  Do not stir or whisk as this will make the whites “deflate”.  Fold gently until the whites and yolks are combined.
4.  Place a sheet of parchment or waxed paper onto each of two cookie sheets.  With a large spoon or large cookie scoop, dollop the mixture in four or five piles on the paper/cookie sheet.  Use the back of the spoon to make these dollops into nice even circles.  You want these to be at least 1/2-3/4″ thick.
5.  Bake on the middle rack of the oven for about 30 minutes (you really have to watch these, only bake until they are golden).  Since I had two large cookie sheets I switched their positions halfway through and just baked each sheet until the “bread” was a nice golden color.
6.  Allow to cool COMPLETELY on a wire rack (I just transferred the papers straight onto a wire rack).  Once cool, they will become soft but just out of the oven they are a bit crispy.  Store in a ziploc bag.

Makes 8 to 10 pieces

Notes:

  • Another recipe that I saw said you could use the same amount of cottage cheese in place of the cream cheese.  Haven’t tried that yet.
  • The recipe I used called for 1 packet of stevia, but I only had it in a large bag.  A web search informed me that 1 packet = 2 tsp.
  • The recipe I used did not suggest lightening up the yolks mixture with the whites, but I’ve watched enough cooking shows to know that this is a great tip and helps with the folding process (plus, it’s always worked better for me personally).
  • These are fairly fragile.  They stood up okay to an egg/sausage load for breakfast, but just barely and only because I sort of cradled the sandwich carefully.  Toasting them makes them crispy but may also make them taste more egg-y.
  • One piece is about 38 calories and about .25g of carbs, by my calculations.
  • I’ve learned that this recipe is also known as Oopsies.
Source:  all over the internet, but I used the recipe from Mom, What’s for Dinner?

Stuffed Baguette

I am in favor of recipes that you can make ahead and leave in the fridge until needed.  This recipe reminds me of those pinwheel tortilla appetizers that you buy in the freezer section of Sam’s Club.  I would imagine you could come up with several variations of this and pack them for picnics.

Ingredients:

Baguette about 14 inches long

8 oz. cream cheese, at room temperature
4 oz. fresh goat cheese
1 large garlic clove, minced
1/2 c. finely chopped red bell pepper
1/2 c. finely chopped sun dried tomatoes in olive oil
1/4 c. finely chopped kalamata olives
2 oz. finely chopped spicy salami
2 T. minced Italian parsley
1 t. minced fresh thyme
freshly ground black pepper
salt to taste (if needed)

Directions:

1.  Slice off both ends of the baguette.  Using a long thin knife and working from the both ends, hollow the baguette out leaving about 1/2 inch thick crust all around.

2.  Using an electric mixer beat the cream cheese until smooth and lump-free.  Beat in the goat cheese and garlic.  Stir in the rest of the ingredients.

3.  Working again from the both ends, fill the baguette with the cheese mixture.  Pack the filling tight.  Wrap the stuffed baguette very well in plastic and refrigerate for at least 2 hours and up to 2 days.  Right before serving, slice* the baguette into 1/2 inch thick slices and serve.  (I left them in larger sections but the small ones work great for appetizers.)

*Hint:  For the most neat looking slices, treat it as a cheesecake – each time slice it with a hot knife.

Source:  bakingobsession.com

Salmon Sliders

As a kid, we used to have Salmon Croquettes every so often, and this is really just a new use for them.  Canned salmon is pretty cheap and packed with Omega-3 fatty acids.  If you keep canned salmon around, as I do, you’ve got a quick, cheap go-to lunch or dinner.  I kind of just threw in whatever, so this recipe is not precise.

Ingredients:
1 can of salmon, drained*
chopped onion and peppers (I used a small onion and 1/2 to 3/4 of a bell pepper)
1 egg
salt and pepper
seasonings**
bread crumbs
oil (I used coconut oil)

1.  Empty the drained salmon into a medium bowl.  Using a fork, mash the bones and skin pieces together with the flesh until well mixed.*  Saute the chopped onion and peppers (I used a little yellow, orange, and red bell pepper) in oil  in a skillet on medium heat until they are to your liking.  (I like my onions slightly caramelized.)  Add this to the salmon in the bowl and stir together.
2.  Add the egg and seasonings, stirring until well-combined.**  Add enough bread crumbs so that the mixture forms patties easily…not too dry to fall apart, but not so wet that it’s mushy.  Form into small patties about the width of the rolls you are using; mine were about a half inch thick.
3.  In a skillet on medium heat, allow the oil to heat up.  Carefully place the patties in the skillet and cook for a few minutes on both sides until browned.

Makes about 8 small patties

Source:  inspired by this but embellishments are mine

Notes:
*The bones and skins don’t bother me; the bones are so soft they crush up easily.  But if it bothers you, take them out while draining.  Personally, I just don’t want to bother!
**I used lemon pepper, but you can add any seasoning that you enjoy in your burgers (onion soup mix, Montreal steak seasoning, etc.).

Also,

  • I used dinner rolls from Sam’s for the buns.  I buy the big bag and divide it up by the dozen into freezer bags.  I keep them in the freezer and pull them out when needed.  For added flavor, after cooking the sliders, add some butter to the skillet.  Place the rolls cut-side down in the skillet and allow to “cook” until they are golden brown.
  • For slider fixin’s this time, I used provolone cheese, mayo, and spinach.  I would’ve thrown some avocado on there if I’d had some.

Chicken and Spinach Stromboli

My kids love Stromboli, but only the kind with ham and cheese. Mr. Blue Eyes and I like ham and cheese, too, but sometimes it’s nice to zest it up a bit, don’t you think?

One day I had some fresh spinach in the fridge, some chicken in the freezer, and I thought, “I wonder…”  Well, my friends, IT WORKED! And here I am to share this concoction with the world. Lucky you. 🙂

Ingredients:
1 Batch of Pizza Dough (or a frozen loaf of Rhoades, thawed)
2-3 Chicken Breasts, thawed
Crushed Peppercorn and Garlic Rub (or some variation thereof–use your favorite and what’s on hand)
2 Cups Mozzarella Cheese, shredded
Fresh Baby Spinach Leaves

1. Rub the chicken with the seasoning and bake, fry, etc. until done. I use my panini maker to grill it. A George Foreman or out door grill would work great, too. Just cook the chicken. 🙂
2. Using a fork, shred the cooked chicken and set it aside.
3. Preheat the oven to 350 degrees F.
4.On a lightly floured board, roll out the dough into a rectangle.
5. Spread the mozzarella cheese over the dough until evenly covered. Spread the chicken over the cheese. Spread the spinach over the chicken. It should look like this:

6. Beginning at the upper long edge, roll the dough in toward you (like cinnamon rolls), carefully tucking spinach leaves as you go. Don’t worry too much if they bunch a little. You’ll win in the end.
7. Pinch the seam and ends shut and place in a jelly roll pan (or on a cookie sheet of some kind) seam side down.
8. Bake for 25 minutes.

Cut into slices and enjoy!

Source: An original

~Kara