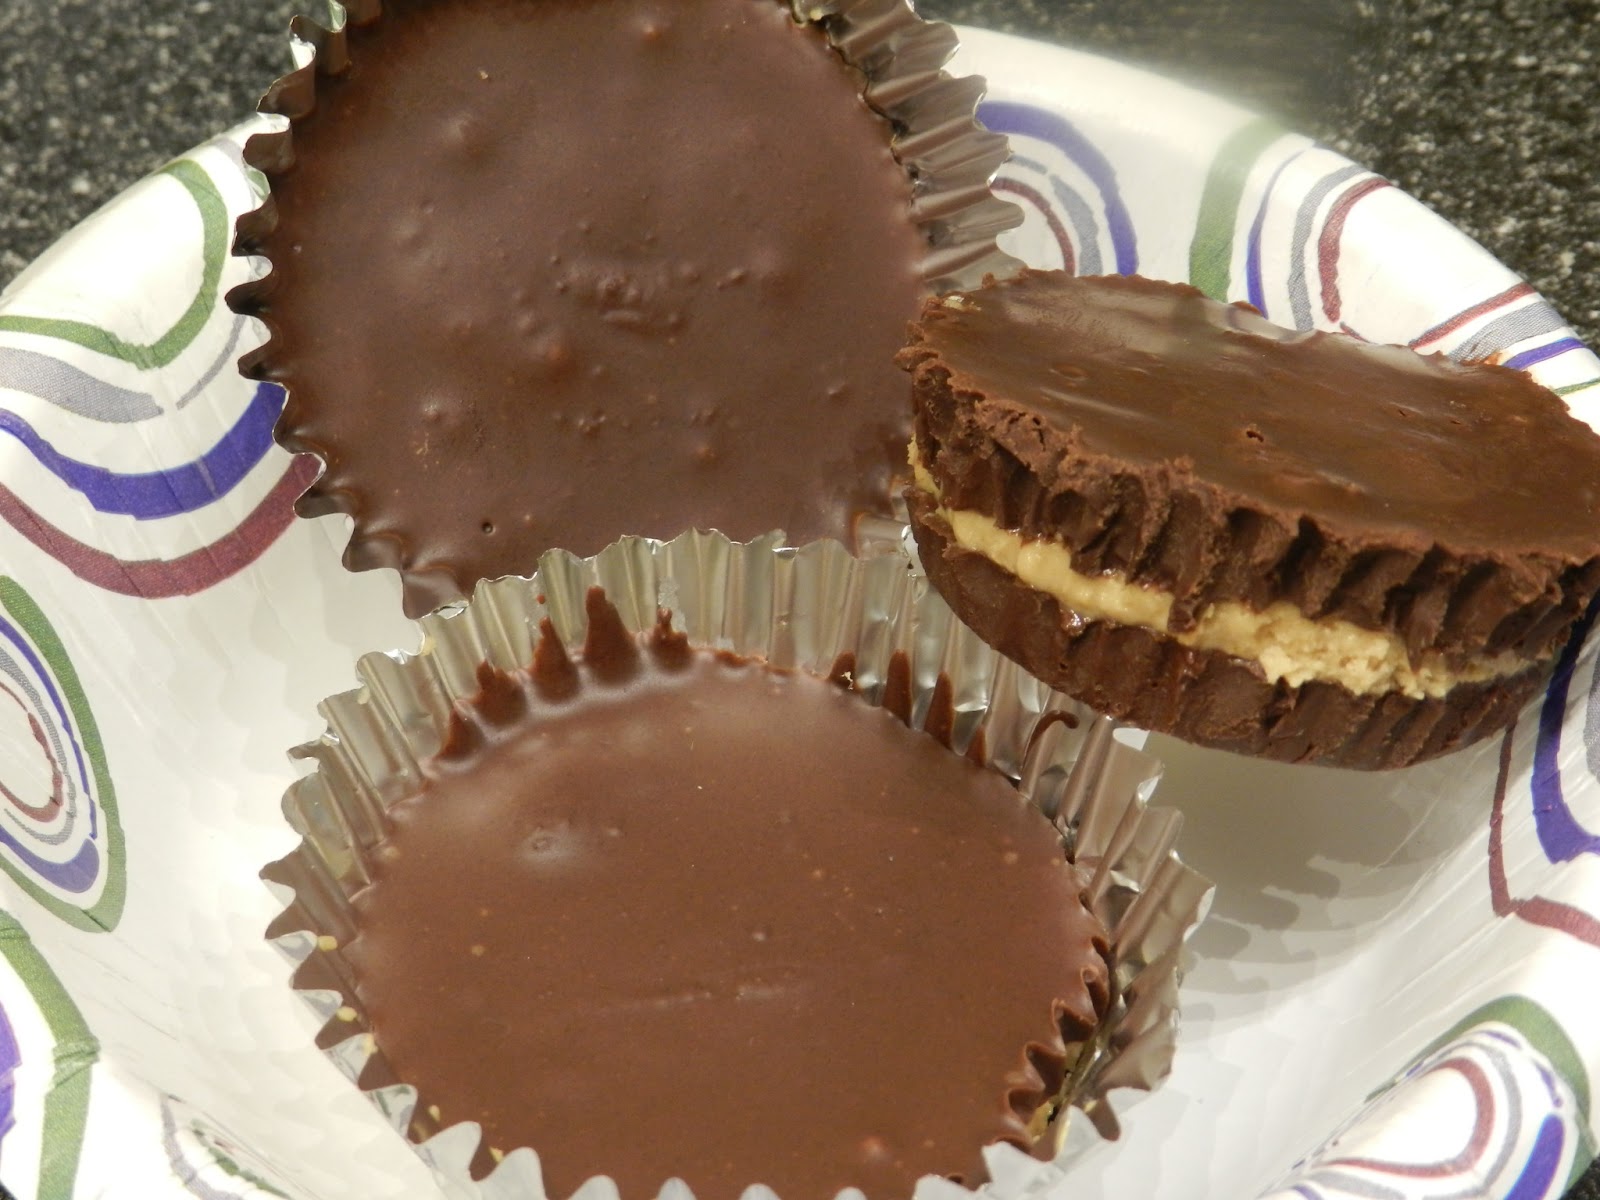
Homemade Peanut Butter Cups

Ingredients:

16 oz. semi-sweet chocolate, chopped
1/2 c. creamy natural peanut butter
2 T. butter, softened
1.75 oz confectioner’s sugar (1/4 c. plus 2 T.), sifted

Directions:

  1. Line a standard 12 cup muffin tin with paper cupcake liners.
  2. Melt half the chocolate either in a double boiler (the safer method) or in the microwave (the more dangerous, but easier/lazier method). I opt for the latter.
  3. Distribute the melted chocolate into the 12 muffin tins (I use a cookie scoop to portion the chocolate), only barely filling the bottom of each cup. If the chocolate does not lie flat, drop the pan repeatedly on the counter, and it will flatten and smooth itself out. Place the pan in the freezer for 15 minutes.
  4. In the meantime, whip the peanut butter, butter, and confectioner’s sugar together with a hand mixer until mixed and light. Taste it and make sure the sweetness is to your liking. Place small tablespoons of peanut butter into each cup, then drop the pan repeatedly on the counter again, so the peanut butter layer is flattened out. Place in the freezer for 15 minutes.
  5. Melt the last 1/2lb of chocolate, and portion small spoonfuls of chocolate into the cups, one cup at a time, immediately dropping the pan repeatedly on the counter to flatten each cup. In my experience of making these, the chill from the peanut butter (because it was just in the freezer) will harden up that top layer of chocolate very quickly, so you must flatten out the tops immediately after you pour the chocolate into each cup. Place the peanut butter cups in the freezer for 15 minutes to set the top layer of chocolate.
  6. You can either refrigerate them for a peanut butter cup with more bite, or leave them at room temperature for a softer, creamier bite. Just peel the wrapper off, and enjoy!

Source:  fifteenspatulas.ziplist.com

This entry was posted in Candies.

Black Bean Lime Salad

This is a DELICIOUS black bean salad that I had to share with you! It’s light, and fresh, and perfect for summer parties or barbecues. The lime juice makes it extra tasty. You can serve this with chips, as a topping for a taco/burrito bar, or as a side for hamburgers or grilled chicken. Great recipe!!

Black Bean Lime Salad

Ingredients:
3 cans black beans, rinsed
2 colored peppers, diced (or a mixture of red, yellow, orange, green – whatever you like!)
1/3 cup red onions, diced small
A large handful of chopped cilantro
Zest of 1 lime
Juice of 2 limes
1/4 cup of olive oil
A little salt to taste
Optional – diced avocado – add right before serving

Instructions:
Add all ingredients together in a bowl, gently toss until mixed, cover and put in fridge for at least an hour to let flavors blend. If you are adding avocado, add right before serving. Enjoy!

Notes:  
To add a different kick, you can add 1/4 cup of apple cider vinegar instead of the lime juice. Or you can add both if you would like.

Source: My amazing sweet friend, Liz Zimmerman.

What’s On Your Plate?

Quite the catchy title for a food blog post, wouldn’t you say?  I placed this sign above my kitchen window.  I used to have a clock up there, but 6 months out of the year it was always an hour off!  Yeah, that’s right.  To change the time I would have to get up on a step stool and then stand on the sides of my kitchen sink.  Way too much trouble and probably a little dangerous.  Anyway, to make a long story just that much longer, my daughter brought this plaque home from babysitting at a friend’s house. She was de-junking before a move.  It had a metal plate on the front that had a quote on it but I thought it needed to be redesigned for my house.  My friend, Stacie, has a vinyl lettering business and I knew that would be the perfect way to give this thing new life.  I gave it to her and told her I would be trying to figure out what to put on it and since it would be in the kitchen I wanted something, well, kitchen-y.  She gave me some suggestions and offered “The Gathering Place,”  which I thought was really cool. 

One day Stacie and I were discussing the sign.  Thankfully, she had not started on it yet but was ready to get going on it since she had a baby boy joining the family any week and just wanted to get it done.  I told her I understood that because she had a lot on her PLATE.  Ka-ching!!  Stacie, let’s do “What’s On Your Plate?”  It totally fit in a kitchen setting, but also gave “food for thought.”  She loved that idea and has probably added it to her repertoire of quotes for her business.  I gave her permission to use it.  Haha…

So, what’s on your plate?  As women, we’ve “got it goin’ on” all the time.  Busy at home, busy at work, busy at church, busy in our communities, busy with our blogs, busy with our dogs.  BUSY! BUSY! BUSY!  (have you ever written a word so many times in a row that it looks wrong?  Yeah, that just happened.) 

We should all be “anxiously engaged” in the things that matter most in our lives, but we need to remember to balance our plate as we would balance food groups for a meal.  A little bit of this, a little bit of that, maybe just a little more of one thing, and then something sweet to top it off (chocolate has to go somewhere).  I won’t go into the details of what you or I have to manage or outline a plan to get it all together because today I have a full plate to take care of and I don’t have time.  However, if you will click on the Power of Moms button on this site or right here you will find out about a great way to get organized and get things off of your brain (plate) and into action.  It is called Mind Organization for Moms.  I am slowly building my M.O.M. system as we speak.  I need it.

Two Minute Smores

Everyone has that one snack that you can’t get enough of. Mine, smores. LOVE them. Every time I turn on the grill you better believe that make up a few. I’ve also made them in the microwave, but the marshmallows tend to get rubbery. Not good. The other day it hit me, the broiler! Great discovery. Now you can get tasty browned smores in under two minutes. 

You know the drill, gather up your graham crackers, marshmallows and chocolate.

Place the marshmallows on top, stick them in the broiler until they start to brown. Pull them out and top with chocolate. 

 Two Minute Smores

Ingredients:
Graham Crackers
Hershey Bars
Marshmallows

Directions:
1. Place graham crackers and marshmallows on a baking sheet.
2. Place in a preheated broiler for one to two minutes, until they are browned to your liking.
3. Pull them out and top with chocolate.

Yum!

Chicken Salad with Grapes

This recipe comes from my sister-in-law who got it from an old roommate’s dad or something like that. I have tweaked it a bit over the years, as is usual for most recipes I use. It uses sour cream as well as mayonnaise to lighten it up a bit. The other secret ingredient is fresh lime juice. It adds some brightness to the salad.
Please feel free to add or omit ingredients. And a lot of the measurements are approximations. I do not measure when I make this. I just add as I go. 
4 Chicken breasts cooked and cut into small cubes
3-5 Cups seedless red grapes cut in half
3-4 Green onions, chopped
1/2-1 Cup sliced almonds
1/2 Cup mayonnaise
1/2 Cup sour cream
Juice of 1 or 2 limes
1/2-1 tsp. dried thyme
Sprinkle of seasoned salt
S&P to taste
Combine chicken, grapes, green onion and almonds in a large bowl. 
In a separate bowl, combine the mayo, sour cream, lime juice, thyme, seasoned salt and S&P. 
Pour dressing over the chicken mixture and stir to combine. Taste and adjust seasoning and lime juice as desired. 
Serve with your choice of bread, rolls or crackers.

“Where Shall I Work Today?”

A Relief Society lesson at church was taken from the October 2012 General Conference talk “First Observe, Then Serve” by Sister Linda K. Burton.  During the lesson a story was related of a man who worried because he had not been asked to serve in “important” callings or positions in his ward congregation.  He felt somewhat diminished and fretted that at his age he ought to be having heavier leadership responsibilities and ought to be contributing more.  It reminded me of a poem by Meade McGuire that I ran across in college, so I thought I’d share it.  I think of this poem from time to time and it always reminds me that every contribution counts.

Father, where shall I work today?
And my love flowed warm and free.
Then He pointed out a tiny spot
And said, “Tend that for me.” 
I answered quickly, “Oh no, not that! 
Why, no one would ever see,
No matter how well my work was done;
Not that little place for me.”
And the word He spoke, it was not stern;
He answered me tenderly:
“Ah, little one, search that heart of thine.
Art thou working for them or for me?
Nazareth was a little place,
And so was Galilee.”
 
christ-teaching-the-people-39554-gallery
image source: lds.org


Grandma’s Brownies

Brownie’s 2 day’s in a row!  These are my Grandma’s brownies. I love them!

1 tsp. vanilla
4 eggs
2 c. flour
2 c. sugar
2 heaping Tblsp. Cocoa
2 cubes melted butter (be careful pouring this in so as not to cook the eggs)
1/2 c. chopped nuts if desired.

Pre-heat oven to 325 degrees.
Mix all ingredients together and place in greased 9×13 cake pan.  Bake for 40-45 Min.  Top with frosting (I usually make my frosting to taste using butter, powdered sugar, cocoa, and milk)

Source: Grandma Larson

Lunch Lady Brownies–redo

Shut the front door!  Slap yo’ Mama!  Have mercy!  Best danged iced brownies I have EVER sunk my teeth into (and I don’t like my brownies with icing).  I am so dang serious.  This recipe came from Saltbox House  via Facebook or Pinterest.  I don’t know.  Last week was a busy blur, so I have no clue.  I made a double batch (baker’s half sheet pan worked great) right from the get-go because family was coming to grill out and Mike also needed something for a Relay for Life bake sale at work.  This will be my brownie recipe of choice from now on, and my family will expect nothing less.  Are you ready for this?

Ingredients:

For the batter
1 cup butter
2 cups all-purpose flour
1/2 cup cocoa
2 cups sugar
4 eggs
4 tsp. vanilla
1 cup chopped nuts (optional)

For the icing–(make this while the brownies are baking)
1/4 cup butter, softened
1/4 cup evaporated milk
1/4 cup cocoa
3 cups powdered sugar
dash of salt
1 tsp. vanilla (I added this ingredient.  Just thought it tasted better.)


1.  Melt the butter in the microwave and put into mixing bowl.

2.  Add cocoa and mix until smooth.

3.  Add flour and sugar.  Beat together and then add eggs, vanilla, and nuts, if desired.  Mix until combined.  Do not over stir.

4.  Spread evenly into greased and floured 9 x 13 baking pan (I used baking spray with flour and it worked fine).


5.  Bake 20-25 minutes at 350 F or until done.  Check at about 20 minutes. Toothpick inserted into center should come out clean.

6.  Remove brownies from oven and wait only about 10 minutes to frost them.  You want to frost while they are warm, not hot.

Results:  fudgy, cakey deliciousness!!


Source:  Bonneville Junior High School Brownies via Saltbox House (see link above)


Chicken and Gnocchi Soup (Olive Garden style)

     Thank you so much for inviting me to post on this wonderful blog! I love to cook and try new things, so I am looking forward to being here very much. 

    For my first post, I will share a wonderful soup we tried a few weeks ago. If you have ever tried Olive Garden’s Chicken and Gnocchi soup, you will be as excited to try this as I was. I was pleasantly surprised by how easy this was to put together. We all loved it (kids included)! It is hearty, silky, and satisfying. And let’s be honest, Gnocchi is just fun to say.

Chicken and Gnocchi Soup (Olive Garden Style)

Ingredients

  • 1 tablespoon EVOO
  • 4 tablespoons butter
  • 4 tablespoons flour
  • 1 quart half and half
  • 1/2 cup celery, finely diced
  • 1 cup onion, finely diced
  • 2 minced garlic cloves
  • 1 or 2-14 ounce cans of chicken broth (adjust to desired level of thickness)
  • 1 cup carrots, finely grated
  • 1 cup chicken breasts, cooked and diced
  • 1 package gnocchi, cooked  (usually in the pasta or prepared food sections of the store)
  • 1 cup of fresh spinach coarsely chopped
  • 1/2 teaspoon salt
  • 1/2 teaspoon thyme
  • 1/2 teaspoon parsley
  • 1/4 teaspoon nutmeg (optional, but you should use it!)

Instructions

Saute the onion, celery, and garlic in the butter and olive oil over medium heat until the onion becomes translucent. Cook gnocchi according to directions. Stir in flour to make a roux and cook out the raw flavor of the flour for about one minute. Add half and half. Add in the carrots and chicken. Once the mixture becomes thick, add the chicken broth. Stir until the mixture thickens again, add the cooked gnocchi, spinach, and seasoning. Simmer until soup is heated through. May season with additional salt to taste.

Notes: I used home canned chicken for speed and it was delicious. You could also use a Rotisserie chicken, which would give it an added flavor boost.

For those of you who don’t know, Gnocchi is Italian for potato dumplings. 

Source: Copykat.com

Crockpot Mac & Cheese

This is probably the recipe I get asked for more than any other. It is heavenly! If you like creamy, cheesy, gooey mac and cheese, this recipe is for you! The youth at church ask me to bring it to every pot luck dinner, and they scrape the pot clean! 
 
 
Crock Pot Mac and Cheese
 
 
Ingredients:
4 cups dry macaroni noodles
1/2 cup butter, melted
2 cans evaporated milk (you can use regular milk if you don’t have this)
3 cups milk (Ok, I never measure this…I just add it until it looks almost right. See photo and note below.)
4 eggs, beaten
8 cups shredded cheese (I personally like the shredded Mexican Blend, but sharp cheddar is yummy too.)
Salt and pepper to taste 
 
Directions:
1. Cook macaroni noodles in salted water until done. Drain off water and put into crock pot.
 
2. Pour in melted butter, evaporated milk (or a few cups of milk), beaten eggs, salt and pepper. Stir until mixed.
 
3. Add about 6-7 cups of the shredded cheese. (You want to save a cup or two to spread over the top.) Mix in the cheese and add a few more cups of milk. Keep adding a little milk until you have it just right. You know you have enough milk when you pull back the noodles, and you can see milk a little below the surface. See photo. I have never measured the milk, because this is how my grandma and mom taught me to do it. : )
 
4. Put a cup or two of shredded cheese over the top of the mixture and cover with lid.
 
5. Cook on HIGH for 45 minutes to 1 hour (until it’s nice and hot), and then turn it to LOW or WARM for another few hours. In my crock pot, if I leave it on LOW, it will burn the edges and overcook it, so I turn it down to WARM. It’s done when the milk and eggs are absorbed and set.
 
6. Enjoy every last bite of this delicious macaroni and cheese! 
 
Notes:
1. This recipe makes enough to fill a huge 6 quart crock pot. If you have a smaller crock pot, you might want to half the recipe. You can also cook a half recipe in a casserole dish in the oven. Cover with foil and bake at 350 degrees for about 30 minutes. It’s done when the milk and eggs are absorbed and set. Some people like to take the foil off and let it bake uncovered for about 10 minutes so the cheese gets crusty. I like creamy and melty cheese, so I keep mine covered the whole time.
 
2. You can use whatever cheese you like, and as much or as little as you like. I have a friend who puts in some Velveeta cheese, although I would never do that because I am crazy over cheddar cheese. My point is, use your favorite cheese and make it your own!
 
3. I often make it without the evaporated milk and just use 2% milk or whatever I have in the fridge. I’ve even used reconstituted powdered milk and it turned out great. 
 
Source: I have made this for years and years and cannot remember when or why I first made it, or who might have given me the idea. All I know is that it is the best mac and cheese I have ever had!