Snicker Doodles

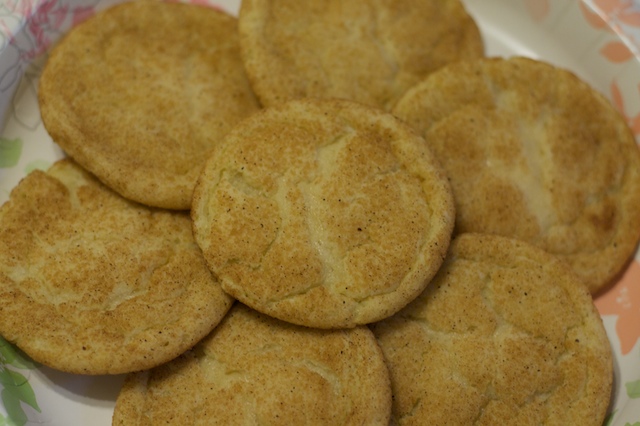
Every time I make Snicker Doodles, I always wonder why I don’t make them more often. They don’t take long and they are super tasty! Cooked right, these have that perfect crunchiness around the outside edge with a soft middle. Mm-MMM!

Ingredients:


1 C Shortening
1.5 C White Sugar
2 Eggs
2 3/4 C All-purpose White Flour
1 tsp Baking Soda
2 tsp Cream of Tartar
1/2 tsp Salt


 3 Tbsp White Sugar
2.5 tsp Ground Cinnamon

1. Preheat the oven to 375 degrees F.

2. In a Medium bowl, cream together the Shortening, Sugar (1.5 Cups), and Eggs. I have a superstition about beating the sugar/egg/shortening mixture for five minutes until it’s good and fluffy. I do this with all cookies (or try to) and have no idea it it does anything special, but I like to think it does.

3. In a Small bowl, sift together the Flour, Soda, Tartar, and Salt (or not. Sometimes I add them separately.). Gradually add the dry mixture into the Sugar mixture until nice and incorporated.

4. In a cereal bowl, mix together the Tbsp Sugar and tsp Cinnamon.

5. Taking a heaping teaspoon full, roll the dough into a little ball and then roll it around in the cinnamon until the entire ball is coated.

6. Place on an unprepared cookie sheet two inches apart.

 7. Bake for 7 – 10 minutes. I do mine for 7 minutes and they’re perfect! Cool on a wire rack.

8. Share them. Or DEVOUR them. Whichever you prefer.

Source: LKUEHL, on All Recipes.com, a little personal variation added

~Kara

Brownie Bites

I think I found this recipe on Pinterest way back in February.  I used it then to send in for a Valentine party at school for one of my girls.  But, this would be a great end of school party treat!  This is soo easy!

Mini Muffin pan
Pam
Box of your favorite Brownie Mix
Reese’s Peanut Butter chips
Semi-sweet chocolate chips
Peanut Butter

Set oven to 350 degrees. Grease muffin pan. Mix up the brownie mix by the box directions. Fill the muffin pan cups to about 3/4 of the way up. Bake until done…about 15-20 min (depends on how chewy you want them) When they come out of the oven use the back of your spoon, or something rounded that you can press down into the brownie, to form a little cupped space for the peanut butter. (This step must be done immediatly after you remove them from the oven.)  Then let them cool for a bit, and dump them out to finish cooling.  Melt your peanut butter in the microwave until you could pour it!  Then spoon into the brownie cup tops and quickly add the chips.  As they cool the peanut butter will stiffen back up and the chips will be set!

Pretzel Dogs

Happy Memorial Day to all my fellow Americans!

Years ago, when my husband and I were newly married and still attending Brigham Young University, we had some great friends who shared a great pretzel recipe with us.  We’ve made it countless times in the last twenty years…sometimes plain, sometimes cheese-stuffed, always good.  But a couple of years ago we decided to try using our favorite Nathan’s Hot Dogs as a filler.  It was a tasty experiment and has turned out to be one of my favorite ways to eat pretzels!

Ingredients:
1 1/2 cups warm water
1 Tbsp. yeast
1/3 cup brown sugar
4-5 cups all-purpose flour
coarse kosher salt
1 egg white, beaten
Nathan’s Hot Dogs (8)
2 cups water
2 Tbsp. baking soda

1.  Mix water and yeast until dissolved.  Stir in brown sugar.  Slowly add flour, stirring constantly.
2.  Knead dough till stretchy and smooth.

3.  Divide dough into 8 equal pieces.  Shape each piece into a log 1″ longer than the hot dog (the dough will stretch as you pull it over the ends).  Flatten the log and place the hot dog on the dough.  Fold in the ends, then fold one long side over tightly.  Roll the whole thing over onto the remaining flap.  Pinch edges to seal, getting out as much air as possible.

4.  Fill a pan with the water and baking soda and bring to a simmer/gentle boil.  The pot should be wide enough to allow for the pretzel dog to sit “comfortably” inside.  (They get cranky if they’re not comfortable.)  Carefully lower one pretzel dog at a time into the water, making sure to gently move it around a bit at first so it doesn’t stick to the bottom.  Allow it to bathe for 30 seconds, then carefully lift it out of the pan and onto a cooling rack.  Continue until all 8 have taken their baths.

5.  Brush each pretzel dog with the beaten egg white and sprinkle with the coarse salt.  Grease a cookie sheet and sprinkle it with the salt also.  Place the pretzel dogs on the cookie sheet and bake in a 475 degree oven for 8-12 minutes.

Makes 8 pretzel dogs

Source:  Kari Hafen
Incidentally, if any of you know Kari Hafen from Alaska, PLEASE let her know I’m looking for her.  We lost touch after BYU.

God Doesn’t Grade On The Curve

God does not grade
On the curve,
I’m sure of it.

But we sit around
Like high school students
In an important class,
Whose teacher has drawn
On the blackboard
The tiny wedges
For the A’s and E’s.
And the great bulge
For the C’s.

We sigh in veiled relief
As the person down the row
Messes up,
Because it makes us
Look better
And probably means an E
For him, which is good,
Because while we have
Nothing against him personally
It means an A is more
Available to us.

And we secretly sorrow
When the person in front of us
Does really well,
Although we like her okay,
Because there goes another good grade,
Darn it and we’re looking
Worse and worse
And slipping further down the curve.

And God, I think,
Sits at the front of the class
Holding A’s enough for all,
Watching us
Working out our salvation
In fear and competition.

          -Carol Lynn Pearson

That last stanza really gets you doesn’t it?  I’ve read this poem a hundred times and it still hits me just as hard as the first time I read it nearly 30 years ago.  I’m still learning how meaningful AND powerful AND so very individual that the atonement really is.  Let’s try to visualize Him at the front of the class holding A’s enough for ALL and see if we can’t let some of the competition fall by the wayside.

Succulent Steak Marinade

This is a mild, yet sweet and tangy marinade!  Yum!

Ingredients:
1 cup soy sauce
1/2 cup brown sugar
1/2 cup cider vinegar
1/2 cup pineapple juice
3 gloves garlic, crushed/pressed

Wisk all ingredients together in a bowl and use as a marinade.  For types of steak and their marinating time, check out THIS page.

We used only half of the marinade for one HUGE steak.  We’re going to try marinating a few chicken breasts in the leftovers.

Source:  Mel’s Kitchen Cafe

Chile Rellenos

Our traditional Christmas Eve dinner is Mexican food.  Usually we have tamales, rice, beans and a salad.  This year we chose Chile Rellenos because my tamale source-no I have never attempted tamales, and my friend makes them as a fundraiser for summer programs for her kids–was not available. I also opted for guacamole salad (like in a Mexican restaurant) instead of my usual tossed salad, because my daughter was home from college and she makes the BEST guacamole–maybe she will share in a future post!

Ingredients:
whole long green chilies (Anaheim)
all-purpose flour
Monterey Jack cheese, cut into 3 or 4 inch pieces
Eggs, separated
Salt
Vegetable oil

DO AHEAD TIP:  Since the chilies need to be roasted, I do this ahead of time and put them in the freezer in zippered plastic bags so that they will sweat and the skins will separate more easily from the meat of the chiles. When I need to use them, I just take them out of the freezer and let them thaw.  It is super easy to peel the skins from the chilies and I always have some on hand.  I also do this with jalapenos for making salsa.
1.  Roast the chilies on a hot grill, or in a broiler on high heat, turning so that the skins are blistered and charred on both sides.  Let them cool to room temperature and then peel the skins off.  Be careful to not tear the chilies while peeling (you can also use canned whole chilies).
2.  Make a small slit (about 2-4 inches) in the side of each chile and carefully remove the seeds.  
3.  Place a slice of cheese into each chile, trimming the cheese if necessary.  You want to be able to bring the sides of the chile together over the cheese.
4.  Lightly dredge the stuffed chile in flour–this helps the batter adhere better.
5.  For the batter you will need about 2 large eggs per pound of chilies.  Separate into whites and yolks.  Beat the egg whites until stiff.  In a separate bowl, beat the yolks.  Fold the yolks and a dash of salt into the whites, incorporating carefully.  
6.  Dip each chile into the egg batter, then fry in about an inch or so of hot oil or grease.  I use an electric skillet because I can do about 8 or 10 chilies at a time.  Fry until golden brown, flipping to get both sides (you can also bake these, but my crew wants FRIED).
7.  Place cooked chilies on paper towels to drain off excess oil.
8.  Serve with salsa.
Source:  I got the basic recipe from the Internet several years back but found better directions HERE while preparing this post.

Kale Chips

Move over potato chips…….kale chips are here to stay!  Kale is a super food!  So, why not make it part of your regular diet?  I made these the other day and got kudos from all age groups.  Give it a try yourself.

Sorry about the picture.  I have too many white dishes I guess.

Ingredients:

kale (about a salad spinner’s worth or a grocery produce bag stuffed lightly)
2 t. olive oil
kosher salt

Directions:

1.  Tear the leaves off the thick stems into bite size pieces.  Spread out on cookie sheets.
2.  Drizzle with oil.  Sprinkle on desired amount of salt.
3.  Bake at 375 for about 15 minutes, until edges are brown and kale is crispy when moved in pan.

Source:  Kath Eats Real Food

This entry was posted in Snacks.

What’s Your “Something?”


“You can do something for another person that no one else ever born can do.”

            —President James E. Faust, former counselor in the First Presidency of the Church of Jesus Christ of Latter-Day Saints, October 2005 Talk.

Pretty bold statement, don’t you think? I mean, think about all the billions of people who have ever lived and do live on the earth. No one else can do something that little old me can do? It’s hard to believe, isn’t it?

But a prophet of the Lord, Jesus Christ said it.

And I believe him.

So, why the random picture to go with this topic? Well, it’s random to you. It’s not random to me, however, and I am the writer so I get to choose the picture.

This is the Greenville 2nd Ward Primary as of Oct. 2011. Every man, woman, and child in this picture has effected me in a positive way. By their kindness, their examples, their words of wisdom (even the kids!), their random acts of service. They have touched me in ways no one else ever could!

The question now stands: What is the something that I was born to do? Have I done it yet? Is it still to come? And is it just one something, or is it many somethings?

I’m not sure the answer to that question. But the thought that my work here is undone, that I still have someone left to help in a way that no one else can, makes me want to BE better and to DO better, every day. It makes me want to be the kind of child that my Heavenly Father would be proud of.

What about you?

Beefaroni

It’s 5 o’clock. You have no idea what to make for dinner. You go to your pantry to see what you can throw together. Chances are, you have everything for this meal. 


Ingredients:
1 lb. ground beef

16 oz. elbow macaroni

24 oz. jar pasta sauce
6 oz. can tomato paste
2 1/2 C. shredded cheddar cheese
Directions:
1. Crumble ground beef into skillet, brown and drain.
2. While meat is browning, bring water to boil and cook pasta (about 8 minutes). Drain.
3. Add meat to the pasta. Pour in pasta sauce and tomato paste. Stir.
4. Place in a greased 9×13 casserole. Top with cheddar cheese. 
5. Cook at 350 for 30 minutes or until cheese is melted and sides are bubbly. 
If you’re like me and have a small family to feed, then simply freeze half of this recipe and enjoy it later!

(This is only half the recipe, I froze the other half!)

Grandma’s Spare Ribs

I inherited this recipe from Mr. Blue Eyes’ grandma when I married into the family. Lucky me! When cooked right, the meat falls right off the bones. You can’t beat that!

3 – 4 lbs Pork Spare Ribs
3 small Onions, sliced
3/4 – 1 Cup Ketchup
3/4 (or less) Cup Water
2 Tbsp Vinegar (we use white)
2 Tbsp Worchestershire Sauce
1 Tbsp Salt
1/2 tsp (or less) Red Pepper (we usually leave this out because we have small children)
1/2 tsp ground Black Pepper
1 tsp Paprika
1 tsp Chili Powder

1. In a 9×13 pan, or Large Cast Iron Pot, cook meat at 450 degrees F until brown.
2. Remove the meat from the oven and cover with the sliced onions.
3. Mix all other ingredients together. Pour the mixture over the meat and onions.
4. Cover with tinfoil (or lid) and bake at 250 degrees F for three hours (or 350 for 1.5 hours), basting occasionally. It really depends on your time frame. Just remember, cooking at a lower temperature for longer will make it more tender.
5. Uncover and bake for 15 minutes more.

Serve with rice, potatoes, or egg noodles.

Note: I don’t dig a whole lot of fat on my meat, so I usually trim fat off as I go, depending on how hard it is or how much time I have.

Source: Grandma M., who told me she cut it out of a newspaper umpteen years ago.

~Kara