Summer Zucchini Bake

It’s nearly July and gardens across the country are producing massive amounts of Zucchini. I sadly don’t have a garden (once I have a yard, you better believe I’ll have one!), but I am the grateful recipient of those who have them.

This is a great recipe to have on hand. Zucchini are so easy to cook with, they take on nearly any flavor you pair them with. I LOVE this recipe, and know you will too.


Summer Zucchini Bake

Ingredients
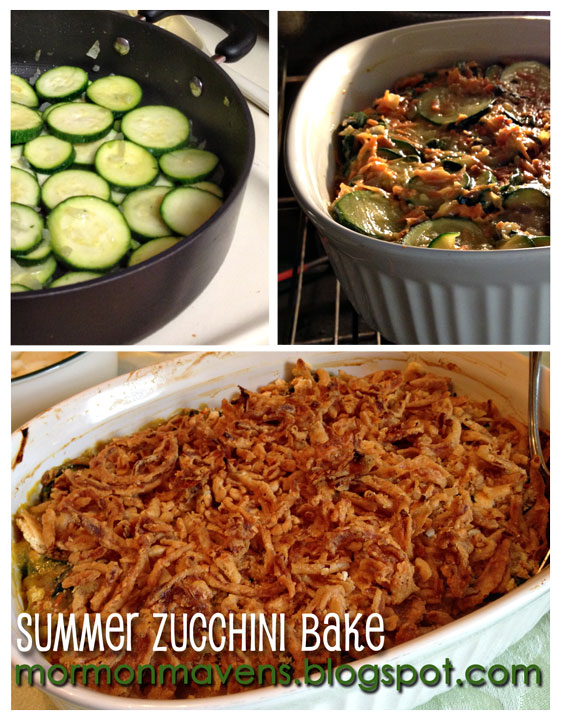
4 (regular sized) zucchini, sliced thin
2 carrots, grated
1 Vidalia onion, chopped
1 clove garlic, minced (mine came from a jar of minced garlic)
1 can cream of mushroom soup
Ritz Crackers, French Fried Onions, or another crunchy topping of your choosing

Directions
– Coat frying pan with olive oil. Add onion, saute. Once the onion is starting to saute, add zucchini and garlic. Cook until tender. (Make sure to not over cook the zucchini, you don’t want mush!) Remove from heat.
– In a bowl (or the casserole dish that you’ll bake it in) combine zucchini mixture, carrots, and soup. Mix well.
– Cook at 375 for 15 minutes in a shallow 2 quart dish. Add your topping and cook for an additional 5-10 minutes, or until heated through.

This recipe is easy to mix up too. If you have squash, throw those in. No cream of mushroom soup? I’m sure Cream of Celery would be great too. It’s such a nice way to use all that fresh produce straight from the garden.

Chicken and Spinach Stromboli

My kids love Stromboli, but only the kind with ham and cheese. Mr. Blue Eyes and I like ham and cheese, too, but sometimes it’s nice to zest it up a bit, don’t you think?

One day I had some fresh spinach in the fridge, some chicken in the freezer, and I thought, “I wonder…”  Well, my friends, IT WORKED! And here I am to share this concoction with the world. Lucky you. 🙂

Ingredients:
1 Batch of Pizza Dough (or a frozen loaf of Rhoades, thawed)
2-3 Chicken Breasts, thawed
Crushed Peppercorn and Garlic Rub (or some variation thereof–use your favorite and what’s on hand)
2 Cups Mozzarella Cheese, shredded
Fresh Baby Spinach Leaves

1. Rub the chicken with the seasoning and bake, fry, etc. until done. I use my panini maker to grill it. A George Foreman or out door grill would work great, too. Just cook the chicken. 🙂
2. Using a fork, shred the cooked chicken and set it aside.
3. Preheat the oven to 350 degrees F.
4.On a lightly floured board, roll out the dough into a rectangle.
5. Spread the mozzarella cheese over the dough until evenly covered. Spread the chicken over the cheese. Spread the spinach over the chicken. It should look like this:

6. Beginning at the upper long edge, roll the dough in toward you (like cinnamon rolls), carefully tucking spinach leaves as you go. Don’t worry too much if they bunch a little. You’ll win in the end.
7. Pinch the seam and ends shut and place in a jelly roll pan (or on a cookie sheet of some kind) seam side down.
8. Bake for 25 minutes.

Cut into slices and enjoy!

Source: An original

~Kara

Banana Cake with Vanilla Icing

Oh. My. Gosh!  This is delicious!  The icing is what makes it taste sooo good.  The cake itself tastes almost like a banana bread, but much sweeter and smoother. It would be yummy by itself, but with the icing…yum!  The icing is just addicting! I found this recipe on pinterest and changed a few things that worked better for me.  You’ve gotta try this!

Cake:
2/3 c. white granulated sugar
1/2 c. sour cream (use the good stuff!)
1 egg
2 TBSP. butter, softened (use the good stuff)
2 mashed ripe bananas
1 tsp. vanilla extract
1 c. a/p flour
1/4 tsp. salt
1/2 tsp. baking soda
Icing:
2 TBSP butter, softened
1/4 c. heavy cream
1/2 tsp. vanilla
1-1/4 c. confectioner’s sugar

Preheat oven to 375 degrees. (glass pans heat to 350)
Cream together the first 4 ingredients. Add the mashed bananas and the vanilla. Add in the last 3 cake ingredients and mix slowly. No lumps from flour…banana lump is okay, but you really should mash those well before you incorporate them into the mix. Pour into a greased 8×8 pan. Bake at 375 degrees for 20-25 minutes or until golden brown and a toothpick comes out clean! Cool completely before icing this. 
To make the icing: Cream together the butter and the confectioner sugar until smooth. Slowly add the cream in…(this is what makes it so good!)  Add in the vanilla extract and mix until smooth.  Put in the fridge if your waiting for the cake to cool because this has cream in it.  But if your cake is cooled, then ice away!
No joke…this is soo good!

*I doubled this the very first time I made it! Cooked it in a 9×13 pan and it worked well.

Banana Oatmeal Chocolate Chip Muffins (No Flour)

I’ve been looking for more recipes that don’t include flour and/or dairy.  By way of Pinterest, I found this one!  *If you want a totally gluten-free version, simply use the gluten-free oats. =)

Ingredients:
3 Very ripe bananas, mashed 
1 C Vanilla Almond Milk (I used original flavor almond milk and it was still yummy) or cow’s milk
1 T Coconut Oil (optional: helps to moisten the oats a little more and make the outer layer crisp) 
2 Eggs
1 T Baking Powder (Yes, Tablespoon)
3 C Old Fashioned, Quick,  or Gluten-Free Oats (I know, that’s a lot of options 😉
1 tsp Vanilla
As many MINI chocolate chips as you like (I used about 1/2 C)
PREHEAT OVEN TO 375* (I put that in bold type because I seem to always forget this step)
First, mash your bananas

Mix together all of the ingredients except for the chocolate chips and 
let the batter sit while you’re preparing the muffin tins. 
*This is really important in this recipe because it gives the oats a chance to release their natural thickening agent.* I was AMAZED at how these turned out looking like I had added flour.  

Spray your muffin tin with non-stick spray or use muffin liners. 
Give your batter another quick stir as you add the chocolate chips.
Evenly divide the batter into approximately 15-18 muffins.  (Or 6 mini bundt ca)
Bake 20-30 minutes. My first time making this recipe I used regular muffin tins with liners. You can attempt to eat them while they’re hot, but the muffin liners may not come off very easily.  You’ll definitely have a better time getting them off when they’re cool.  
Have I mentioned what a great texture these guys have?  Great texture. 
*Adapted from Green Lite Bites Banana Oatmeal Cups with Chocolate Chips

Fresh Blueberry Cobbler


So, somebody brought home two pints of fresh blueberries and that means I had to make something with them quick before they went all mushy.  You know the story.  Anyway, I pulled out a few cookbooks and, since it was 10:00 in the p.m., there was no time to be really creative.  Enter my trusty Betty Crocker Cookbook–you know, the orange one, circa…I have no idea, because I lost the title page with all that good info on it.  But I can always find a recipe in there when I have an ingredient and don’t have a clue what to make with it.  Hope you enjoy this cobbler.  We did…with a scoop of vanilla ice cream–can’t believe I had that in the freezer!

Ingredients:
1/2 cup sugar
1 tablespoon cornstarch
4 cups fresh blueberries (or 2 1/2 cups because some of mine got eaten first)
1 teaspoon lemon juice
3 tablespoons shortening
1 cup all-purpose flour
1 tablespoon sugar
1 1/2 teaspoons baking powder
1/2 teaspoon salt
1/2 cup milk


1.  Heat oven to 400 degrees F.  Mix 1/2 cup sugar and the cornstarch in a 2-quart saucepan.  Stir in blueberries and lemon juice.  I added about 1/4 to 1/2 cup water because it needed a little more juice.  Cook, stirring constantly, until mixture thickens and boils. Boil and stir 1 minute.


2.  Pour mixture into ungreased 2-quart casserole; keep blueberry mixture hot in oven.

3. Cut shortening into the flour, 1 tablespoon sugar, the baking powder and the salt until mixture resembles fine crumbs.  Stir in milk.

4. Drop flour mixture by 6 spoonfuls onto hot blueberry mixture.

5. Bake until topping is golden brown, 25-30 minutes.  Serve warm.  Makes 6 servings.


Source:  Betty Crocker’s Cookbook, New and Revised Edition

Brownie/Cookie Cups

This is a quick, convenient fix that satisfies youth and adults.  Nothing wrong with a little convenience!

Ingredients:

brownie mix (family size)
2 pkg. refrigerated cookie dough (the kind that is scored)
24 snack size Reese’s cups

Directions:

1.  Preheat oven to 350.
2.  Push 1.5 squares of break-apart refrigerated cookie dough into the bottom of each section of a muffin
     tin.
3.  Place 1 Reese’s cup upside down on top of cookie dough.
4.  Top with prepared brownie mix, filling 3/4 full.
5.  Bake for 18 minutes.

Notes:  Obviously you could half this recipe.  Next time, I think I would opt to use homemade cookie dough.  I loved using the square baking mold as opposed to the traditional round muffin tin.

Source: www.stockpilingmoms.com

Simple Chicken Parm

This is a great recipe that will be ready in 30 minutes. It’s simple and low in calories… just the way I like it!!

Simple Chicken Parm


6 small boneless skinless chicken breast halves (around 1lb to 1.5lbs.)
2 egg whites, lightly beaten
1 cup Italian-style bread crumbs
1 Jar of your favorite spaghetti sauce
Shredded Mozzarella Cheese
1/4 cup KRAFT Grated Parmesan Cheese
spaghetti, cooked, drained

– Heat oven to 400ºF.
– Dip chicken in egg whites, then in bread crumbs. Make sure to coat the whole chicken.
– Place in 13×9-inch pan lined with foil and sprayed with cooking spray.
– Bake for 20 to 25 min. or until chicken is done (165ºF).
– Top with sauce and cheeses.
– Bake 5 min. or until mozzarella is melted.
– To serve, place chicken on top of a bed of spaghetti! Enjoy!

(Source)

Mango Salsa

Fresh homemade salsa in the summer? YES, PLEASE! How can you resist those veggies?? (fruit…if we are technical.)

Oh. My. Goodness.

Ingredients:
8-10 Medium sized garden tomatoes
1 Red Onion
3 Mangos*
0 – 3 Jalapeno peppers
Fresh Cilantro, chopped, to taste
1 Tbsp Salt (or to taste)

1. Chop your tomatoes and onion up. Mix them in a Large bowl.
2. Dice your mangos and add them to the mixture. Here is a great video on how to dice a mango. We learned the checkerboard method when we lived in the Caribbean.


3. Deseed (or not) your Jalapenos and dice them up. I used three Medium sized jalapenos, got every seed out of each one, and our salsa wasn’t hot at all. But if you’ve ever experienced jalapenos–you can’t bank on them. 🙂 I use surgical gloves to deseed and I don’t take the gloves off until I’m finished handling the pepper, because only an idiot would cut up jalapenos, wash her hands and then harmlessly scratch an itch by her eye, right? The burning sensation is harmless. (Oy! Can you hear the sarcasm drip??)
4. Using scissors, cut the leaves of fresh cilantro and add them to the mix. We really love cilantro so we put in quite a bit–maybe 1/3 of a bunch.
5. Stir in the salt to taste and serve with your favorite chips!

HAPPY SUMMER!

Source: An Original from watching many people make many different types of salsa.


~Kara

Pineapple Creams

Pineapple is one of my favorite things to eat.  I love this fruit!  Fresh, out of the can, the juice, icecream, pineapple cake, dried slices,…etc.  I love anything pineapple.  One of my fondest memories is going to the Dole Pineapple Plantation on the island of Oahu with my husband and eating pineapple icecream while standing in the pineapple field.  That was some yummy stuff!  I came across a pineapple icecream recipe on pinterest (that the creator had concocted while trying to copy a dessert she had tasted at Disney World.   Well, I have never had one of those particular desserts, but like I said, I love pineapple.  So, I decided to try it.  It is really good!  Its not very sweet, but just enough.  I froze it first as the original recipe suggested and then I froze it overnight.   I like it both ways! But, I think I like it better when its softer.  This is really yummy! Enjoy!

2 -20 oz cans crushed pineapple with juice
2 TBSP Lemon juice
2 TBSP Lime juice
1/3 cup white granulated sugar (I think I would like to add a bit more next time)
1 and 1/2 cups of heavy whipping cream, whipped
Drain the pineapple, and reserve the liquid. Set aside, adding 2 TBSP of this pineapple juice into a blender, or food processor. (I used my Ninja!) Into the blender add drained pineapple, lemon juice, lime juice, sugar and 2 TBSP pineapple juice. Mix until smooth.  Pour into ziplock bags so it can lay flat and freeze quickly.  Whip the cream and refrigerate until needed.  When its slushy (about 1 hour and 45 min for me) pour into the whipped cream and gently stir until its all incorporated.  Freeze again in ziplock bags or container of your choice…for at least an hour. It will be the consistency of homemade icecream.  Its really yummy!

Banana Pops

When I was a kid my mom used to make a version of these as an occasional treat for me.  I make them now with just a couple of slight changes, but they are still just as tasty.

Ingredients:
bananas
creamy peanut butter
Nutella
wheat germ
popsicle sticks

1.  Peel bananas, then slice in the middle to make 2 equal sections.  Carefully insert a popsicle stick into the cut end of each banana half.  Place on cookie sheet lined with wax paper and place in freezer for 30 minutes.
2.  While bananas are freezing, melt peanut butter for about 15-20 seconds in a microwave-safe bowl.  Add Nutella and stir well to combine; set aside.  Pour wheat germ onto a small plate and set aside.
3.  Remove bananas from freezer.  “Frost” each banana with the PB/Nutella mixture.  Roll the frosted banana gently in the wheat germ and place back on wax paper.  Repeat with each banana pop.  Return pops to freezer until ready to serve.
4.  Remove from freezer for 10-15 minutes before eating (to allow bananas to soften a bit).

Notes:

  • Amounts:  I end up using about 1 Tbsp. peanut butter, 1/2 Tbsp. Nutella, and 1/2 Tbsp. wheat germ per banana pop.
  • You can use just peanut butter or just Nutella.  You could also try different nut butters like almond or cashew.
  • You can roll the frosted banana in nuts, coconut, sprinkles, anything you want.
  • It may not necessarily be a “lite” recipe, but it’s better for you than an ice cream binge!
Source:  adapted from my mom