Copycat Shoney’s Hot Fudge Sundae Cake

Shoney's hot fudge sundae cake

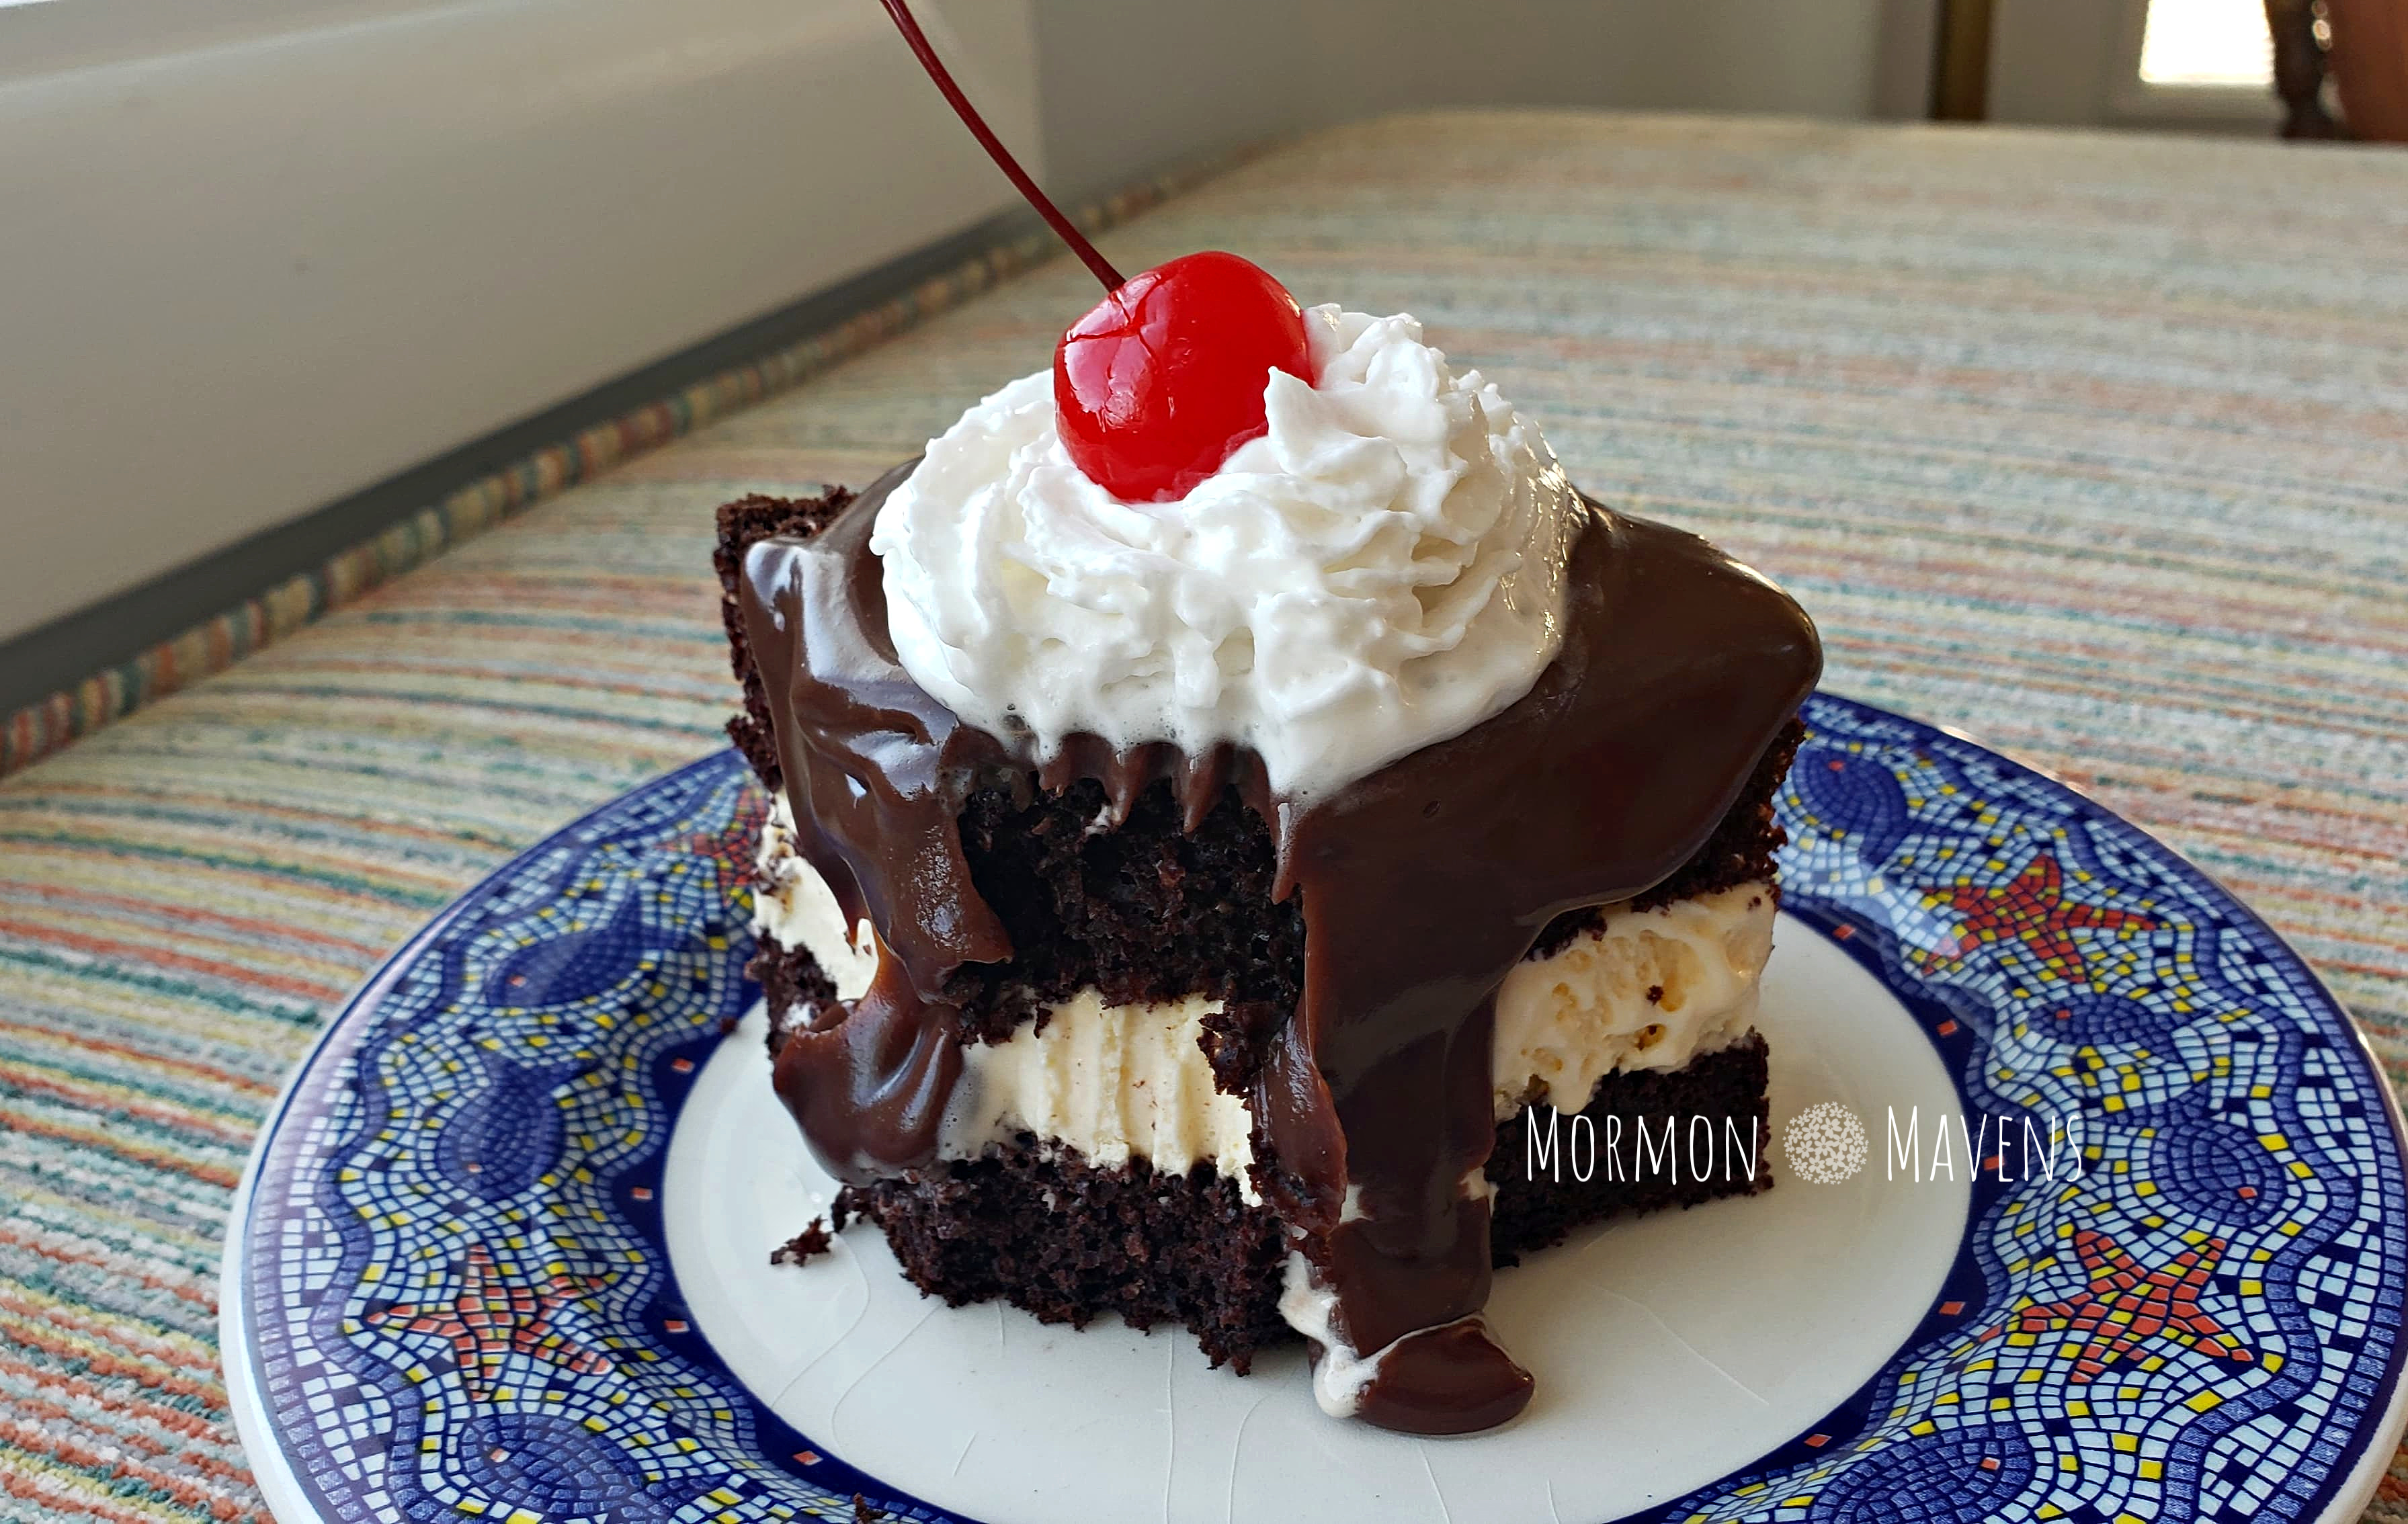
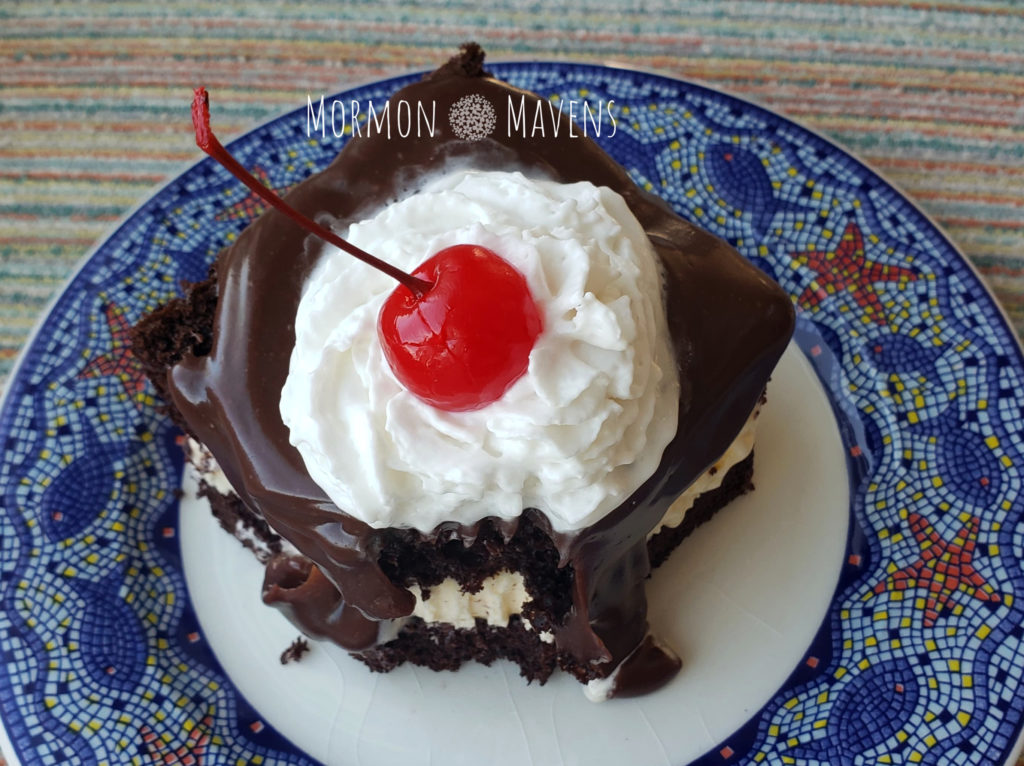
I had actually forgotten that this yummy chocolate cake, hot fudge, and ice cream dessert existed (or that Shoney’s existed) until recently while browsing Pinterest. When I saw a picture of it, immediately recognized it without even reading the text, and was instantly overcome by a wave of nostalgia.

I used to have those all the time!

When I was eleven or twelve years old we would head to Shoney’s (you may remember it as Bob’s Big Boy) occasionally for a meal and the only thing I remember about those restaurant visits is the Hot Fudge Sundae Cake. (You may also know it as Hot Fudge Cake, Hot Fudge Ice Cream Cake, etc.)  I’m sure they had other dishes that I liked but, you know, priorities.

shoney's hot fudge sundae cake


<drool>

And since National Chocolate Day is September 23, I figured this is a great recipe to honor what should be (and in my mind, IS) its own food group….CHOCOLATE.

It’s a pretty simple recipe with few ingredients.  Just make sure that you have time to allow for baking and freezing.

Copycat Big Boy's Hot Fudge Sundae Cake
Serves 12
A delicious dessert with chocolate cake, vanilla ice cream, and chocolate sauce!
Write a review
Print
Total Time
2 hr 45 min
Total Time
2 hr 45 min
Ingredients
  1. 1 dark chocolate fudge cake mix (I used Duncan Hines)
  2. plus ingredients for the cake mix (usually eggs, vegetable oil, water)
  3. 1/2 gallon vanilla ice cream
  4. 1 cup semisweet chocolate chips
  5. 1 14-oz can sweetened condensed milk
  6. 3 Tbsp. whipping cream
  7. 1 tsp. vanilla
  8. Reddi Whip or prepared whipped cream
  9. maraschino cherries with stems
Instructions
  1. Preheat oven to 350 and line a 9x13-inch pan with heavy duty aluminum foil so that, length-wise, the foil extends over the ends of the pan (this will become "handles" later to take out the cake). Spray with nonstick cooking spray and dust with a little of the cake mix powder (or use flour if you like).
  2. Mix cake mix according to package directions. Pour into you prepared pan and bake for the length of time your cake mix suggest. For me this was 26 minutes. A toothpick inserted in the center should come out clean or with just a hint of cake crumbs on it.
  3. Cool completely for (about an hour).
  4. Carefully lift up on your foil handles and place the cake on the counter. Using a long serrated knife (like a bread knife), carefully cut into the edges of the cake to a depth of about 2-3". Do this all the way around trying to stay even. Then, insert the whole knife at one end of the cake and carefully zig zag your way through the entire cake. (Using those starting cuts should help your knife to stay in a "channel" so that you don't end up with it cut unlevel.)
  5. Lift both layers at the same time from the foil and place back into the pan. Then carefully lift out the top layer and lay on top of the foil. I found this to be the easiest way to move fragile cake layers. But you do you!
  6. Take the vanilla ice cream out of the freezer. The easiest way to slice up the ice cream is to remove it as a block from it's container onto a cutting board. Use a long knife to cut 1"-ish slabs from the ice cream. Place these slabs on the top of that bottom cake layer, laying them like puzzle pieces to fit as tightly together as possible. You may need to take some ice cream scraps and fill in any gaps.
  7. Replace the top cake layer, cover with that foil you used before, and place the whole thing in the freezer for at least an hour.
  8. When you're about ready to serve the cake, place the chocolate chips, sweetened condensed milk, and whipping cream in a saucepan and melt the mixture together over medium heat, stirring constantly. Remove from heat and whisk in the vanilla.
  9. Remove the cake from the freezer and cut into 12 portions (4 by 3....or smaller portions if you want). Remove a piece to a serving plate, top with sauce, whipped cream, and cherry and you're ready to dive in!
Mormon Mavens https://www.mormonmavens.com/

Texas Skillet Cake

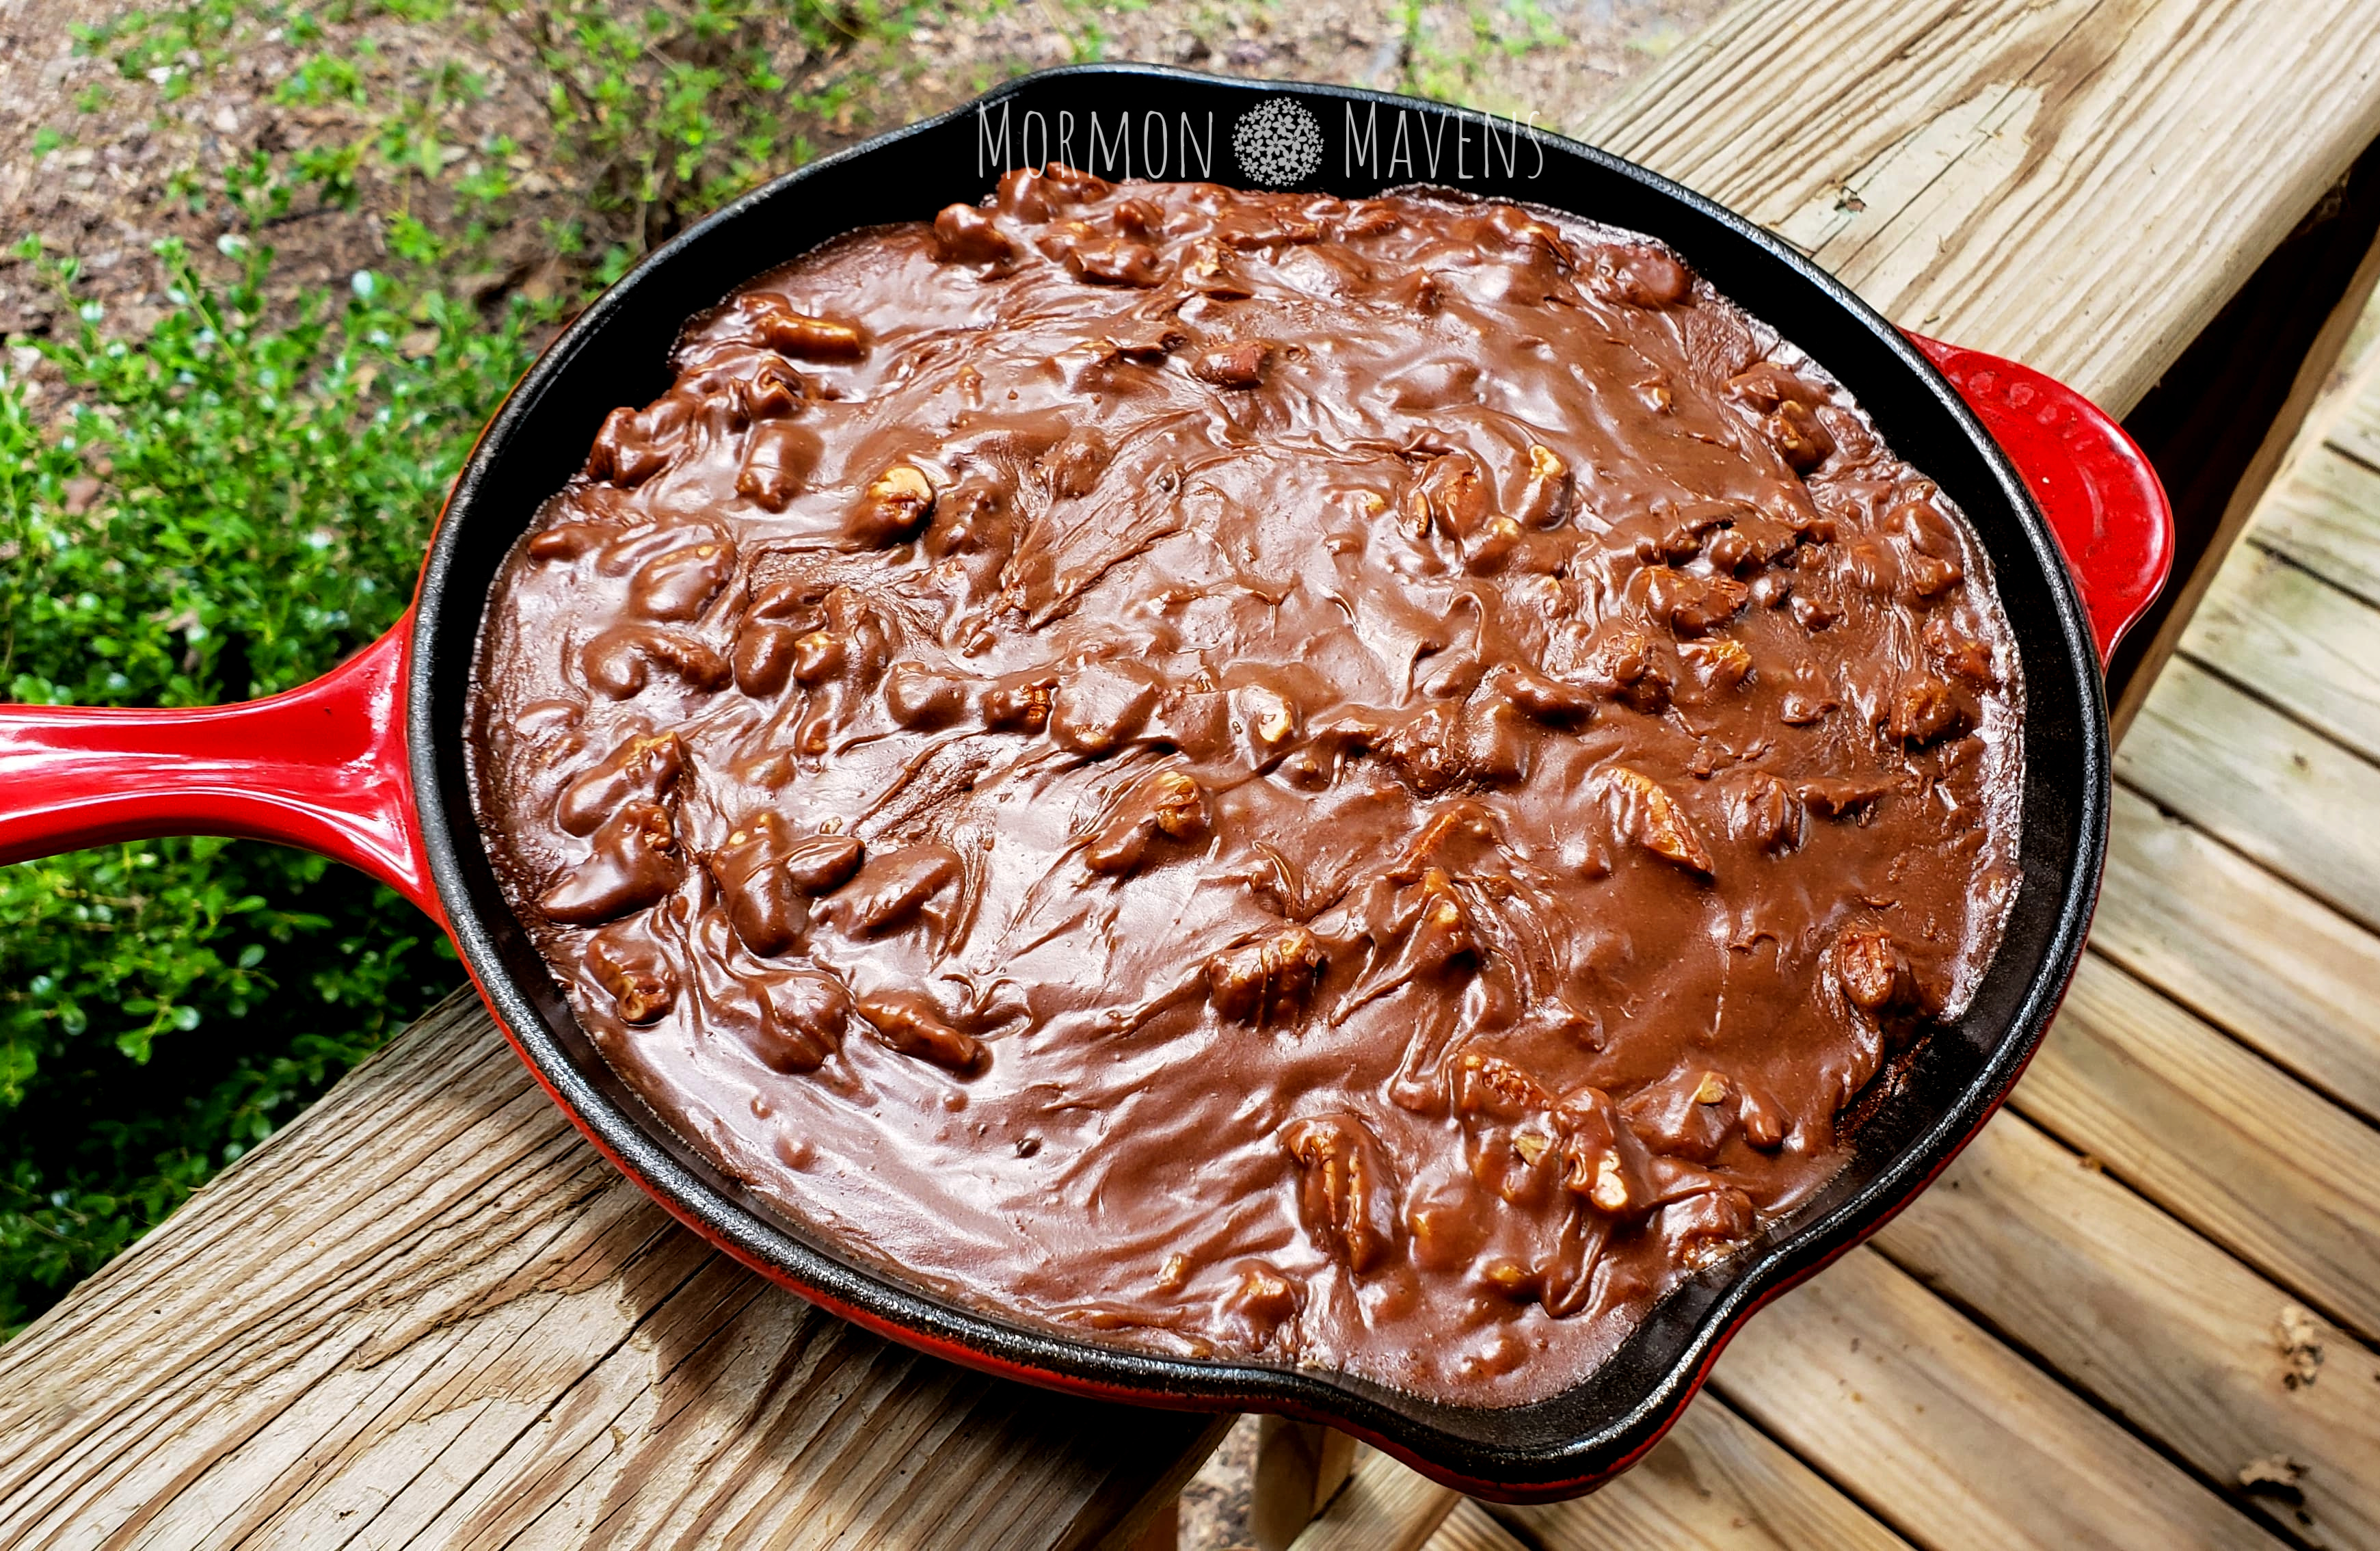
Raise your hand if you love Texas Sheet Cake!  I’ll be honest….it took me a while to like it.  I’m not sure if the cinnamon threw me off at first or what, but now I’m a die-hard fan.  But do I make it often?  No.  No, because it’s a whole sheet pan full of cake and I just can’t deal with the temptation.  There’s just something about the way that frosting seeps into the cake that just….great, now I’m drooling.

But as I was scrolling through Pinterest recently (why do I feel like all my recipes start with this line?) I came across a recipe for Texas Sheet Cake in a cast iron skillet.

Well, if you know me, you know that I LURV my cast iron skillets (I mostly use Lodge but also have this lovely Le Creuset) and am always looking for new recipes to use in them.  So, of course, I jumped on this one!

The size of this recipe is just perfect.  It’s enough to feed a family dessert and maybe have a few portions left for dessert after dinner the next day.  Or to eat for breakfast.  Not that I did that or anything.

Anyway…..here’s a tip:  the recipe calls for buttermilk but you can make your own buttermilk substitute by pouring 3/4 tsp. apple cider vinegar into a measuring cup, then fill to the 1/4 cup mark with milk. Let stand a few minutes, then add to the recipe.

All right…off with you…let them eat Texas Skillet Cake!

Texas Skillet Cake
Serves 6
The same great flavor you know and love in a much more manageable amount! Plus, cast iron skillet...hello!
Write a review
Print
Ingredients
  1. 1 cup sugar
  2. 1 cup plus
  3. 1 Tbsp. all-purpose flour
  4. 1/2 tsp. baking soda
  5. 1/2 tsp. cinnamon
  6. 1/2 cup water
  7. 1/4 cup butter
  8. 1/4 cup vegetable oil
  9. 2 heaping Tbsp. unsweetened cocoa powder
  10. 1/4 cup buttermilk*
  11. 1 egg
  12. 1/2 tsp. vanilla
For the Frosting
  1. 1/4 cup butter
  2. 2 Tbsp. unsweetened cocoa powder
  3. 3 Tbsp. milk
  4. 2 cups powdered sugar
  5. 1/2 tsp. vanilla
  6. 1/2 cup chopped pecans
Instructions
  1. Preheat your oven to 400 degrees. Prepare your skillet; it should be well-seasoned and greased. I poured a little vegetable oil in mine and wiped it around the inside with a paper towel.
  2. Sift together the sugar, flour, baking soda, and cinnamon. Set aside.
  3. Combine the water, butter, oil, and unsweetened cocoa in a sauce pan and bring to a boil while stirring. Pour this mixture over the dry ingredients and mix well.
  4. Mix the buttermilk, egg, and vanilla together then add to the chocolate mixture, mixing the batter well.
  5. Pour this mixture into your prepared cast iron skillet (mine is about 10" across). Bake for 20-25 minutes. It's done when a toothpick inserted into the center of the cake comes out clean or with just a few tiny little crumbs on it.
  6. While the cake is baking and is almost done, prepare the frosting by combining the butter, unsweetened cocoa, and milk in a saucepan. Slowly bring it to a boil, remove it from the heat, and add in the remaining frosting ingredients. Mix it well and pour it over the cake when it comes out of the oven.
  7. Let the frosting set up before serving. Serve with whipped cream or vanilla ice cream.
Notes
  1. *Here's a tip:  the recipe calls for buttermilk but you can make your own buttermilk substitute by pouring 3/4 tsp. apple cider vinegar into a measuring cup, then fill to the 1/4 cup mark with milk. Let stand a few minutes, then add to the recipe.
Mormon Mavens https://www.mormonmavens.com/

Angel Biscuits

In search of…..the perfect biscuit.

I found recipes.  I tested them.  I made notes on each version of what to tweak next time.  Then I realized that I had no time to keep testing before I posted for today.  I knew I wanted to post a biscuit recipe since it’s National Biscuit Month in September, but how to do that when I was out of time?

And then I thought, “Hey, what about Angel Biscuits like the ones I used to make when Rick and I first got married?”

But crud…..I’m on vacation and my recipe is at home in a recipe box.  Well, let’s go ask the Google.

And, y’all, I literally just clicked on the first recipe that came up.

Trisha Yearwood’s Angel Biscuits.

Sure….okay…let’s try this one.  Bit different than what I remember, but whatever.

(Keep in mind that, at this point, I’m just thinking this recipe will “have to do” for National Biscuit Month until I can find the ultimate recipe through more testing.)

So I make this recipe for my family (and some visiting family) and hope for the best.

And that’s exactly what I got.  THE BEST.

Responses from family members…and I quote:

     Amazing!

     Bojangles has nothing on this biscuit!

     This is the best biscuit I’ve ever had!

     I just found my new happy place!

How serendipitous!  I find the ultimate recipe while thinking I’m just going to “make do” with plain old Angel Biscuits.

Well, these are not like the ones I used to make (although those were mighty good).  These are, well, incredible.  They took a little longer with rise time, but they are SOOOOO worth it!

Try ’em out and let me know what you think.

Angel Biscuits
Serves 12
Delicious, layery, buttery Southern goodness.
Write a review
Print
Total Time
2 hr
Total Time
2 hr
Ingredients
  1. 5 cups flour
  2. 1 1/2 tsp. baking powder
  3. 1 tsp. baking soda
  4. 1 tsp. salt
  5. 5 Tbsp. sugar (divided)
  6. 1/4 cup warm water (90-100 degrees F)
  7. 1/2 ounce active dry yeast (2 pkg)
  8. 1 cup salted cold butter, diced (2 sticks)
  9. 2 cups buttermilk
  10. 4 Tbsp. melted butter
Instructions
  1. In a large bowl, whisk together the flour, baking powder, baking soda, salt, and 3 Tbsp of the sugar.
  2. In a small bowl combine the yeast, sugar, and water. Stir this until the yeast dissolves and set it aside. Let stand for a few minutes until bubbles appear.
  3. Add the cold diced butter to the flour mixture and toss with hands. Use a pastry cutter to break up the butter and cut it into the flour. Stop when you have pea-sized chunks of butter mixed in with the flour.
  4. Add the buttermilk and the yeast mixture to the flour/butter mixture. Stir with a wooden spoon until it’s mostly combined. It will probably be pretty crumbly looking.
  5. Turn out onto a very lightly floured surface and knead until the dough comes together (no more than about 15 times). Place back in bowl, cover with plastic wrap or a clean dish towel, and allow to sit and rise for about an hour.
  6. When you’re ready to cut the biscuits, preheat your oven to 425 degrees F.
  7. Dump the dough onto a lightly floured surface again. Press the dough out to about 1-1.5″ thick. Fold over onto itself and press out again. Repeat this technique 3 times. Then press out to desired thickness (I like 1-1.5″).
  8. Using a floured biscuit cutter, cut out your biscuits making sure NOT TO TWIST the cutter. Just go straight down and back up again. Place cut biscuits in a 9×13-inch pan or large cast iron skillet that has been brushed with some of the melted butter.
  9. Do not just smush together the leftover biscuit dough for cutting more biscuits. Repeat the whole press/fold technique each time you need to recut.
  10. Brush the tops of the melted butter (save some for when they come out of the oven).
  11. Bake for 18-22 minutes or until the tops are a golden brown. Brush with melted butter and enjoy!
Mormon Mavens https://www.mormonmavens.com/

Vanilla Fondant

Originally posted on March 17, 2014.

When I was looking for a fun recipe to re-post for today, I realized that next month (can’t believe it’s almost September!), among other things is National Breakfast Month.  Okay. Didn’t know that was a thing, but let’s go with it.  Don’t you love this cake?  Yes, it’s a cake and why not make it for your family next month in honor of Breakfast? This is one of my favorite cakes that Julie has made.  I mean, seriously.  How much fun is this?

When I first began decorating cakes in earnest I wanted to try my hand at fondant.  But I had always heard that store-bought fondant tasted, well, icky.  Plus, it was expensive.  So I checked out cakecentral.com to see if I could find a fondant recipe.  I was a little intimidated, but decided to forge ahead anyway.  Well, I hit the jackpot with this recipe because it has turned out every single time and I always get compliments on it’s flavor and texture.  Many people try the popular marshmallow fondant recipe that’s floating around but, to me, that thing is just a messy headache.  This recipe may take longer and have more ingredients but I find it far superior to the marshmallow fondant.  Once you’ve made it a couple of times, it’s a piece of cake!  Get it?

Yes, the pancakes, butter, egg, and bacon are all made out of fondant.  I made this cake for one of my sons’ birthdays.  One of my favorite cakes to date!  So much fun.

Ingredients:
1/2 cup milk
3 pkg. plain gelatin (6 tsp.)
1 cup light corn syrup
3 Tbsp. salted butter
3 Tbsp. glycerin
2 tsp. vanilla
dash salt
3-4 pounds powdered sugar

1.  Combine the milk and gelatin in a double boiler and allow to set until firm.  Then simmer the water and cook gelatin until it is dissolved.
2.  Add the corn syrup, butter, glycerin, vanilla, and salt and cook until the butter is almost completely melted, stirring frequently.  Set aside to cool.
3.  Put TWO pounds of powdered sugar in large mixer bowl.  Strain the gelatin mixture into the powdered sugar.  Mix slowly with a batter blade until just combined.
4.  Change to the dough hook attachment.  Slowly add 1-2 pounds powdered sugar.  The amount will depend on the humidity where you live.  I never get to 2 pounds.  You want the fondant to be firm and barely sticky.
5.  Scrape fondant onto a heavily-powdered-sugared surface and knead it for a few minutes.
6.  Take two pieces of plastic wrap, about 2 feet each, perpendicular to each other.  Spray lightly with nonstick spray.  Place fondant in center and fold wrap over fondant.  Store this in a large Ziploc bag or large airtight container.  Allow to set for 24 hours before using.

Source:  cakecentral.com

Back-to-School Mantelscape

Don’t yell!  I know we are all in full Summer mode right now, but the school bell will be ringing before you know it and we just wanted to share this great idea–originally posted on September 13, 2016–for a back-to-school decorating project that will have you and your kiddos excited for the first day of school! Whether you homeschool or do public school, this is a fun and creative idea.  I might do it myself and my kids are grown–ahh, but I do have grandchildren…

I have never, ever thought much about a mantel-scape.  My house is not brimming with magazine-level decor or “scapes” of any kind, really.

But the thought of having a finite area to decorate kind of appealed to me when I began to mull it over.

And since the hubs and I built a new mantel last year, it really is due for an upgrade in the decor department.  I just threw the look pictured below together quickly to keep it from being naked.  I posted our DIY pic on Facebook and when a former Maven (hi, Kara!) mentioned in a comment that she couldn’t wait to see what I would do with it, I was a little stymied.

ready-old-mantel-1

What would I do with it?

It was only recently that the idea began to form.  Wouldn’t it be fun to do something different each month?  Nothing extravagant, and mostly consisting of items already in the house.

Yes, that could work.

So, as much as I’d love to jump onto the Halloween theme now (I’ve already been playing with some items for it), I figured September is best pigeon-holed as “back to school” month.

And while we are a homeschooling family with no school bus stops by our driveway, we are “back” at it this month!  So, yeah….I’m lovin’ it.

ready-new-6

What you see is mostly items scavenged from around our home.  In fact, why don’t I just list for you the breakdown?

 Found at Home
globe
encyclopedias & books
ruler & pencils in cup
wooden puzzle
chalkboard blocks
clipboard with worksheet
chalkboard
flag
flannel board
 Made for This Project
felt ABC & 123
page bunting
 Purchased for This Project
jute for bunting
artificial apples


Wow!  Just typing it out I’m thinking, “How cool is it that you can pull something together like this with stuff you already have?”  I LOVE IT! 

And really, the basic ideas to keep in mind are:

  • vary the heights of the objects (high and low)
  • balance the colors (sprinkle them throughout and focus on a few colors)
  • balance the “weight” (doesn’t necessarily have to be symmetrical, it should just feel balanced)
  • use pics of other mantelscapes that you like as a guide

ready-new-1

I bought the jute for $4 and a bag of fake apples for  $9.99 (but there were 6 in there–and yes I bought it specifically for the mantel but that’s only because my old fake apples from a Thanksgiving arrangement finally bit the dust after too much hot/cold attic storage!).  Pretty cheap mantel!

ready-new-8

Now, I have to confess that, never having cared about a themed mantelscape before now, I really didn’t know where to start!  Oh, Pinterest…you amazing idea generator, you!  Yes, Pinterest saved the day.  I pretty much used an image on there for my template and just ran with it from there.  And that’s how I roll, really.  I’m not super great at completely original ideas, but I AM super great at taking an existing idea and developing it.  

ready-new-3

The main inspiration image I saw used dictionary pages for the page bunting.  I thought about cutting out pages from a book, but….well, book-lovers just don’t do that!  So, I went online and found images of old pages from dictionaries, school primers, maps, etc., and printed them out.  Then I used a flag bunting template (that I also snagged on Google images) to pencil in the cutting lines on the printed pages.  A quick hole punch through each top corner and they were ready for stringing onto the jute!

ready-paper-bunting-1
ready-paper-bunting-2
ready-paper-bunting-3

ready-new-2

I was unsure if mantelscapes would be something I could get on board with.  But y’all, I am loving this idea and can’t wait for October, November, and December!!!

Happy ‘Scaping, Y’all!


Frosted Marshmallow Brownies

‘Tis the season for all those summer get-togethers and family reunions.  Running out of ideas for what to take? 

Whether you say “dish to pass” or “potluck”, sometimes it’s just hard to come up with something yummy and easy.  Here is a great idea we shared last summer.

And who can resist a recipe post that starts out with Captain Jack Sparrow?  Savvy?


 Yesterday, my kids asked for “you know, those marshmallow brownie things we used to make all the time” and I was like…

jack sparrow brownies

Seriously, I had completely forgotten.  It’s been years!

It’s a recipe out of my husband’s family’s cookbook.  The original recipe has a scratch brownie, but when I’ve got Thrive Life Brownie Mix lying around, why not use it?  It’s a “just add water” mix so I love that.  But you can use your favorite store mix or your favorite basic brownie recipe!  The fun part comes in what you put on top!

Frosted Marshmallow Brownies
Yields 16
A quick and easy brownie makeover!
Write a review
Print
Prep Time
5 min
Cook Time
35 min
Prep Time
5 min
Cook Time
35 min
Ingredients
  1. 3 3/4 c. THRIVE Fudge Brownie Mix
  2. 1/2 c. hot water
  3. 2 c. mini marshmallows
Frosting
  1. 1/4 c. butter, softened
  2. 1/3 c. unsweetened cocoa
  3. 2/3 c. powdered sugar (approximately)
  4. 1/4 c. milk
  5. 1 tsp. Vanilla Extract
Instructions
  1. Preheat oven to 350 degrees.
  2. Add the hot water to the brownie mix in a medium bowl. Stir just until the mix is fully moistened. Allow to sit for 5 minutes. (If not using Thrive mix, just prepare your favorite box mix or brownie recipe as directed.)
  3. Spread brownie batter into a greased 9x9-inch baking pan. Bake for about 35 minutes or until a toothpick inserted into the center comes out almost completely clean.
  4. Turn off the oven, pour the marshmallows out in an even layer on top of the brownies, and return the pan to the oven for 3-5 minutes. Remove and set aside to cool.
  5. Mix the frosting ingredients together, adding more powdered sugar if necessary to make the frosting spreadable. Spread the frosting over the cooled marshmallow layer. Cut into squares and enjoy!
Mormon Mavens https://www.mormonmavens.com/

Pizza Bowls


Hey, the kids are home for the summer !  Here’s a recipe–originally posted by Julie on November 21, 2016–that you can do together and it’s sure to please everyone at your house.  I’m thinking I might need to try this one soon…


You know those videos you see on Facebook?  The ones where they show amazing food?  Well, I save those.  And sometimes I actually make the recipes!  But this one…this one was different.

A Food Network dude was talking about one of his favorite places and that they served these Pizza Pot Pies.  I was drooling!  I mean, they looked amazing.  But hey, this place had some kind of Sicilian crust thing going on and, of course, a fancy restaurant oven.  I can’t make that at home, can I?

Challenge accepted.

I had to work with what I had.  So I took some poetic license with their concept.  With the crust.  With the oven.  With the name, even.

But the result was, well…..UH-MAZING!!!

These things are the bomb at my house–every single person in my family loves them.  And, they are so customizable!  Plus, they are fun to experiment with.

pizza-bowl-varieties

Adjust your cheese, sauce, and toppings to fit your mood, taste, or leftovers in the fridge!  here’s what I used to make the above 3 experiments:

  • Philly Cheesesteak:  leftover flank steak, provolone cheese, Thrive Bechamel sauce, Thrive red peppers, Thrive green peppers, Thrive onion slices
  • Chicken & Broccoli Alfredo:  mozzarella cheese, grated Parmesan, Thrive Seasoned Chicken Slices, Thrive Broccoli, Thrive Onion Slices
  • Meat Lovers:  mozzarella cheese, bacon, diced pepperoni, Thrive Sausage Crumbles, Thrive Ground Beef

I can see my oldest daughter wanting an experiment with pineapple and ham.  And I’d love to give a dessert pizza a try maybe with some ricotta and cream cheese, Nutella, and strawberries!

Pizza Bowls
Serves 4
Upside down pizza pot pie goodness baked in a bowl!
Write a review
Print
Prep Time
1 hr 20 min
Cook Time
15 min
Prep Time
1 hr 20 min
Cook Time
15 min
Ingredients
  1. 2 1/4 tsp. active dry yeast
  2. 1 cup plus 2 Tbsp. very warm water
  3. 3 3/4 cup Thrive Country White Dough Mix
  4. cheese of your choice (mozzarella, provolone, cheddar, etc.)
  5. sauce of your choice (spaghetti, pizza, Alfredo, Bechamel, etc.)
  6. toppings of your choice (pizza meats, veggies, etc.)
Instructions
  1. In the bowl of a stand mixer, combine the yeast and the 1 cup + 2 Tbsp. very warm water. With the dough hook on the mixer, slowly add in the dough mix until well-combined, then let the machine knead for 5 minutes.
  2. Remove the dough to an oiled bowl, turning dough over to coat. Cover bowl with a clean towel and allow to rest and rise for about 40 minutes or until doubled in bulk. Punch down and allow to rise again.
  3. Punch down and separate into 4 equal chunks. On a counter or floured board, roll or press out each chunk into a circle wide enough to cover the bowl and come down the sides of the bowl by at least an inch.
  4. Spray each bowl with nonstick cooking spray thoroughly. Also spray the outside rims a little. Layer 4-6 cheese slices in the bottom of each bowl.
  5. Mix the Tomato Sauce with the water until smooth. Pour 1/2 cup of sauce into each bowl.
  6. Add pizza toppings of your choice. It's okay to fill up the bowl to the top or even have it be mounded a little.
  7. (Note: you can use Thrive veggies and meats for toppings. Just refresh them first!)
  8. Take a circle of dough and carefully cover each filled bowl so that the dough goes over the edge and down the sides of the bowl by at least an inch.
  9. Place bowls on a large baking sheet making sure to leave space between them. Bake at 425 degrees for 15 minutes or until deep golden brown on top.
  10. Remove from oven and brush the crusts with melted butter.
  11. Remove a bowl from the baking sheet and place it on a dinner plate. Take another dinner plate and place it upside down over the pizza bowl. Using both hands--thumbs on top plate and fingers under bottom plate--firmly and carefully turn the plates over. Remove the top plate.
  12. Using a couple of spoons, carefully release the bowl from the crust/filling by lifting up on one side. If cheese has stuck to the bottom of the bowl, use the other spoon to scrape it out. Carefully remove the hot bowl and set aside.
  13. Enjoy! You'll want to eat this with a fork and knife!
Notes
  1. Because I sell Thrive, I have a LOT of Thrive. So I used our bread mix. But you can use your favorite bread dough mix or bread recipe. Just use what you'd use for 1 loaf.
  2. I made this using our family's cereal bowls, which are OVEN SAFE*****. But you can use any oven safe bowl/ramekin. I've even used kid sized real baking tins. I like using the ramekins we have because it makes a smaller portion which is just right for me.
Mormon Mavens https://www.mormonmavens.com/

Peach Cider Sorbet

My husband picked up some Peach Cider at South of the Border a couple of weeks ago, probably because we once had a Peach Cider Slushie at an Amish country store that I still think/talk/drool about.  I decided to try making sorbet out of it but couldn’t find a recipe specifically for peach.  So I looked over a few recipes I found on the internet and combined/tweaked/added to come up with this one.  It was a big hit with the family!  It tastes like fall, but since peaches are a summer fruit it’s best in summer.  Of course, you could always try frozen peaches.  Or you can try it with apple cider and apples, maybe add some whole cloves in with the cinnamon stick.  I’m sure that would be great!

Ingredients:
2 cups peach cider
2 large, ripe peaches (peeled, pitted, and cut into bite sized chunks)
1/4 cup white sugar
1 Tbsp. molasses
1 Tbsp. lemon juice
1 cinnamon stick
1/8 tsp. salt.

1.  Place all ingredients in a medium saucepan and bring to boil.  Reduce heat and simmer for 10 minutes.  Peaches should be soft.  Remove from heat and let the mixture cool for a bit.
2.  Remove the cinnamon stick and discard.  Transfer mixture to a blender and puree until smooth.  Strain mixture through a sieve into a bowl.  Allow to cool to room temp, then cover and refrigerate for at least 2 hours.
3.  Pour chilled mixture into ice cream machine and process until frozen and thick.  Transfer sorbet to a freezer container and freeze for at least 2 hours.

Serve and enjoy!


Originally posted on August 11, 2014.

Soft Caramel Dip


I love this yummy dip.  It reminds me of all things fall, so I’m posting it today in honor of our first day of school which also reminds me of fall (even though technically it’s still summer!).  I usually serve it with cut up apples and bananas, but you could experiment with other fruits as well as pretzels and various types of cookies (I bet Ginger Snaps would be awesome).  It’s normal for small bits of caramel to never quite get mixed in.  Think of those as hidden treasures.


Ingredients:
1 8-oz. pkg cream cheese, softened
1 cup sour cream
50 store-bought caramels, unwrapped

1.  In a mixer, blend the cream cheese and sour cream together until smooth.
2.  Melt caramels in a microwave safe bowl.
3.  Immediately pour caramel into creamed mixture and blend well until smooth.
4.  Eat right away or store in the fridge.  You may need to warm it a bit in the microwave if it is too stiff from refrigeration.

Source:  my recipe box (no clue where it came from, sorry!)

Originally posted on August 22, 2011.

Chocolate Fondue


I recently returned from a wonderful river cruise in Europe with my husband and my parents.  We had a wonderful time!  Our first stop before boarding the boat was Lucerne, Switzerland.  Chocolate everywhere!  My kind of place.  We had lunch one day at a little restaurant on a side street….a fondue house.  We grabbed a table outside and checked out the menu.  We had every intention of having cheese fondue but when we saw the prices (holy cheese!) we quickly decided on the cheapest fondue item for our meal:  chocolate fondue (and that was still really expensive).  

 
It. was. uh. mazing.  (That’s my hubby in the pic above, enjoying a tasty chocolate lunch in the heart of Lucerne.)  Then we found out it was nothing more than melted chocolate bars and cream.  What?!?  I knew as soon as we got home I had to try this with the kids.  So we did.  And it tasted exactly the same!  Well, until our makeshift fondue pot exploded.  Yeah, that wasn’t as tasty.  The next time we made it we didn’t worry about having it on a flame.  It didn’t stay in the bowl long enough to harden up anyway….we ate it too fast!
 
 
Ingredients:
6 small Toblerone bars
heavy cream, about 1/2 cup to start
 
1.  Unwrap the bars of chocolate, break them up, and place the pieces in a saucepan with the cream.  
2.  Stir while it melts and remove from heat when the mixture is smooth.  Add more cream to get your preferred consistency for dipping.
3.  Serve with cut up fruit, pretzels, cubed pound cake, etc.  My personal favorites are strawberries and fresh pineapple.
 
You can use any combination of Toblerone flavors.  We used half-yellow packaged bar, half blue-packaged bar (I believe those are the technical terms).  My local grocery store carries those as well as a dark chocolate and a white chocolate.  Mix and match to your heart’s content!
 
Originally posted on September 30, 2013.