Chocolate Chip Pancakes

These are so tasty that my kids ask for them *almost* every morning! (It couldn’t have anything to do with the chocolate…) The syrup that comes with this recipe is so easy, and SO DELICIOUS! Definitely  one of my favorites!

Pancake Ingredients:

2 Cups all-purpose Flour
1/4 Cup White Sugar
2 Tbsp Baking Powder
1 tsp Salt
2 Eggs
1.5 Cups Milk
1/4 Cup Vegetable Oil (We use Canola.)
1/2 Cup MINI-Chocolate Chips

1. Sift all the dry ingredients together in a Medium-Large Bowl.
2. Combine the wet ingredients together and the add them into the flour mixture.
3. Stir in the Chocolate Chips*.
4. Pour onto a lightly greased hot griddle. Flip over when bubbles form on top; cook until second side is golden brown.

CINNAMON HONEY SYRUP:

Ingredients:
1 Cup Honey
1/2 Cup (1 stick) Margarine or Butter
1 tsp Ground Cinnamon

1. Combine all the ingredients into a 2 cup microwave-safe bowl. (I use my Pyrex Measuring Cup.)
2. Microwave, uncovered, on high until the butter is melted, stirring occasionally until the syrup is hot.

Camping Granola Bars

I love when a new family tradition blossoms.  One of those for my family has been an annual cabin camping trip to Hanging Rock State Park.  A tradition within a tradition has been to have these yummy granola bars as part of that trip.  When the trip gets calendared the next thing out my kids’ mouths is “You have to make those granola bars, Mom!”

Ingredients:
8 cups oats (we use old fashioned)
1 cup butter, melted
2 tsp. vanilla
2 cups brown sugar
1 cup corn syrup or honey
2 tsp. salt

Optional ingredients:
1 cup peanut butter
chocolate chips
nuts
coconut
dried fruit
cinnamon
etc.

1.  Mix all together in large bowl.  Use your hands to evenly mix.
2.  Press firmly into a large, greased cookie sheet.  Bake at 400 degrees until the bars are golden brown and have begun to bubble a little.
 At this point you can sprinkle chocolate, peanut butter, and/or vanilla chips across the top if you want to.  Allow them to melt and then spread in a thin layer.

3.  Cool completely and cut into bars.


Source:  Melissa Coombs’ cookbook, The Hows and Whys of the Year Supply (Chat N Chew Granola Bars)

Notes:

  • I doubled the original recipe in the amounts above, so you can easily half it if you need less bars.
  • I like to wrap my bars in wax paper and tape closed.
Enjoying a rest at the top of a very long, very steep hike!

French Breakfast Puffs

I remember making a version of these delicious morsels as a teenager.  Back then I think I pulled the recipe from the Fannie Farmer Cookbook.  But recently I noticed that The Pioneer Woman had a version in her first cookbook.  My daughter decided to give them a try and they were even more delicious than I remember.

Truly, they just melt in your mouth.  I dare you to eat just one.

Ingredients:
3 cups all-purpose flour
3 tsp. baking powder
1 tsp. salt
1/2 tsp. nutmeg
1 cup sugar
2/3 cup shortening
2 eggs
1 cup milk
——–
Coating:
2 sticks butter
1 1/2 cups sugar
3 tsp. cinnamon

1.  Preheat oven to 350 degrees.  Lightly grease 12 muffin cups.
2.  In a large bowl combine the flour, baking powder, salt, and nutmeg; stir to combine and set aside.
3.  In another large bowl, cream the sugar and shortening together.  Add in the eggs and mix well to combine.
4.  To the creamed mixture add:  one-third of the flour mix, one-third of the milk.  Beat well.  Repeat until all the flour and milk have been added.
5.  Fill your muffin cups two-thirds full and bake for 20-25 minutes until golden.  Remove the muffins from the pan and set them aside.
6.  Melt the 2 sticks of butter in a bowl (P-dub uses loaf pans and these work great!).  In another bowl (or loaf pan) combine the sugar and cinnamon.  Dip the warm muffins into the butter, completely coating each one.  Then roll the muffin in the cinnamon-sugar.

According to P-dub, these freeze well.

Source:  The Pioneer Woman Cooks

Peach Preserves

We moved two weeks ago into a new home on the Eastern Shore of Maryland.  The previous owner was an outdoor lover and put lots of time and care into her beautiful yard.  When we were moving into the home I glanced out the kitchen window and saw our new peach tree was OVERLOADED with peaches! Into my wanna be domestic mind came one thought, “Oh! I get to make peach preserves!”  Well, two weeks later as the peaches started to fall off the tree and the neighbors started coming over and asking if they could have some, I remembered I wanted to try my hand at making some preserves.  So, I stopped unpacking and arranging the house and set to making preserves.  Which, I have NEVER done before! Long story short, it wasn’t hard!  It went really great!  (Aside from the fact that I had the heat turned up too high at one point and it popped all over my arm while I tried to stir the concoction! That burned like crazy! But, I’m okay now.) This recipe is scrumptious!  And we have probably gained a few lbs this week because we can’t stop eating it! That probably has something to do with all the sugar in this, but I keep telling myself its the fresh peaches…they are so healthy for you!  This is my recipe. Its a combination of at least 3 or 4 I have read in preparation for this. And believe it or not, I didn’t add as much sugar as some of the recipes suggested! 

12 cups peaches, fresh whole peaches, peeled and chopped, about 20 peaches size of tennis ball
3 TBSP. lemon juice, freshly squeezed, no seeds please
8 cups white granulated sugar, for every 3 lbs of peaches use 3-4 cups of sugar
1 box of pectin
12- 1/2 pint sterilized canning jars and lids, and I also used 2 pint sized jars for immediate use.
tongs, to remove the jars from the canning process in the hot pot of water
wide mouth funnel, but I didn’t have one and all went well

     The first thing I did was set a big pot of water on the stove to boil.  Sterilize everything! Then set to dry on a sterile rack.
    Then boil some more water and get all the peaches washed while waiting for the water to boil.  I filled the sink with the peaches and then filled it with water. Washed them off really well again as I was draining the sink and rinsing it out.  Place all the peaches in a huge bowl and then one by one cut an “x” across the bottom of the peaches and placed them into the pot.  Add about 6-8 peaches at a time and let them boil for about 1-2 minutes.  Then take them out and place them into another large bowl. Add more peaches to the pot of boiling water.
     The purpose of this is to loosen the peach skin so you can peel it right off!  It works pretty well. Although, you might not find it necessary if you just want to dig in and start peeling away with your knife. But, I think the boiling method helps you save more of the peach flesh when peeling.
     After you have seeded and peeled and chopped all the peaches,you should do a bit of clean up and get out the sugar. Add 8 cups of white granulated sugar to the peaches in the bowl and stir really well. Let it sit for about 30 minutes to an hour.  Stir periodically to get the settled sugar off the bottom.
     Add the peach and sugar mixture to a big stock pot and stir in the pectin. Bring the mixture to a boil then lower it as needed to keep yourself from getting burned as you stir constantly to keep it from sticking. Boil and reduce this while stirring for about 30 minutes, maybe longer if it needs to thicken more. Cut off the heat. Funnel the peach preserves into the jars and tighten the lids.
     Bring another pot of water to boil that will be deep enough for your jars to sit in. Water should reach the lids. Add about 5 jars at a time and boil for about 10 min per group.  You should hear the lids popping.  That is the suction being created!  Remove and set aside on a rack to cool.  I even heard the popping after the jars had been removed!  It was like an applause for  a job well done!!!!
    We immediately spooned some hot peach preserves over ice cream and thought we had died and gone to heaven.  This stuff is divine!

Apple Cider Syrup

I guess this is one of those recipes that you don’t usually find until the fall, HOWEVER, we LOVE pumpkin. Pumpkin cookies, pumpkin pancakes, pumpkin waffles, pumpkin seeds, pumpkin heads…that’s what my granddad used to call us kids when we were young.

This syrup is the perfect combination for pancakes and waffles. It is Celestial Kingdom food–trust me.

Ingredients:
1/2 Cup Sugar
1 Tbsp Cornstarch
1 tsp Cinnamon
1 Cup Apple Cider
1 Tbsp Lemon Juice
2 Tbsp Butter

1. In a medium sauce pan, stir together Sugar, Cornstarch, and Cinnamon.
2. Add Apple Cider and Lemon Juice. Stir until well combined.
3. Cook over Medium Heat until it comes to a boil. Boil until thick enough to coat a spoon.
4. Remove from heat and stir in butter.

Serve warm.

Source: Uh…somewhere on allrecipes.com, I’m sure

~Kara

Banana Oatmeal Chocolate Chip Muffins (No Flour)

I’ve been looking for more recipes that don’t include flour and/or dairy.  By way of Pinterest, I found this one!  *If you want a totally gluten-free version, simply use the gluten-free oats. =)

Ingredients:
3 Very ripe bananas, mashed 
1 C Vanilla Almond Milk (I used original flavor almond milk and it was still yummy) or cow’s milk
1 T Coconut Oil (optional: helps to moisten the oats a little more and make the outer layer crisp) 
2 Eggs
1 T Baking Powder (Yes, Tablespoon)
3 C Old Fashioned, Quick,  or Gluten-Free Oats (I know, that’s a lot of options 😉
1 tsp Vanilla
As many MINI chocolate chips as you like (I used about 1/2 C)
PREHEAT OVEN TO 375* (I put that in bold type because I seem to always forget this step)
First, mash your bananas

Mix together all of the ingredients except for the chocolate chips and 
let the batter sit while you’re preparing the muffin tins. 
*This is really important in this recipe because it gives the oats a chance to release their natural thickening agent.* I was AMAZED at how these turned out looking like I had added flour.  

Spray your muffin tin with non-stick spray or use muffin liners. 
Give your batter another quick stir as you add the chocolate chips.
Evenly divide the batter into approximately 15-18 muffins.  (Or 6 mini bundt ca)
Bake 20-30 minutes. My first time making this recipe I used regular muffin tins with liners. You can attempt to eat them while they’re hot, but the muffin liners may not come off very easily.  You’ll definitely have a better time getting them off when they’re cool.  
Have I mentioned what a great texture these guys have?  Great texture. 
*Adapted from Green Lite Bites Banana Oatmeal Cups with Chocolate Chips

Cinnamon Roll Pulls (aka cinnamon crack bread)

Ingredients:

1 unsliced round loaf sourdough bread

1/2 cup butter, softened
1/4 cup powdered sugar
1/4 cup honey
1 tsp pure vanilla extract

1 cup sugar
1 1/4 tsp cinnamon

1 cup powdered sugar
1-2 Tbsp milk

Directions:

1.  Preheat oven to 350 degrees.

2.  To make Vanilla Honey Butter: Whip butter and 1/4 cup powdered sugar together until smooth; stir in honey and vanilla.  Set aside.

3.  Cut the bread lengthwise into 1/2″ slices, without cutting through the bottom crust. Spread vanilla honey butter in between slices.  Rotate the bread 90 degrees and slice the bread again into 1/2″ pieces, without cutting through the bottom crust. Spread more vanilla honey butter in between new cuts. This doesn’t need to be perfect – just make sure there is lots of butter in between all the cuts. Combine sugar and cinnamon. Generously sprinkle in between all cuts. (You may have extra butter and cinnamon sugar.  It will just depend on how large your bread loaf is.)

4.  Wrap in foil; place on a baking sheet. Bake at 350 degrees for 25-30 minutes, until bread is warm.  Unwrap cinnamon bread and place on serving platter.  Combine powdered sugar and milk – adding milk until you get the consistency desired.  Drizzle icing over bread and serve immediately.

Source:  Pinterest

Banana Date Muffins

I’m always looking for good recipes to use dates in because I ALWAYS have dates on hand for these.  I guess it’s not a bad thing to only eat dates paired with bacon.  However, I’m trying to branch out.  These were easy to make and tasted yummy!

Ingredients:
2 ripe bananas
1/2 cup vegetable oil (next time I’ll try replacing the oil with applesauce)
2 eggs
3/4 -1 cup chopped dates
3/4 cup brown sugar
1 1/2 cups self rising flour
1 tsp. baking soda
1/2 tsp. of cinnamon (optional)
1 tsp. vanilla (optional)

1.  Preheat oven to 300 degrees.  Lightly grease a muffin pan and set aside; you could also use baking cups if you like. 
2.  Mash bananas with a fork and mix well with remaining wet ingredients.  In a separate bowl, mix dry ingredients and add to wet ingredients until just combined.
3.  Fill muffin cups 1/2-2/3 full.  Bake for 18-20 minutes or until done.
4.  Serve muffins with butter/jam or dress them up with some cream cheese frosting!

*While I thought these were moist and delicious, they tasted pretty close to regular banana muffins.  The date flavor was very mild.  Next time I make them I’m going to add at least 1 1/4 cups of chopped dates.

Source: Nigella.com

Blueberry Banana Smoothie

Just call me the Smoothie Queen. I can’t get enough of them.
Here’s one that I’ve made up…. it’s quickly become a favorite of my husbands. (Go figure. He’s from Maine. Anything with Maine Blueberries, he loves!!)

Blueberry Banana Smoothie
Serves 2
Ingredients
1 Banana
1 1/2 cup Frozen Blueberries (If you have a Costco close by, they carry frozen Wild Maine Blueberries, Wlyer’s Brand… these are naturally sweeter and SO tasty!)
1/2 C. Vanilla Yogurt (if you have a 6 oz. container, that works too!)
1 C. apple juice

Directions

Blend.
Enjoy!

Cinnamon Rolls

These are one of my weaknesses. I don’t know why I don’t make them more often since they really aren’t  hard. Most times I just throw my bread dough ingredients in the bread maker and push a button. Then, an hour and a half later (you know, when the bread machine beeps telling me the dough is done), I roll the dough out and voila! I’m on my way to gaining 100 pounds. 🙂 Just kidding. Moderation in all things, right? That’s why I have to give them away. Makes you look like an AWESOME neighbor. Except when I’m greedy and keep them all to myself. Then I make my family happy because they get some, too. It’s win/win, really.

Ingredients*:
Your favorite bread dough–from scratch or a thawed, frozen loaf of dough works too.
1/4 Cup (1/2 stick) Butter
Several Tbsp Ground Cinnamon
1/2 Cup Brown Sugar
Chopped Walnuts, Pecans, and/or Raisins (optional)
18″ piece of thread

1. Preheat oven to 400 degrees F.
2. On a lightly floured surface, roll out the dough into a Large Rectangle, about 1/4 inch thick.
3. Using a rubber spatula, paint the butter over the dough. Leave 1/2 inch unbuttered on one of the long sides of the rectangle.
4. Sprinkle cinnamon all over the butter. Keep it fairly light and remember to leave that unbuttered portion “clean”.
5. Sprinkle Brown Sugar all over the cinnamon. I don’t know if 1/2 Cup will do it. I just grab handfuls out of the bag and have learned how much I like. Experiment until you find how you like it. Just remember all your neighbors will love you for it.
6. If you want, now is the time to add the nuts and raisins. We do it both ways at our house.
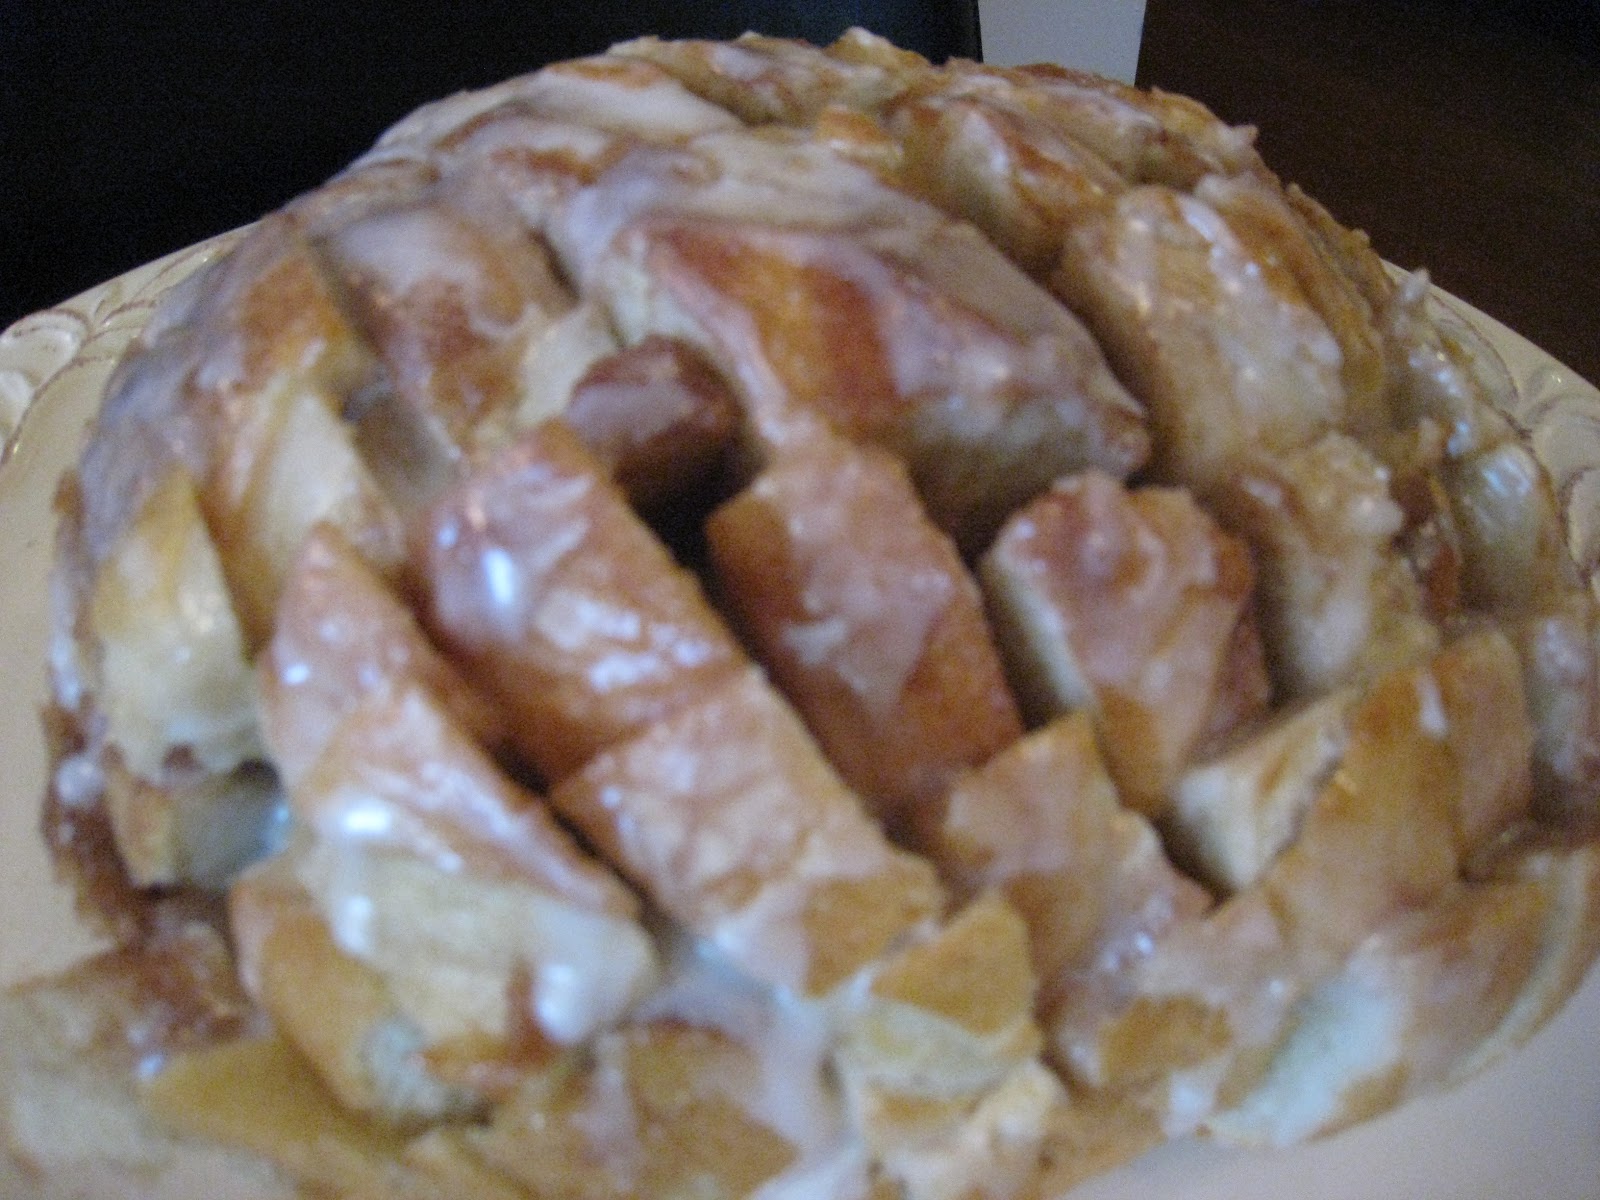
7. Beginning on one long side, begin to roll the dough toward the unbuttered 1/2 inch seam. Once you reach the seam, fold it up and pinch along the roll so you close all the cinnamon-sugar in.
8. Take the thread and slide it under one end of the roll–about 2-3 inches. Cross the string over the top of the roll (like the very first step to tying your shoe) and pull the ends until the string cuts through the roll completely. Repeat till you have the whole roll cut into cinnamon rolls. I don’t know why, but this is my very favorite step. Don’t judge.
9. Lay the Cinnamon Rolls in a 9×13″ pan about 1 – 2 ” apart. (I actually use an 11×15 glass pan, but you don’t have to). Cover and let raise for 1/2 hour.
10. Bake for 15 – 20 minutes.

Glaze*:

2 Tbsp Butter, softened
2 Cups Powdered Sugar
1/2 tsp Vanilla
1/4 – 1/3 Cup Milk

1. In a small bowl, cut together the butter and the powdered sugar until the sugar takes on a slightly yellow hue.
2. Add the vanilla.
3. Gradually add milk and stir with a fork until you get a runny consistency. If the glaze is “gritty” add more powdered sugar and mix till smooth.
4. Drop spoonfuls of the glaze on each cinnamon roll right after they come out of the oven.

*You should know that I really just eyeball most of this stuff. Once you’ve made the recipe a few times, you’ll know how each step should look according to your taste. And don’t be afraid to play around a little. One friend told me she uses white sugar and orange peel zest instead of brown sugar and cinnamon. I’ve never tried it, but it sounds great!

Source: Adapted from a good family friend

~Kara