Mango Salsa

Fresh homemade salsa in the summer? YES, PLEASE! How can you resist those veggies?? (fruit…if we are technical.)

Oh. My. Goodness.

Ingredients:
8-10 Medium sized garden tomatoes
1 Red Onion
3 Mangos*
0 – 3 Jalapeno peppers
Fresh Cilantro, chopped, to taste
1 Tbsp Salt (or to taste)

1. Chop your tomatoes and onion up. Mix them in a Large bowl.
2. Dice your mangos and add them to the mixture. Here is a great video on how to dice a mango. We learned the checkerboard method when we lived in the Caribbean.


3. Deseed (or not) your Jalapenos and dice them up. I used three Medium sized jalapenos, got every seed out of each one, and our salsa wasn’t hot at all. But if you’ve ever experienced jalapenos–you can’t bank on them. 🙂 I use surgical gloves to deseed and I don’t take the gloves off until I’m finished handling the pepper, because only an idiot would cut up jalapenos, wash her hands and then harmlessly scratch an itch by her eye, right? The burning sensation is harmless. (Oy! Can you hear the sarcasm drip??)
4. Using scissors, cut the leaves of fresh cilantro and add them to the mix. We really love cilantro so we put in quite a bit–maybe 1/3 of a bunch.
5. Stir in the salt to taste and serve with your favorite chips!

HAPPY SUMMER!

Source: An Original from watching many people make many different types of salsa.


~Kara

Brownie Bites

I think I found this recipe on Pinterest way back in February.  I used it then to send in for a Valentine party at school for one of my girls.  But, this would be a great end of school party treat!  This is soo easy!

Mini Muffin pan
Pam
Box of your favorite Brownie Mix
Reese’s Peanut Butter chips
Semi-sweet chocolate chips
Peanut Butter

Set oven to 350 degrees. Grease muffin pan. Mix up the brownie mix by the box directions. Fill the muffin pan cups to about 3/4 of the way up. Bake until done…about 15-20 min (depends on how chewy you want them) When they come out of the oven use the back of your spoon, or something rounded that you can press down into the brownie, to form a little cupped space for the peanut butter. (This step must be done immediatly after you remove them from the oven.)  Then let them cool for a bit, and dump them out to finish cooling.  Melt your peanut butter in the microwave until you could pour it!  Then spoon into the brownie cup tops and quickly add the chips.  As they cool the peanut butter will stiffen back up and the chips will be set!

Beef and Bean Taco Casserole

!Delicous! (in my singing voice.)
I usually don’t go for the taco soups and taco dips. If I am going to eat something that tastes like a taco, I want a taco! But, I came across a recipe on the Betty Crocker website that pricked my interest. I changed several things and made it my own. And oh my goodness. …it’s really good! The kids even loved it! What I loved most about it were the warm green bell peppers and warm tomatoes that still had a bite to them! This is really yummy and easy to make. And reheating the leftovers just made it better!
-1 lb ground beef, browned & drained well
-1 can black beans, drained & rinsed!
-1 16 oz jar chunky salsa, mild
-1 package of taco seasoning
-2 -1/2 cups broken tortilla chips
-1/2 medium green bell pepper, chopped (This added alot of flavor! Infact, it was my favorite part. So next time I might add more!)
-1/8 c yellow onion, chopped fine!! (You can add this into the meat when browning it, or just toss it into the mix and the baking will soften   
    them up just fine.)
-2-3 good size Roma tomatoes, chopped (These are my favorite. You can obviously use any tomato you want.)
-1 c shredded cheddar cheese
-1/2 c mozzarella cheese, or your favorite white cheese
  (I will be honest and say, I added cheese until I felt like it was enough!  So, you might want to play with the amount. Cheese adds fat, so take that into    
   consideration if you want this on thisdish on the lean side!)
 -shredded lettuce, to add as a topping, so as much as you want (but at least 1 cup.)
-tortilla chips, for topping or eating this dish with!

Heat oven to 350 degrees. Brown beef, and drain well. Set aside. Saute onions and add beef back into the pot. Drain beans and add into the pot along with the seasoning packet and the salsa. Stir well. Reduce heat to medium. (You may need to add some water if the mix is too thick.) Bring to a slow simmer.

In ungreased 9×13 baking dish, place 2 cups of broken tortilla chips evenly along the bottom. Top evenly with the beef mixture. Sprinkle chopped bell pepper, tomatoes, and cheese over the beef.
Bake uncovered for 25 – 30 minutes or until hot and bubbly and the cheese has melted. Serve and add lettuce, tomato and remaining chips on top.

You can add olives to this and green onions on the top, or whatever you fancy.   Eat this with a fork or scoop with the tortilla chips. We did a bit of both!

Mini Berry Tarts

I really love spring. A fresh start in so many ways! One of my favorite spring activities is going to the strawberry patch and picking big, juicy fruit right off the bush. Most of the strawberries make it into our basket, but I will admit that a fair share go from vine to mouth in one swift motion.

 
Once we get the berries home, it’s a race to see how may ways we can use them before they spoil. Among many of the strawberry dishes we have had over the past week were these little babies:
 
I bet you are glad you stopped by, because I am going to tell you how to make them!!! And once you do, share them at your spring brunch, or take some to a neighbor!
 
You will need some sort of tart pan, which looks a lot like a regular sized muffin tin, but with shallower pockets.
 

You could attempt to make the tart shells in a muffin tin, but I am not taking responsibility for stuck and broken shells. Just be sure to grease and flour the pan before you place your pastry in the cups.
 
Tart Shells:
6 T. sugar
2/3 cup margarine
1 1/2 T. cream
1 egg yolk
1/2 tsp. vanilla or almond extract
1 1/4 C. cake flour, plus extra if your dough seems too sticky
 
Directions:
1. Cream sugar and margarine together in a medium bowl. Add cream, egg yolk, and vanilla/almond extract and mix until well blended. Add the 1 1/4 cups of cake flour. If the dough is really sticky, and doesn’t come together or leave the sides of the bowl, add more flour in small increments until it does.
2. Remove dough from bowl and wrap it in plastic wrap. Refrigerate 30 min. to 1 hour.
3. Roll chilled dough out on a floured surface and use a cookie cutter or glass to cut circles about an inch larger than the tart pan cups. Transfer circles of dough to each cup, easing them into the bottom and up the sides. Press gently around the sides and cut away the excess dough on top. Cover the pan with foil and bake at 350 degrees F. for 10 minutes. Remove the foil and bake for 5-10 minutes more or until golden brown (watch them carefully for the color you want, they can over-brown quickly). You want the shells to be crunchy though, not soft.
Allow to cool before filling.
Makes 24 mini tart shells or one 9-inch tart shell*
 
* If you would like to make one large tart shell, roll out dough to 1 inch larger than the pan and gently lay the dough into the bottom and up the sides. Roll the rolling pin over the top of the pan to seal the edges and cut away excess. Lay foil over the dough, gently pressing it against the bottom and sides. Pour 1 1/2 cups baking beads, dry beans, or rice on top of the foil (this is to prevent the dough from rising during baking) Bake this way at 350 degrees F. for 15 min. Remove foil and return the crust to the oven for 10 minutes until golden brown.
 
Tart Filling:
1 C. strawberries
1 C. blueberries (*if you are making a 9-inch tart add another cup of berries)
3 oz. cream cheese, room temperature
4 T. sugar, divided
4 oz. frozen whipped topping, thawed in the refrigerator (that’s 1/2 of an 8 oz. container)
 
Directions:
1. Rinse the berries and dry on paper towels. Cut the strawberries into quarters.
2. Beat cream cheese and 1 T. sugar until smooth. Add whipped topping and mix until well blended.
3. Spread filling into tart shells, and arrange berries on top of filling.
4. Sprinkle with the remaining 3 T. of sugar.
 
Source: adapted from a Lion House Pies recipe.

Spinach-Artichoke Dip

A party favorite!
Ingredients:
1 8-oz. block cream cheese
1 10-oz. box frozen cut or chopped spinach, thawed (you can also use the majority of a 16-oz. bag)
1 12-oz. jar artichoke hearts, drained
3/4 Cup sour cream
1 Cup grated mozzarella cheese (original recipe called for cheddar; I used a combination of Monterey jack and cheddar b/c it’s what I had)
1/2 tsp. kosher salt
1/4 tsp. black pepper
1. Preheat oven to 400 degrees Fahrenheit.
2. Soften the cream cheese (I think I micro-waved mine for 30 seconds). Whip the cream cheese with a mixer.
3. Squeeze the spinach between paper towels to remove excess moisture and then add it to your mixing bowl with the cream cheese.
4. Roughly chop the artichoke hearts; add the artichoke, sour cream, and cheese to the mixing bowl. Season with salt and pepper. Mix together.
5. Scrape the mixture into a small oven-safe baking dish. Bake until lightly golden and heated through, about 15 minutes.
6. Serve warm with pita chips or bread.

Pepperoni Roll Ups

These pepperoni roll ups are delicous! We have added this recipe to our list of family favorites. I can see so many possibilities with this roll up! You can add anything to these, and everyone will love them!

Pam
cling wrap
Rhodes White Bread Loaves
Olive Oil
1/2 lb. Pepperoni Slices, thin slices from the DELI

*if too spicy for you, then use salomi slices – not spicy and delicous!
1 bag grated mozzarella cheese
1/2 cup of less of parmesean cheese, or romano
Italian Seasonings, a light sprinkle is all you’ll need
Garlic powder
4 TBSP melted butter
marinara suace, optional

Spray baking sheet with Pam and place two frozen loaves onto pan. Spray cling wrap with pam and place over top of the loaves. Let loaves rise for about 7 hours.
Roll dough out to 11×11 square. Brush with olive oil. Lay pepperoni slices out cover the entire square. Sprinkle mozzarella and parmesean cheeses over the pepperoni slices. Don’t over do the parmesean cheese. Sprinkle, very lightly, the italian seasoning over the square. Sprinkle garlic powder over the square. Roll up loaves. Brush butter over tops of the pepperoni Rolls.
Bake in preheated oven at 375 degrees. for 15-25 min. The tops of the pepperoni rolls should be lightly brown and hollow when you thump them.
Serve immediatly. You may serve this with marinara suace for dipping.

Cottage Ranch Dip

In an attempt to eat healthier and also to sneak some more protein in my diet, I came up with the recipe for veggie dip.  It’s easy and even cottage cheese haters (like my husband) will be fooled that it’s not a traditional fatty dip.

It helps tremendously to have a Magic Bullet-type blender thingy, but you can use a regular blender too.

Ingredients:
16-ounce container small curd cottage cheese (lowfat)
1 envelop ranch dip or dressing mix (I used Hidden Valley Harvest Dill Dips Mix)
sour cream to taste (I used about 1/4 cup)
milk to thin

1.  Place ingredients in a blender, adding milk to thin to the desired consistency.  (With the Magic Bullet type blender, you may have to place half the cottage cheese in, blend, then add the rest, and blend.)
2.  Refrigerate for a few hours for flavors to blend.  Serve with your choice of veggies.

Makes about 2 1/4 cups

Source:  a Julie original

German Chocolate Caramel Brownies

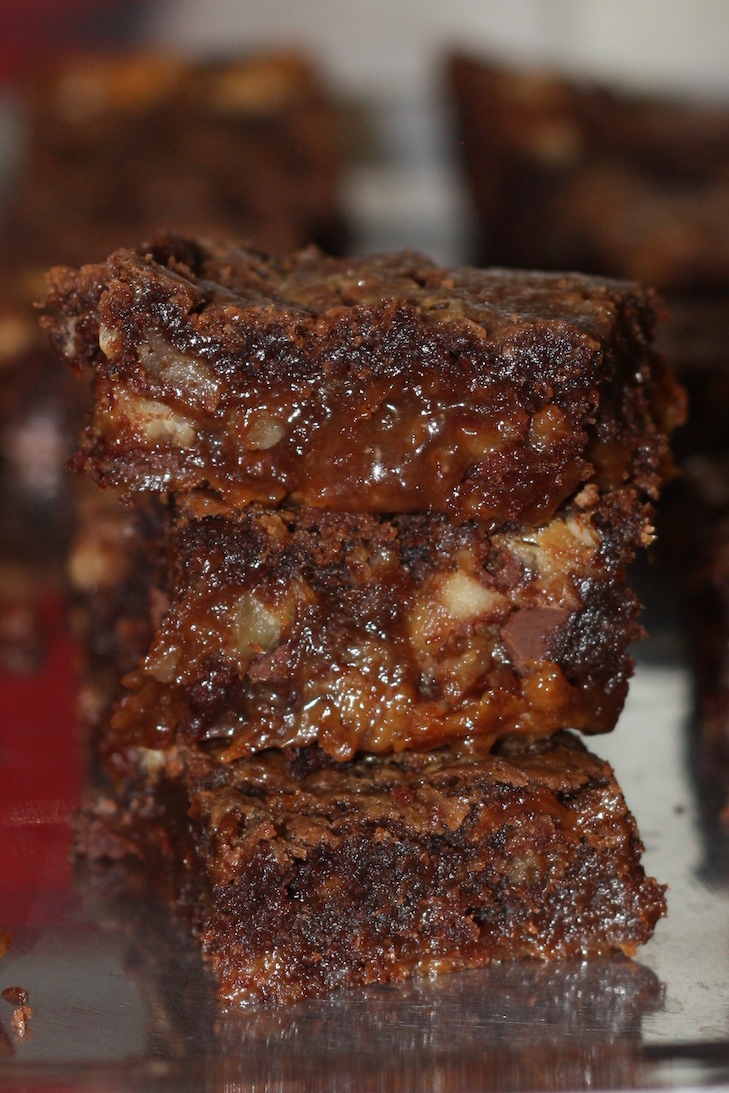
Do you see that ooey-gooey, nutty goodness amidst the chocolate? Oh yeah, baby. THAT’S why I LOVE these brownies. THAT’S why they’re my all time FAVORITE. Mmm-MMM! And don’t let the steps (or the margarine) fool you, either. They’re pretty easy and most definitely worth it.
Ingredients:
50 Kraft caramels (1 pkg)
1 Cup Evaporated Milk, divided
1 German Chocolate Cake Mix
3/4 Cup (1.5 sticks) Margarine, melted (as much as I LOATH to say it, butter does an ok job, but margarine does it better. Please tell me I never have to say those words again…)
1.5 Cups Chocolate Chips (your favorite–we use semi-sweet)
1 Cup Chopped Walnuts or Pecans–pecans are shown here, optional
1. Preheat oven to 350 degress F, and unwrap all the caramels into a medium-small microwavable bowl.
2. Add 1/2 Cup Evaporated Milk to the caramels and microwave for 1 minute increments (about 5 increments), stirring between each minute until smooth and creamy (or melt in a double broiler). Set aside.
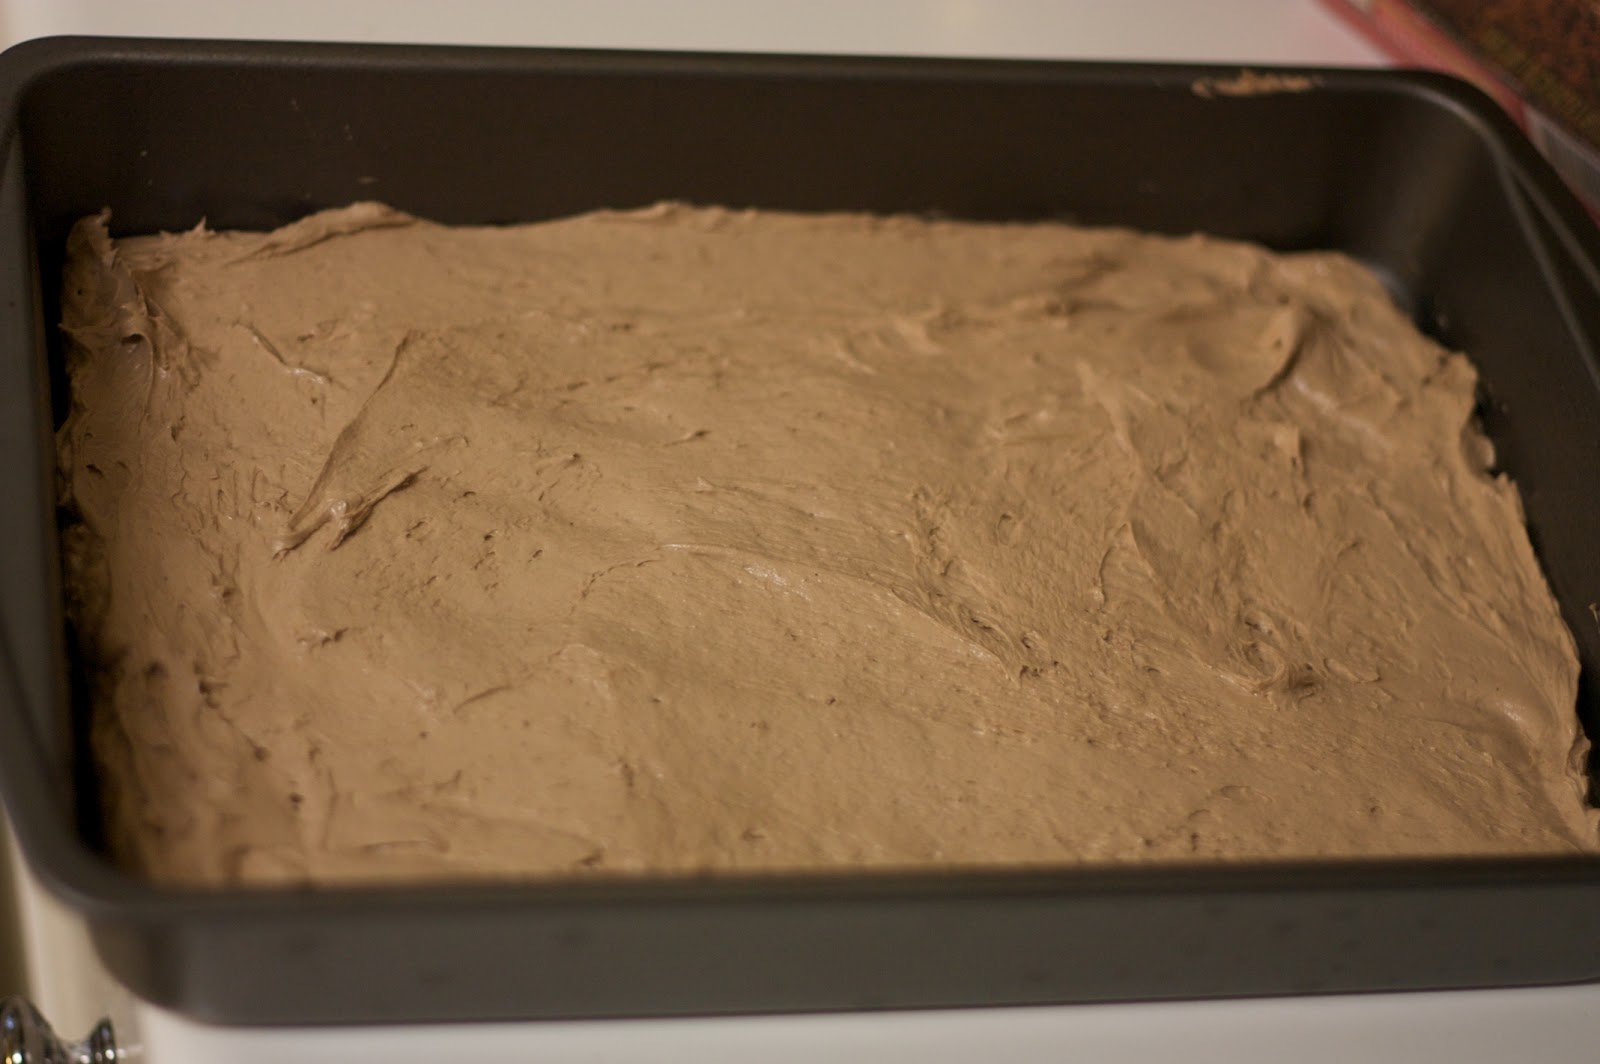
3. Mix the cake mix, the last half cup of evaporated milk, and melted margarine with a mixer for 3-4 minutes until everything is well incorporated, smooth, and light brown in color. The batter should be fairly stiff.
4. Pour 1/2 of the cake batter into a greased 9×13″ cake pan and smooth to the edges.
5. Bake for 6 minutes.
6. Sprinkle chocolate chips and nuts over the cake, immediately after removing it from the oven. They may sink a little and that’s ok.

I was trying to appease the nut-lovers (myself and Mr. Blue Eyes) and the nut-haters (the kids) and did half and half. What we won’t do for love? (notice they’re equal halves…muahahahaha!)

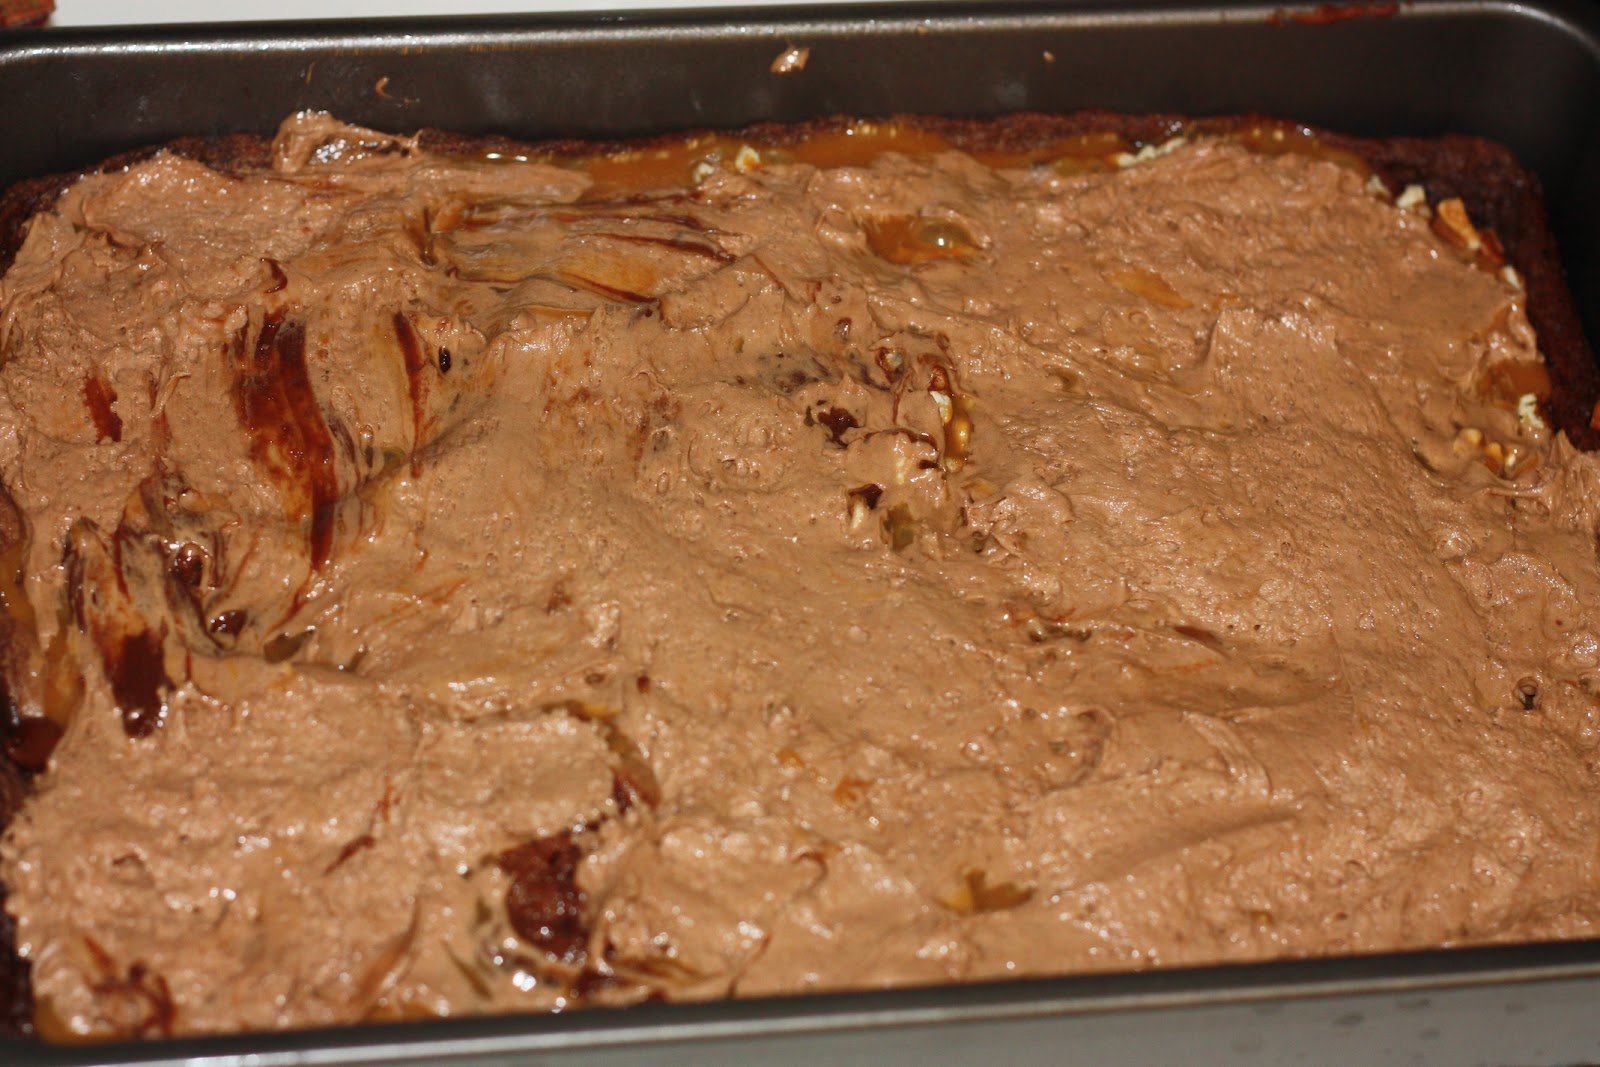
7. Pour creamy caramel mixture over the chips and nuts.

8. Using the unused portion of the cake batter, drop spoonfuls over the caramel. Try to smooth it out over the top as best you can. Sometimes it seems like it doesn’t work too well, but don’t give up! Even if you can still see mostly caramel, it’s ok. (That has happened to me.) The cake batter seems to have a mind of its own and knows to bake up over the caramel.

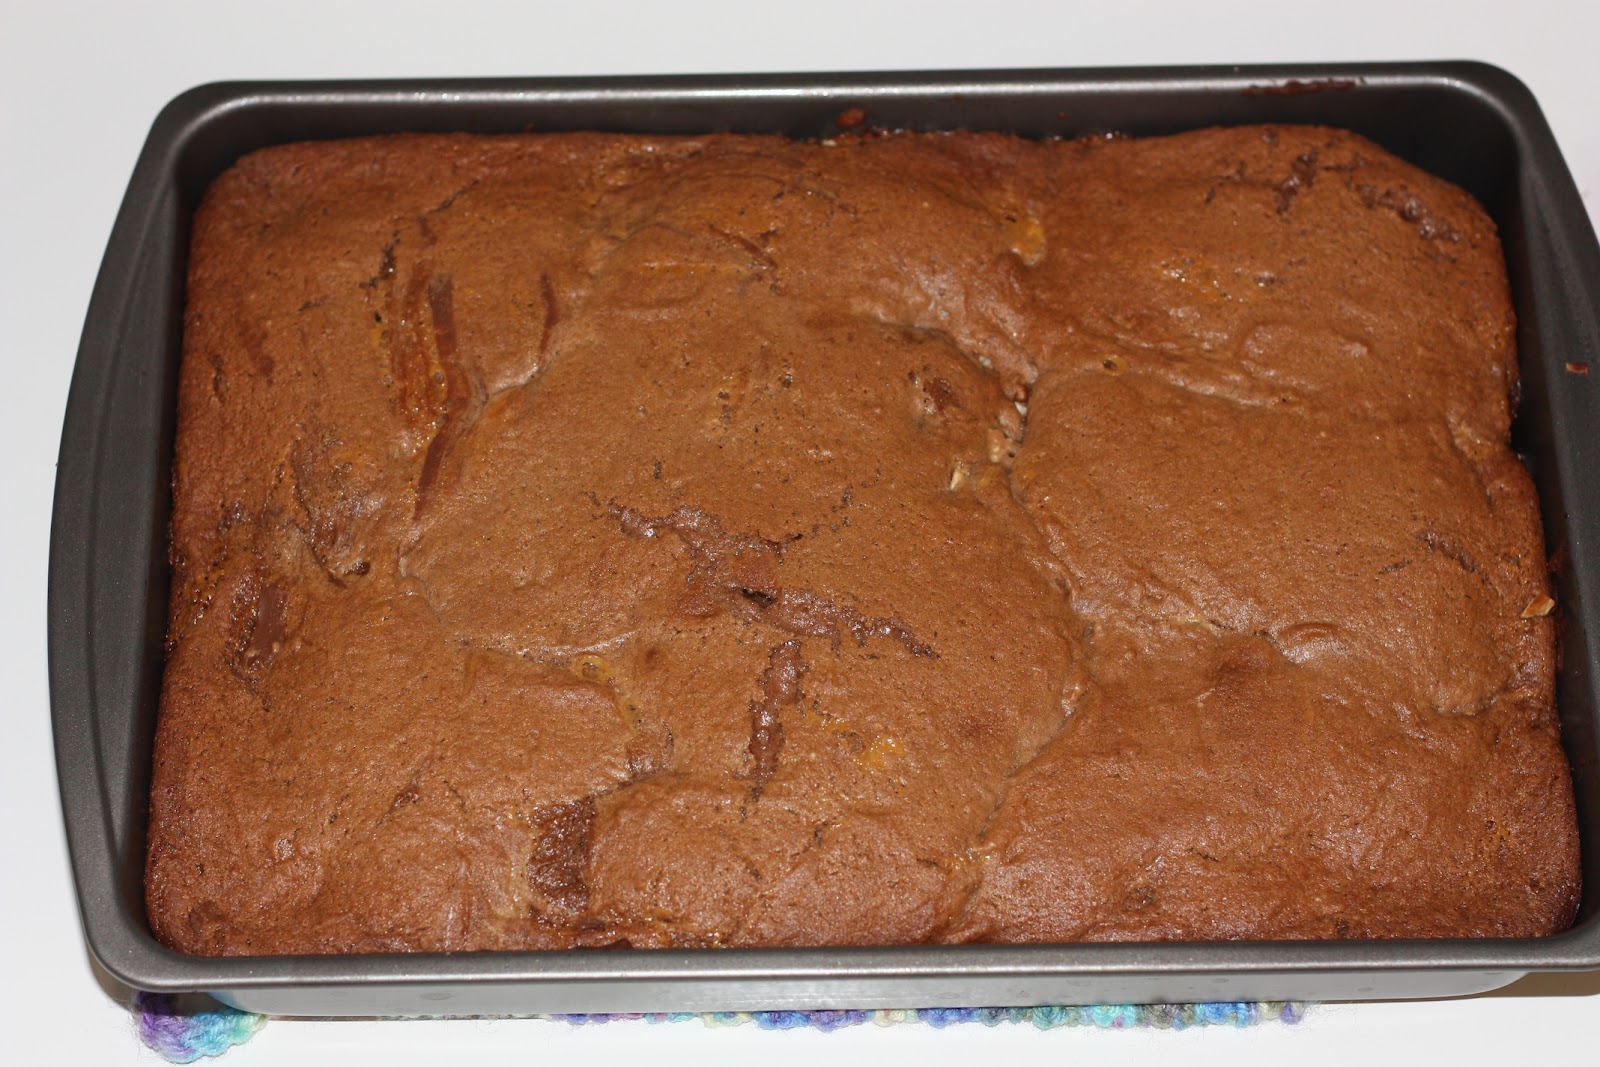
9. Pop it into the still-hot oven and bake again for 18 minutes. Voila! The yummiest brownies you’ll ever eat!
10. Cool completely and dive in!

A Few Notes:
~Kraft caramels melt the best. 
~German Chocolate Cake mix tastes and bakes the best, although I have used Devil’s Food and Swiss Chocolate and they turned out fine, too. The German Chocolate seems to hold the chips and nuts up best.
~I have seen recipes that use caramel ice cream topping–the kind in the microwavable jar–in place of the caramel/milk mixture. I have never tried it, but it seems like a good idea if you’re in a pinch.
~There is really no way (that I know of) to test to see if these are done. Because of the caramel, they will always be slightly “jell-o-ish” (is that even a word?!) right after you get them out of the oven. There’s no harm in leaving them in for a few extra minutes just in case, but be careful not to overcook them. Hard brownies/hard caramel = No Bueno!
~I don’t know why, but I have never made a batch that didn’t “fall” a little. If you know why this is and how to prevent it, PLEASE let me in on your secret!
~And this is the most important! These are a taste-melding brownie. As much as I love hot, fresh-from-the-oven brownies, these taste the best when they are made the day before (or the morning of at the latest). Trust me.
Source: The best mama in the world, Karri H!
~Kara

Spinach Dip

BEWARE: Once you take this dip to a party, it’s the only thing your friends will ask for in the future. It is THAT GOOD! And I’m not even a Swiss Cheese fan. I mean, LOOK at all that cheesey goodness!

Ingredients:
2 (9 oz) packages of Creamed Spinach*, thawed (found in the frozen veggie section)
3 2/3 Cups Shredded Swiss Cheese
3 Tbsp Parmesan Cheese
1/2 Cups Sour Cream
1/2 tsp Salt
1/2 tsp Pepper
1 Loaf Sour Dough Bread

1. Mix all ingredients, except for the bread bowl, in a large bowl and set aside.
2. Using a knife (we use a steak knife), cut into the bread bowl diagonally, making a circle–much the same as a jack-o-lantern top– and remove the top. Trim off extra bread to make the underside flat, and set both aside.
3. Cut all the way around the inside of the bread bowl, leaving 1/2″ wall. Carefully remove the bread from inside the bowl. We try to leave fairly big chunks of bread. Store all the extra bread pieces in an air tight ziplock bag for later.
4. Empty the cheesey contents from the mixing bowl into the bread bowl.
5. Put the “lid” back on the bread bowl.
6. Wrap the entire thing in tin foil (we use 2 sheets. One wrapped one way, the other for the other way) and bake at 450 degrees F for 45 minutes.

Serve immediately with extra chunks of bread or your favorite crackers. Our favorites are Club and Multigrain Toppers, although really, ANY cracker will do! Refrigerate and reheat leftovers…if there are any.

*One time I couldn’t find creamed spinach anywhere–honestly, what is WRONG with grocery stores these days?  I used 1 10 oz. (or less) bag of frozen chopped spinach instead and it still turned out deliciously. Thaw the spinach and dab away any excess water with a paper towel. Kind of eyeball the amount you put in. There should be more cheese than spinach. Add a few Tbsp cream, evaporated milk, or regular milk to help with consistency.

When the dip is gone, rip into the bowl!  Go ahead. Say, “Ahhh…” and take a bite!

Source: I can’t remember, but Mr. Blue Eyes actually made this round of dip. So the credit is all his!
~Kara

Tortellini Skewers

Need to serve something tasty but don’t have the time or energy to make something that’s gonna be really involved?  Want a fun main dish for dinner that you can prepare in a snap?  Have I got a dish for you.

Buttoni premade, refrigerated Tortellini…I got two packages:  Three Cheese and Spinach Feta (I think!).  They were BOGO at the store.  (Please ignore my nasty tile countertop.  I do my best to ignore it.  I’ve given up cleaning it because in a day it’s stained again, even after scraping, bleaching, grout-line-painting, and sealing.  My new counter top is on it’s way, thank goodness!)

Ingredients:
refrigerated Tortellini
olive oil
Pesto sauce
Spaghetti or Marinara sauce
wooden skewers

1.  Boil pasta as directed on package.  When done, pour into colander and rinse well with cold water.  Allow to cool and drain completely.
2.  Toss cooked tortellini in a bowl with a little olive oil.  Either store in a container in fridge, or go ahead and skewer the pasta to serve immediately.
3.  Serve with pasta sauces of your choice, but my preference is for pesto (which I also bought premade).  Drizzle sauce over the tortellini skewer once it’s on your plate.

Source:  photo idea found on Pinterest