Waffle Cookies

waffle-cookies

My kids looooooove it when I make these.  They are old enough now to make them for themselves (although they still ask me to make the frosting most of the time because it, um, has no recipe–it’s in my head–but they made their own for this batch!).  

It’s a favorite for Family Night treat.  

They’re really easy to make.  

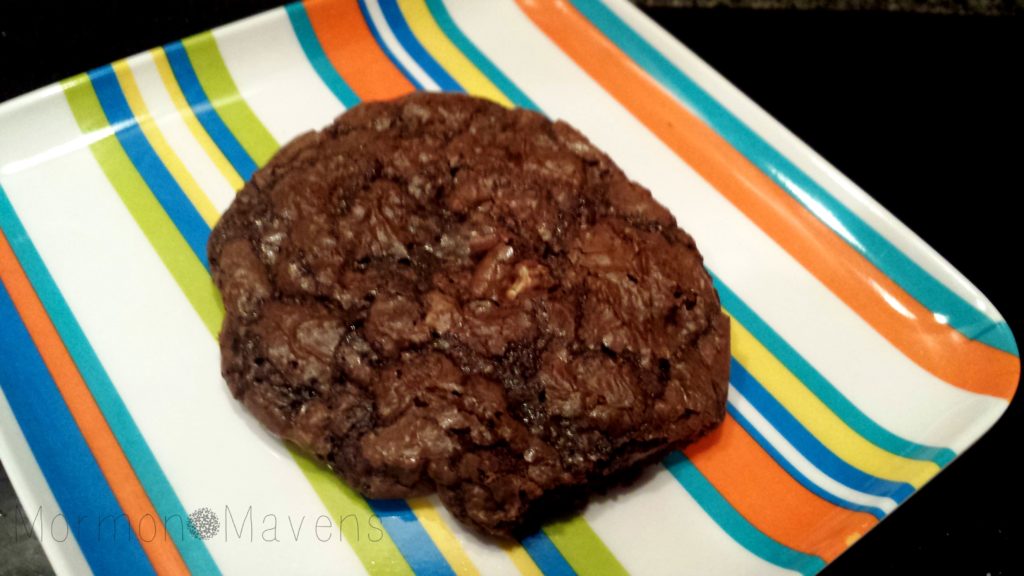
And, hello, FUN!  Cookies with a waffle iron? YES!!

Waffle Cookies
Easy, tasty, fun cookies that are a family favorite!
Write a review
Print
Prep Time
10 min
Prep Time
10 min
Ingredients
  1. 1 1/2 cups sugar
  2. 1 cup butter, softened
  3. 4 eggs
  4. 2 tsp. vanilla
  5. 1/2 cup unsweetened cocoa powder
  6. 2 cups flour
  7. 1/8 tsp. salt
Instructions
  1. Cream together the butter and sugar well.
  2. Add remaining ingredients and mix well.
  3. Drop using a medium cookie scoop onto a heated waffle iron sprayed with non-stick cooking spray to keep the cookies from sticking.
  4. Close waffle iron and allow to cook for 2-3 minutes. Carefully lift out with fork and set aside to cool.
  5. Frost with your favorite frosting.
Notes
  1. No recipe for the frosting, but here's what I do....I start with 1/4 cup of soft butter and cream it with some unsweetened cocoa (maybe 1/3 cup?), a teaspoon of vanilla, and a pinch of salt. Then I just start adding in powdered sugar. When it's too stiff to stir, I drizzle in a little milk. I keep this up till I get the taste and texture I want!
Mormon Mavens https://www.mormonmavens.com/

Chocolate & Coconut Cashew Bars

cashew-bars-2

If you haven’t met me before, allow me to introduce myself.   I’m the girl who wants dessert after every meal.  Every meal.

And also after snacks.

And also after watching TV commercials about meals and snacks.

And that’s a problem.

But luckily I’ve found a way to combat this.  

And I have to be honest.  I really had no faith in this recipe because I am a dessert snob.  If it’s described as a healthy dessert my mind immediately puts it into the “Yeah, right!” category.  And so I wasn’t expecting much.  

I distinctly remember my first bite.  I think I said something like, “Well, it’s okay, I guess.  But I doubt I would make it again.”  Which was followed by multiple bites that impressed me more and more.

A month later and I’m still making them!  

And you know what I love most about this recipe?  The bars taste so rich to me that it only takes one to satisfy!  So they last a long time!  And this has been so helpful for me in my quest to eat healthier and lose weight.  Vegan if you don’t use the honey.

I did tweak the recipe a bit.  It can be gluten free if you make sure that your oats are as well! 

cashew-bars-1


Chocolate & Coconut Cashew Bars
Yields 25
A healthy bar treat that is rich and satisfying! Great combo of a little sweetness and a little salt and a little chocolate and a little nut!
Write a review
Print
Prep Time
15 min
Prep Time
15 min
Ingredients
  1. 1 1/2 cups lightly roasted cashews (I used Planter's)
  2. 1 cup old fashioned oats
  3. 1/4 cup almond butter
  4. 1/4 cup melted coconut oil
  5. 1/4 cup + 2-3 tsp. liquid sweetener*
Topping
  1. 1/4 cup liquid sweetener
  2. 1/4 cup melted coconut oil
  3. 1/2 cup unsweetened cocoa powder
  4. 2-3 Tbsp. unsweetened coconut flakes
  5. sea salt to taste
Instructions
  1. In a food processor, process the cashews for a couple of minutes. Scrape down the sides if you need to. They will start to clump together a little, and that's good.
  2. Add the oats, almond butter, and sweetener and blend for another couple of minutes, scraping the sides down if necessary. This should form a sort of dough.
  3. Line an 8x8 pan with parchment paper and lightly coat it with some non-stick cooking spray. Make sure the edges of the parchment come out over the edge so you can lift out the bars later.
  4. Spread out the dough and press it evenly to the edges.
  5. Make the chocolate topping by whisking together the liquid sweetener, coconut oil, and cocoa powder until smooth. Pour this over the top of the bars.
  6. Sprinkle with coconut and sea salt.
  7. Freeze for an hour or refrigerate for several. Then lift out the bars and cut them carefully into squares. I did 5 slices in each direction which gave me 25 bars.
  8. Store the bars in an airtight container in the fridge.
Notes
  1. *You can use agave nectar (although not actually healthy), honey, brown rice syrup, or maple syrup. I had some agave to use up and that was tasty, but like I said, not really healthy the way it's made today. I was worried that the maple syrup would be too strong, but it was perfect. Gotta be REAL maple syrup though!
Adapted from Dishing Out Health
Mormon Mavens https://www.mormonmavens.com/

My Best Chocolate Chip Cookies

my-best-cc-2

Too dry.  Flattens out too much.  Doesn’t taste great.

No, no…I’m not talking about THIS recipe!  I’m talking about all the recipes I tried up UNTIL I found this recipe.  

I searched the world over for the perfect chocolate chip cookie recipe.  I spent years trying and testing.  

I’d find recipes with shortening instead of butter.  While I appreciate the texture, well….I’m just a butter snob.  

I would find recipes that tasted pretty good but the cookies flattened out too much during baking.  “Oh, I just add a lot of flour and then it won’t do that!” I was told.  Yuck.  I don’t want MORE flour.  I want the flavor, the texture.  I want perfection!

Is that too much to ask?

my-best-cc-cookies

Well, maybe it was.  But I found the perfect recipe–at least my family and I think so.  We loooooove these cookies and make them often.  Too often.  

And I can’t believe I haven’t put them up on the blog until now!  My kids will thank me….we lost the original recipe card a long time ago, and have several not-so-great copies on scraps of paper (that always get lost) and in text messages.

But now, finally, it’s in a place of honor!

We hope you enjoy these cookies–they are one of my family’s most used recipes.

my-best-cc-3

My Best Chocolate Chip Cookies
Yields 2
A yummy combination of the classic cookie, with peanut butter and oats for fun!
Write a review
Print
Prep Time
10 min
Prep Time
10 min
Ingredients
  1. 2 sticks of butter, softened (1 cup)
  2. 1 cup creamy peanut butter
  3. 1 cup sugar
  4. 2/3 cup brown sugar
  5. 2 eggs
  6. 1 tsp. vanilla
  7. 2 cups all-purpose flour
  8. 1 cup oats
  9. 2 tsp. baking soda
  10. 1/2 tsp. salt
  11. 2 cups semi-sweet chocolate chips
Instructions
  1. Preheat oven to 350 degrees.
  2. Using a mixer, cream together the butter and sugars. Scrape down the sides.
  3. Add eggs and vanilla and mix well to combine.
  4. Slowly add in the flour, oats, baking soda, and salt. Mix well to combine.
  5. Add in the chocolate chips and mix on low just until evenly distributed OR mix them in by hand.
  6. Use a cookie scoop and scoop balls of cookie dough onto a baking sheet, 2 inches apart.
  7. Bake for 10-12 or 18-20, depending on the size.
Notes
  1. Baking time depends on how large you make them. My family loves to make cookies using a large cookie scoop and those take longer (18-20). A medium scoop will take more like 10-12. You just want them to be golden brown across the top and slightly brown on the edges.
  2. I always use Old Fashioned Oats, but you can use Quick Oats that's what you have on hand.
  3. We love to use large chocolate chips, but you can use whatever kind you like best.
  4. If you use the large cookies scoop, a batch will make about 2 dozen. With the medium cookie scoop, about 5 dozen.
Mormon Mavens https://www.mormonmavens.com/

Cake Mix Cookies

cake mix cookies


If you know me at all, you know I love simple ideas with great results.  This cookie recipe fits the bill.  You can take just about any cake mix, add eggs and butter, and then just about any add-ins that you can imagine.  Here’s an idea:  yellow cake mix, macadamia nuts, white chocolate chips.  Yep, that easy. Wait, here’s another one:  Spice cake mix, walnuts, Craisins.  Oh my gosh, I can’t stop.  Enjoy.

Cake Mix Cookies
Easy, peasy cookie.
Write a review
Print
Ingredients
  1. 1 box German Chocolate Cake Mix
  2. 2 eggs
  3. 1/2 cup butter, melted
  4. 1/2 cup quick oats
  5. 1 cup semi-sweet chocolate chips
Instructions
  1. Combine all ingredients and mix until well-blended.
  2. Use a cookie scoop to transfer dough to a parchment-lined cookie sheet.
  3. Bake at 350 degrees 8-10 minutes. Cool on wire rack.
  4. Hide from everyone until you are ready to serve.
Notes
  1. Have fun with add-ins and different flavored cake mixes!
Mormon Mavens https://www.mormonmavens.com/

Baklava Cookies

My first bite of these cookies, warm out of the heaven, was a heavenly experience!  You just gotta eat ’em warm.  They’re still good once they’ve cooled, but warm? Holy Macaroni!–as my 7-year old would say. 🙂

To learn more about how you can get Thrive ingredients in YOUR kitchen, visit my website.

(This pic was submitted by me to the Thrive Life recipe site and is labelled with my Thrive Life website url.)

Ingredients:
6 tbsp. butter
 3/4 c. THRIVE Powdered Sugar
 5 tbsp. THRIVE Honey Crystals
1 tbsp. water
1 c. almonds or walnuts, finely chopped
 1/2 tsp. Ground Cinnamon
 1 c. butter, softened
 2 tbsp. water
 1 egg
 3 1/3 c. THRIVE Vanilla Sugar Cookie Mix


Directions:
1. In a small saucepan, melt the 6 T. of butter over low heat. Stir in the powdered sugar, honey crystals, and 1 T. of water.
2. Bring to a boil, then remove from heat and add nuts and cinnamon. Set aside to cool for 30 minutes.
3. Preheat oven to 325 degrees. Spray a cookie sheet with nonstick cooking spray.
4. In a mixer, cream the 1 cup of butter for a few minutes until smooth and fluffy. Add in 2 T. water and egg and mix well, scraping down sides part way through.
5. Add in the sugar cookie mix. Mix well, until dough begins to clean the sides of the bowl.
6. Using a 1.25″-diameter cookie scoop, place cookie dough on cookie sheet leaving 2″ spacing around each cookie.
7. Bake for 10 minutes.
8. Remove cookie sheet from oven and top each cookie with 1/2 to 1 Tablespoon of the nut mixture.
9. Return cookies to oven and bake for 3 minutes.
10. Allow to cool on the pan for a few minutes, then remove cookies to a wire rack to cool.

To use this recipe without Thrive cookie mix, substitute your own cookie recipe, mix, or dough for the last four ingredients.  To use without Thrive honey crystals, use 4-5 tablespoons of honey.

Brownie Cookies

brownie cookies


There is this bakery in town that has some of the most delicious goodies out there.  And their sandwiches and salads are pretty darn good, too.  Anyway, one of my favorites things there is their brownie cookie.  Oh my crispy, chewy goodness.  Yes, very good.  I don’t have a recipe to make them at home, but I do have a box of brownie mix–with a brownie cookie recipe right on the box, baby!  Just thought I would try those out and they did not disappoint.  Try some for yourself with your own brownie mix or recipe.  The only difference is to cut down on the oil.  And of course, you don’t bake the cookies as long as the brownies. That would not be a good thing, at all.

Brownie Cookies
Chewy, crispy cookie
Write a review
Print
Ingredients
  1. 1 pkg. brownie mix
  2. 2 eggs
  3. 1/4 cup vegetable oil (I used coconut oil)
  4. 1 T. water
  5. chopped nuts pecans (we always add these to brownies)
Instructions
  1. Make mix according to directions on the box.
  2. Drop by tablespoonfuls onto parchment lined cookie sheet. Definitely use this measurement. The first time I made these I used a small cookie scoop and they were too big and ran together.
  3. Bake at 325 degrees for 12-14 minutes, until the edges have crisped. Don't over bake.
  4. Cool on wire rack.
  5. Enjoy!
Notes
  1. Here's a tip! Melt peanut butter in the microwave and drizzle over your cookie. My son-in-law was at the house when I baked this batch, and he requested the peanut butter.
Mormon Mavens https://www.mormonmavens.com/
brownie cookie with pb


Aggression Cookies

 
Aggression Cookies
 

Hey everyone! I am just bringing back and oldie but a goodie–literally.  Due to a busy week ahead, I thought it would be fun to repost this yummy cookie recipe.  Hope you enjoy.  Maybe you could even whip up a batch and have ready for those school lunches or after school “cookie talks” with the kiddos!

Do you ever just want to stick your hands down into something squishy and just work it until you’ve gotten rid of all those pent-up complaints/murmurings/naggings/why-can’t-you-put-the-toilet-paper-on-the-holders/pick-up-your-clothes-I-am-not-your-maids?  Yes ma’am, this is your kind of recipe.  Check it out.  I apologize for not having a picture of me mixing my dough, but I am no good at selfies and I was by “myselfie” at the time.

Ingredients:

3 cups brown sugar, packed
6 cups quick cooking oats
3 cups flour
6 sticks butter, very soft (almost melted)
1 T. baking soda

1.  Put all ingredients in a huge bowl and mix by hand until well incorporated, or until the smile returns to your face.  LOL…
 
2.  Form dough into small balls (smaller than a walnut in the shell) and place on ungreased cookie sheet (I like to use parchment paper on the sheets.). 
 
3.  Butter the bottom of a small glass, dip into granulated sugar and press each cookie ball.  Re-dip glass in sugar each time.
 
4.  Bake at 350 degrees F for 10-12 minutes.
 
5.  Makes about 11 dozen cookies.

Source:  Pat Brew, Brew Family Cookbook, Vol. 2.


Aggression Cookies
Write a review
Print
Ingredients
  1. 3 cups brown sugar, packed
  2. 6 cups quick cooking oats
  3. 3 cups flour
  4. 6 sticks butter, very soft (almost melted)
  5. 1 T. baking soda
Instructions
  1. Put all ingredients in a huge bowl and mix by hand until well incorporated, or until the smile returns to your face. LOL…
  2. Form dough into small balls (smaller than a walnut in the shell) and place on ungreased cookie sheet (I like to use parchment paper on the sheets.).
  3. Butter the bottom of a small glass, dip into granulated sugar and press each cookie ball. Re-dip glass in sugar each time.
  4. Bake at 350 degrees F for 10-12 minutes.
  5. Makes about 11 dozen cookies.
Mormon Mavens https://www.mormonmavens.com/

Almond Butter Quinoa Brownies


I am not saying that I have jumped on the quinoa bandwagon, but I got a free “Eating Well” magazine in the mail this past week and was just flipping through it and left it open on the kitchen island.  Next thing you know I have a request to make these lovelies.  Okay, I was game.  These are actually pretty good.  And I had all of the ingredients on-hand, including a hand-crank grinder that I haven’t used in forever*.  Pretty handy little tool, really.  Mental note to use this more often.  
 
Ingredients:
1/4 cup unsalted butter, softened (I used salted because that is what I had.  Paula Deen says that’s okay.)
3/4 cup smooth or crunchy natural almond butter
2 large eggs
3/4 cup packed light brown sugar
1 t. vanilla extract
3/4 cup quinoa flour (I used my hand-crank grinder to make this)
1 t. baking powder
1/4 t. salt
1 cup semi-sweet chocolate chips


1.  Preheat oven to 350 degrees F.  Line an 8-inch square baking pan with foil allowing it to slightly overhang on opposite ends so you have “handles” to lift the blondies out of the pan.  Coat the foil with cooking spray. Seriously. These things are a little sticky when you cut them and pull them off of the foil.


2.  Beat butter and almond butter in a mixing bowl with an electric mixer until creamy.  Beat in eggs, brown sugar and vanilla.  Whisk quinoa flour, baking powder and salt in a small bowl.
 
3.  Mix the flour mixture into the wet ingredients until just combined.  Stir in chocolate chips.
 
4.  Spread the batter evenly into the prepared pan and bake about 25 minutes–until a toothpick inserted in the center comes out with just a few moist crumbs on it.  DO NOT OVER BAKE.
 
5.  Remove from oven and let cool about 45 minutes in the pan.  Lift the blondies out of the pan with the foil  and transfer to a cutting board.  Let cool completely and cut into bars.
 
6.  Makes 24 blondies.
 
7.  These should keep up to 5 days in the fridge, in an air-tight container.
 
*Check out this cool grinder…


SOURCE:  Eating Well Magazine.

Candy Corn Cookies

Now, I’m normally a “make it from scratch” kind of girl.  But sometimes, well, you just don’t have the time or energy.  I had planned to make these cookies from scratch but then thought, “You know, it’s just as wonderful to have a time-saving way to make something cute as it is to have a scratch way to make something cute!”

So, if you’re the type of person who loves ideas using convenience foods, you’ll love this.

Ingredients:
2 logs of sugar cookie dough
food coloring

1.  Preheat oven according to dough directions.  Unwrap logs of dough.  Set aside about 1/3 of the dough.  Take the other 1/3’s and place into two small mixing bowls.  Color one of the 1/3’s orange and the other yellow.  (I used gel food coloring in orange and yellow because that’s what I had.  If you have liquid food coloring, use yellow and then yellow/red to make orange.)
2.  Line a loaf pan with a large sheet of wax paper (you want it to cover all the sides, not just the bottom…and allow some to hang over the sides).  Press the uncolored cookie dough into the bottom of the paper-lined loaf pan.  Make sure it’s even.  Then do the orange, then the yellow so that you have three even layers.  Fold the wax paper down over the top of the dough and press to help the layers be even and also to adhere them to each other well.  Chill for an hour.
3.  Use the paper to lift out the dough from the loaf pan.  Remove the paper.  With the dough on a cutting board, carefully cut the dough into slices about 1/3-inch thick.  Cut each slice into little candy corn shaped wedges (also known as triangles!).  Place on an ungreased cookie sheet, two inches apart.
4.  Bake for 9-11 minutes, or until the edges are just barely starting to get golden brown.  Allow to cool for a few minutes on the baking sheet.  Then carefully remove to a cooling rack to cool completely.

I could have sworn I had a picture of the loaf slice cut into diagonal candy corn shaped wedges, but apparently I did not.  Sorry!

These cookies are a little on the small side, but 2 logs makes a lot of them.  I only had time to cut and bake a few of the slices and that was over 2 dozen.  The rest of the dough I put back in the fridge to use later.

Source:  idea from Kathie Cooks

Heavenly Hash Donut Blondies

You know I just had to try this recipe from the name alone!  You are going to think the ingredients are insane…….and they are.  Just be forewarned that they are super sweet.  I used dark fudge for the frosting but I would recommend using a milder milk chocolate.  Enjoy this food adventure!

Ingredients:

  • 2 regular size packages of refrigerated chocolate chip cookie dough
  • 2 jumbo Hershey cookies and cream chocolate candy bars
  • 1 7 oz. jar marshmallow fluff
  • about 20 donut holes, halved
  • about 1/2 cup chocolate icing (canned works)
Directions:
  1. Preheat oven to 350 degrees.  Line and 8×8 pan with foil, extending the sides of the foil over the edges of the pan.  Mist the foil with cooking spray.
  2. Gently press one package of the cookie dough evenly onto the bottom of the pan.  Top with the chocolate bars, breaking the pieces to fit as evenly as you can to cover the surface of the cookie dough.  Top with an even layer of the marshmallow fluff.   
  3. Top the marshmallow fluff with the halved donut holes, covering the surface evenly.  Lastly, break apart and spread the remaining package of cookie dough to cover the tops of the donut layer.  If the donuts peek through, that’s okay.
  4. Bake for approx. 25-28 minutes or until the top is golden brown and mostly set.  Allow to cool completely at room temperature before putting in the fridge to set, about 2 hours. They really DO need to set in order to come together, or else they’ll be a gooey mess (not as good as it sounds).
  5. After it’s cooled,  drizzle on some melted chocolate icing for extra garnish.
  6. Cut into bars and serve.  Store covered, airtight, in the fridge.
Source:  thedomesticrebel.com