Hashbrown Quiche

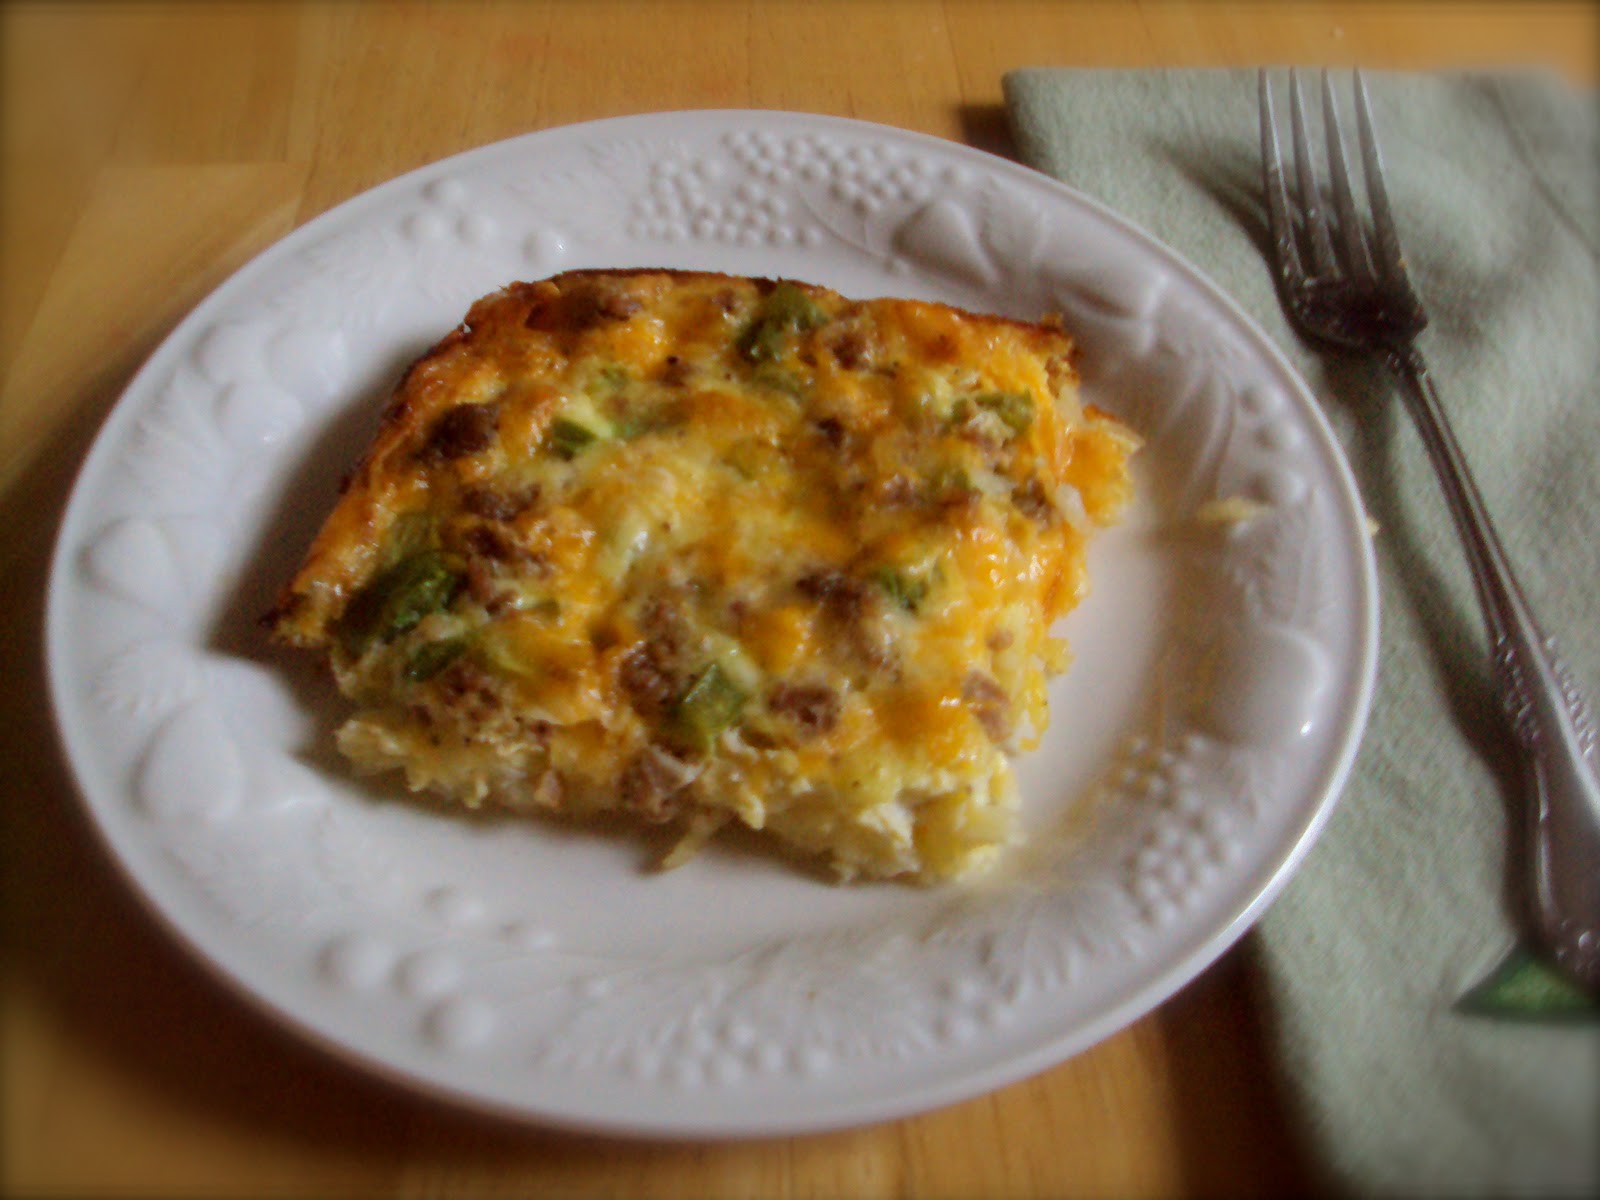
This is one of our favorite breakfast-for-dinner meals.  Also nice for a holiday breakfast or brunch.  Try your own meat and veggie varieties.  It’s yummy! P.S.  I think I found this recipe in a Taste of Home Magazine about 10 years ago. 
Forgive me if I’m mistaken.  

Ingredients:
4c shredded hashbrowns, thawed and squeezed dry with paper towels
5T butter, melted
…………………..
1/2 lb Jimmy Dean (regular) bulk ground sausage, crumbled and cooked
1/2 c diced green pepper
1T dried onion
1 c (or more) shredded cheddar cheese
…………………..
4 eggs
1c milk
1/4 tsp pepper
Salt to taste (I will omit the salt if I use bacon instead of sausage)

  1. Preheat oven to 425* for baking the crust (you’ll change it for the quiche)
  2. Make sure as much of the moisture as possible is soaked out of the hashbrowns to make a nice crispy crust.
  3. Press the hashbrowns into the bottom of a 9×13 pan and drizzle with melted butter and bake at 425* for 25 minutes.
  4. While the crust is baking, prepare the filling.  Mix the meat, peppers, cheese and onions in one bowl.  Mix the eggs, milk, salt and pepper in another bowl.  
  5. When the hashbrown crust is done baking, change the oven temperature to 350*.  
  6. Pour the meat mixture into the pan and spread evenly over the crust. Then pour the egg mixture over the top.  
  7. Bake at 350* for 25-30 minutes.  Cool 10 minutes before cutting and serving.  

*We like to serve ours with a side of salsa…but we’re big fans of salsa… =)

Amish Macaroni Salad

My kids always want a container of the Amish Mac Salad before leaving Walmart. So, I decided to find a recipe so that I could make some at home. It was easy and DELICOUS!

2 c uncooked elbow macaroni
3 hard-boiled eggs, chopped
1 small onion, chopped fine
3 stalks celery, chopped
1 small red bell pepper,seeded & chopped
2 TBSP dill pickle relish
2 c creamy sald dressing (Miracle Whip)
3 TBSP prepared yellow mustard
3/4 c white sugar
2 1/4 tsp white vinegar
1/4 tsp salt
3/4 tsp celery seed, optional

Cook elbow macaroni according to directions and drain really well! Set aside to cool.
In a large bowl, stir together eggs, onion, celer, red pepper, & relish.
In a small bowl, stir together the sald dressing, mustard, sugar, white vinegar, salt and celery seed (optional).
Pour over vegetables, and stir in macaroni until well blended.
Cover and chill for at least 1 hour before serving. (Chilling the salad is very important! This thickens the dressing, and the noodels soak some of the dressing up too!)

Adapted from Allrecipes.com

Slow Cooker Chicken Caesar Sandwiches

My daughter, Madi, is a huge fan of Chicken Caesar Salad so we gave this recipe a try and it is our new family favorite. It’s so easy and deliciouso!

2 lbs. boneless skinless chicken thighs
1/2 to 1 cup of your favorite Caesar dressing
1/2 cup shredded Parmesan cheese
1/4 cup fresh chopped parsley (if you don’t have fresh use 2 t. dried parsley)
1/2 t. ground pepper
2 cups shredded romaine lettuce
12 slider buns or 4-6 regular sized hamburger buns

1. Place chicken in a 3-4 qt. slow cooker with 1-2 cups of water, cover and cook on low 4-6
hours.

2. Remove chicken from cooker using a slotted spoon and drain the water from the slow cooker.
Place chicken on a cutting board and pull chicken into shreds, discarding any fat.

3. Place chicken back in the cooker and pour dressing, Parmesan cheese, parsley and pepper
over the top. I really make sure that I discard any fat pieces so by the time I am done I only
use about 1/2 cup of dressing but you may need more if you have more chicken. Stir until
mixed evenly. Cover and cook on high heat for 30 minutes or until mixture is hot.

4. Spoon 1/4 cup mixture onto each slider bun if you are making sliders or more for regular
sized buns. Top with extra shredded Parmesan cheese and lettuce to serve.

Notes: I have also used a 4 lb. bag of bone-in, skin-on thighs and just doubled the other ingred-
ients (except for the dressing which you have to play around with according to taste). I
used Ken’s Light Caesar dressing.

Source: Pinterest

Hawaiian Tuna Melt

A delicious twist on the old grilled tuna! This makes for a great lunch at home. I recommend using a thicker bread for this sandwich, so you can pile on the ingredients. A wheat ciabatta bread is pictured here, but you could use a hoagie roll, english muffin or thick sliced french bread.
Servings: 3-4
Ingredients:
2 (5 ounce) cans Tuna, drained and flaked
2 T. mayonaise
1 celery stalk, finely chopped
2 green onions, chopped
1/2 C. crushed pineapple
1/2 t. salt
1/4 tsp. lemon pepper seasoning
1/2 C. shredded cheddar cheese
Your favorite bread
1 T. butter
Directions:
1. Combine tuna, mayonaise, celery, green onion, pineapple, salt, and lemon pepper in a bowl.
2. Spread tuna mix over bread slice and sprinkle with cheese. Spread a small amount of butter on the top slice of bread.
3. Broil 6 in. from heat for 2 minutes or until cheese is melted and top slice of bread is toasted. Serve immediately.
Source: my variation of an allrecipes.com recipe

Easy Chocolate Ice Cream


Can you get any easier than 3 ingredients? This is a favorite of ours. It tastes like a Wendy’s Frosty to me.

Easy Chocolate Ice Cream

One half gallon chocolate milk
1 container Cool Whip (you can use the bigger or smaller size-it doesn’t really matter)
1 can Sweetened Condensed Milk
Regular white milk, if needed
Ice Cream Salt
Ice
Ice Cream Churn

1-Mix the chocolate milk, Cool Whip, and Sweetened Condensed Milk together.
2- Pour into the ice cream churn up to the fill line (this is where your extra regular milk comes in-you can add a little more white milk to mixture if you need a little more to make it to the fill line).
3-Put the ice cream churn together and add ice & ice cream salt.
4-Turn on ice cream churn and enjoy once finished.

Source: Pauline Branham

Grandpa’s Chili

My Grandpa Davis made the best chili.  I have fond memories of him making it, nursing it on the stove top till it was just right.   He loved to use a LOT of chili powder, so you may want to back off on that a bit if you’re not into spicy.  Mind you, it’s not radically spicy.  I don’t like super spicy food, and this is just about as spicy as I want to get with my food.  (I’ve found that serving some fresh fruit as a side dish can help with that “burning mouth” syndrome.)

Ingredients:
2-3 Tbsp. oil
2 large onions, chopped
2 green bell peppers, chopped*
2 pounds ground beef
1 (2 ounce) can chili powder
2 or 3 (1-pound) cans pinto beans, drained**
3 (1 pound) cans tomatoes, chopped
1 Tbsp. salt
1/2 tsp. red pepper
1/2 tsp. pepper
1/2 tsp. cumin
1/2 tsp. oregano
water

1.  In a large pot, saute onions and green peppers in oil.  Add ground beef and brown.
2.  Add remaining ingredients and simmer 1-2 hours.***  Use enough water to obtain desired chili consistency.

*I hate green peppers, so I always leave these out.
**Use whatever mix of canned beans you like.  Pinto, kidney, and black beans work well in any combination.
***I tried this the other day in the SLOW COOKER.  I browned the beef, then put everything in the SLOW COOKER.  It worked great!

Source:  my grandpa, James Graham Davis

Create.

This is one of my favorite talks by Elder Uchtdorf. I’ve been thinking about this talk even more lately since I’m pregnant. I get these weekly emails that update me on the development of the baby, and it never ceases to amaze me. Just think, with the help of our loving Heavenly Father…. I’m creating a person! Someone who can change the world.

I think that all of us have that innate desire to create something. I love being crafty, I love using my hands to make something. That’s one of the reasons I love this blog! It’s a chance for me to share something that I’ve created.

I want to share one quote from this talk that wasn’t shared.  “What you create doesn’t have to be perfect. So what if the eggs are greasy or the toast is burned? Don’t let fear of failure discourage you.” I think so many of us can easily get caught up in the fear of failure. I know I do! It’s important for us to try to get past that so we can take a chance. Who knows, maybe you’ll be better than you think.

Scrumptious Apple Pie

If an apple pie and an apple crisp got married, this would be their baby.  A delicious, mouth-watering “pie” baby!

Ingredients:
1 whole pie crust (from scratch or store-bought)

Filling:
6-7 cups peeled and sliced Granny Smith apples (I used 5 large apples)
Juice from half a lemon
1/2 cup white sugar
4 tablespoons flour
1/4 teaspoon salt

Crumb topping:
1 1/2 sticks butter
1/2 cup flour
1 cup brown sugar
1/2 cup quick oats (I used rolled oats because that’s all I had)
1/4 teaspoon salt
1/2 cup chopped pecans
1/2 jar caramel topping (or homemade caramel sauce)

1.  Preheat oven to 375 degrees.

2.  Peel and slice your apples into a large bowl.  Squeeze juice of lemon over apples and stir to coat.  Add your white sugar, flour, and salt.  Mix.

3.  For the crumb topping, cut the butter into the flour with a pastry cutter.  If you have a food processor, that would work too.  Add your brown sugar, oats, and salt.

4.  Pour apples into prepared pie crust.  Spread your crumb topping over apples.

5.  Cover edges of pie crust with aluminum foil and bake for 25 minutes.  When time is up, remove foil and bake for another 30 minutes.  Before last 5 minutes is up, remove pie from oven and sprinkle top with chopped pecans.  Return to oven and finish baking.

6.  When pie is done, remove from oven and pour caramel sauce over topping.  Or wait and pour sauce over individual slices.

*Some of the juices started to bubble out towards the end of baking.  I would recommend placing a cookie sheet lined with foil on the rack below your pie. 

*There is A LOT of butter in this pie!  I think I’ll try using only 1 1/4 sticks next time I make this.

Source:  The fabulous Pioneer Woman

Ghostly Shepherd’s Pie

Now that Halloween is upon us, I thought it would be timely to share my next recipe for you… Ghostly Shepard’s Pie. I love making holidays fun, and I love making this meal every year. This year will probably be the first time that I’ll have a child who will really enjoy it… so that should be fun. This recipe is perfect for the fall, I hope you enjoy it. 

Ghostly Shepard’s Pie
1 lb ground beef
1/2 C. chopped onion
1 bag (12 oz) frozen mixed vegetables
2 C. diced tomatoes with Italian herbs, undrained (from 28-oz can)
1 jar (12 oz) beef gravy
1 3/4 C. water
2 Tbsp. butter/margarine
1/4 tsp. garlic powder
1/2 C. milk
2 1/4 C. Dried Potato Flakes (instant mashed potatoes)
1/4 C. grated Parmesan cheese
1 egg, slightly beaten

1. Heat oven to 375°F. Spray 12-inch skillet with cooking spray. Add beef and onion; cook over medium heat 8 to 10 minutes, stirring occasionally, until thoroughly cooked; drain.

2. Set 12 peas (from frozen vegetables) aside for garnish. Add remaining frozen vegetables, tomatoes and gravy to beef mixture. Heat to boiling. Reduce heat to medium-low. Cover and cook 8 to 10 minutes, stirring occasionally, until vegetables are crisp-tender.

3. Meanwhile, in 2-quart saucepan, heat water, butter and garlic powder to boiling. Remove from heat; add milk. Stir in dry potatoes and cheese. Add egg; blend well.

4. Spoon beef mixture into ungreased 2 – 2 1/2 quart baking dish. With large spoon, make 6 mounds of potato mixture on top of beef mixture to resemble ghosts. Place 2 reserved peas on each mound to resemble eyes.

5. Bake 20 to 25 minutes or until potatoes are set and mixture is thoroughly heated.

Enjoy with your little ghosts & goblins!!

Although this recipe only makes an 8×8 casserole serving – it would be very simple to double… just in case you have a lot of little ghosts and goblins to feed!

Layered Chip Dip

This is a General Conference tradition at our house. It is mui bueno! Mr. Blue Eyes also informed me that 1/8 Cup (including 4 chips) has about 200 calories in it–the same as 1 Glazed Krispy Kreme doughnut. If you’re going for Quality Calories, EAT THIS! If you’re going for SWEET with zero nutritional value, eat the doughnut (I’ll be with you!). 🙂
Ingredients:
2 Cans Refried Beans
4 Mashed Avocados
Lime Juice to taste–about 4 Tbsp
1 Cup Sour Cream
1 Cup Mayonnaise
1-2 Packages Taco Seasoning (I only use one, but know others who use two)
4 Cups Shredded Colby-Jack Cheese
1 Bunch Green Onions
4 Chopped Tomatoes
Your Family’s Favorite Tortilla Chips
1. In an 11×15″ cake pan, spread the refried beans over the bottom.
2. Mix your mashed avocados and your lime juice together. Plop it (or this fabulous Guacamole Dip!) onto the refried beans…

…and spread it over.

3. Mix the sour cream, mayo, and taco seasoning in a small bowl…
…then spread it over the guac.

4. Spread the cheese over the sour cream–use as little or as much as you like!

5. Add your veggies* and serve with your favorite Tortilla Chips. We like any Scoop variety.

Serve immediately. Refrigerate any left overs (or if you’re not serving it until later).
*This recipe is so versatile that you can make it as simple or as glorified as you want. I’ve had several different kinds of veggies (peppers, olives, etc.) and haven’t had a bad combo yet!
Source: My variation of a family friend’s recipe
~Kara