Baked Pumpkin Pie Oatmeal

This is for all you pumpkin lovers!  
Ingredients:
1 (15oz) can pumpkin puree
1/2 cup brown sugar
2 large eggs
1/2 teaspoon vanilla extract
1 teaspoon pumpkin pie spice
1/2 teaspoon salt
3/4 teaspoon baking powder
1 1/2 cup milk
2 1/2 cup old fashioned oats 
1.  Preheat oven to 350 degrees.  Coat an 8×8 dish with Pam (or other non-stick spray).  I used a 9×13 dish.
2.  Pour pumpkin puree, brown sugar, eggs, vanilla, pumpkin pie spice, salt, and baking powder in a large bowl.  Using a whisk or hand blender, mix ingredients  until smooth.  Add milk.
3.  Combine oats with pumpkin mixture.  Pour into prepared baking dish.
4.  Cover with foil and bake for 45 minutes.  When 15 minutes are left, remove foil.
*Top with additional sugar, syrup, whipped cream or nuts!

Pink Milk

My kids love Charlie and Lola, a couple of cute British kids that used to come on the Disney Channel. We own pretty much every book and DVD on those two. One of Charlie and Lola favorite drinks is pink milk.

I found a recipe which involved ice cream, milk and strawberries, i.e., ingredients I did not have. So I adapted the chocolate milk recipe below. For pink milk, simply substitute strawberry powder for the chocolate powder (and yes, I do prefer Nesquik).

Pink milk
1 quart water
3/4 cup dry powdered milk
1/2 cup strawberry milk mix

Whisk together dry ingredients in the bottom of a pitcher. Slowly add the warm water as you are stirring. Chill for at least 3 to 4 hours before serving.


Adapted from: I Can’t Believe It’s Food Storage

Chocolate Milk

My kids love chocolate milk. I mean, whose kid doesn’t? But let’s face it, milk is expensive. So to save a little dough I started keeping chocolate milk (made with non-instant powdered milk) in the fridge.


Chocolate Milk
1 quart warm water*
3/4 cup non-instant dry powdered milk
1/2 cup chocolate milk mix (We prefer Nesquik.)
Mix the dry ingredients in the bottom of the pitcher, then stir in the warm water. Chill for at least 3 to 4 hours before serving

No one has complained that it doesn’t taste as good as fresh milk (just don’t let them see you mixing it!). Go ahead and double it; it’s gonna disappear fast.
*Crystal Godfrey claims that the powder will dissolve easily in any temperature water. I don’t like to argue with the experts, but I have been much more successful mixing it with warm water and then refrigerating.
Source: I Can’t Believe It’s Food Storage

Semi-homemade Caramel Apples

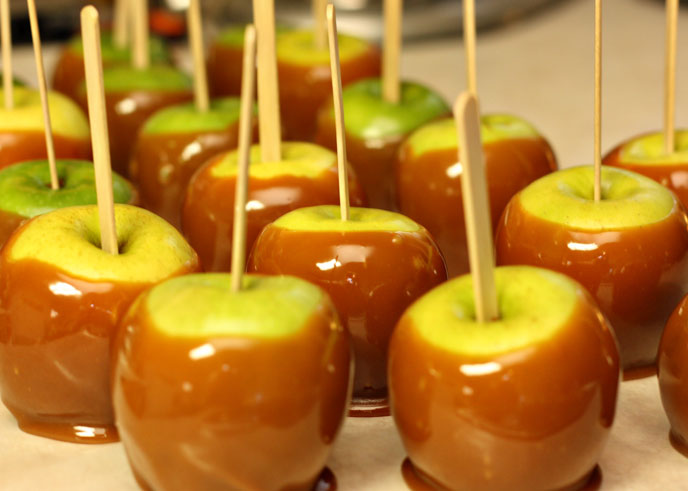
I love caramel apples, like REALLY love them. I’ve never made them, but decided that this was the year. It was so easy and fun. It’ll definitely become a yearly tradition in our home.

Ingredients Needed:
– Apples, make sure they are really cold. 
– Kraft Caramel bits (one bag per 5 apples)
– 2 Tbsp. milk per bag of caramels
– Popsicle sticks
– White chocolate chips (I used Nestles)
– Bittersweet chocolate chips (I used Nestles)
– 1 Tbsp. of Shortening per cup of melted chocolate
– Cinnamon sugar

In just a few steps, you  can have chocolate-shop worthy caramel apples.

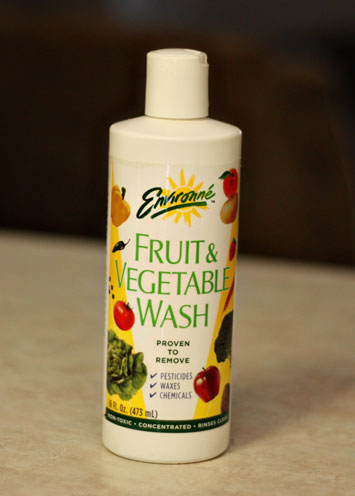
First, CLEAN your apples. My apples came from the grocery store – which means tons of wax and who knows what chemicals.

 I use a fruit/veggie wash to rid my produce of the gunk that’s on them at the store. I highly recommend this brand. I get it at Trader Joe’s.  Nice scrub with this wash, and it’s completely noticeable that a lot of the wax is washed away.

Once the apples are washed, make sure they become completely dry. Caramel will not stick to wet apples! While drying – stick them back in the fridge to make sure they are extra cold.

While the apples are drying empty the bag of caramels into a pot on the stove. Add 2 Tbs. of milk per bag of caramels. Cook on medium-low. Stir often. Do not allow your caramel to boil. (it’ll take a while to melt)

Once the caramel is melted transfer to a smaller container. I used a glass 2-cup liquid measuring cup. Doing this will make it easier to get the caramel higher on the apple.

Once you have the craft sticks stuck in your apples… dip your apples! Shake off excess caramel, use a butter knife to scrape it off the bottom. You don’t want too heavy of a coat. Transfer to either wax paper or a greased cookie sheet.

Let the caramel set.

 While the caramel is setting melt your chocolate (and shortening) in either a double boiler or in the microwave. I used the microwave. Cook it 30 seconds at a time, stir. Transfer white chocolate to a smaller container for dipping.

For an Apple Pie style caramel apple – dip the caramel apple in white chocolate, scrape of excess. Then while chocolate is still wet – shake cinnamon sugar on the chocolate.

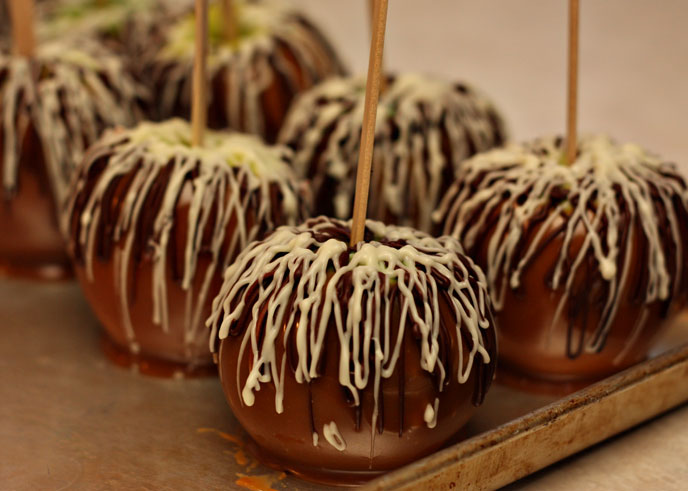
For a Chocolate Lover’s Apple, transfer white and bittersweet chocolate to plastic bags. Cut a TINY corner off and drizzle the chocolate over the apple.

Let the apples completely cool and set in the fridge. I allowed them to set overnight.

Then… most importantly…. ENJOY! These are great neighbor gifts. I wrapped each apple up in cellophane wrap and tied them with a ribbon. Make sure to chill them until you deliver or eat them.

And please…. use a knife to cut into them! Save your precious teeth!! I hope you enjoy them as much as I have!!

Meatball Subs

Mr. Blue Eyes and I love these sandwiches! The meatballs are pretty run of the mill, but I love something that can be used in many recipes and stores or freezes easily. Sometimes I make the meatballs and freeze them for later use. SO great!
Ingredients for the Meatballs:
1 lb Ground Beef
1/4 C Bread Crumbs (we use Italian Seasoned)
1 egg
2 Tbsp finely chopped onion
1 clove garlic, minced
1/2 tsp salt
1/8 tsp ground pepper
Additions for the Sandwiches:
1 (32 oz) Jar of your favorite Spaghetti Sauce (We use Classico, Tomato and Basil)
3-6 Hoagie Rolls (We slice three, and eat them open)
Shredded Cheddar Cheese (Mozzarella is great, too!)
1. Preheat the oven to 400 degrees F.
2. In a Medium sized mixing bowl, mix all the Meatball ingredients together by hand.
3. Roll into balls. I make mine with a cookie scoop–heaping.
4. Place about 1″ apart on a cookie sheet. (We use lean meat. If you use higher fat content, you may want to put these in a cake pan.)
5. Bake for 10 – 13 minutes.
6. After removing the meatballs from the oven, turn it to Broil–500 degrees–and move your rack up to the highest setting.
7. After letting them cool a bit (or not–depending how rushed you are. Just be aware that they may break a little if you handle them too much when they’re hot.), add them with your spaghetti sauce in a sauce pan. Warm them up over Medium heat, about 3 – 5 minutes, stirring gently.
8. Halve your hoagie rolls lengthwise, place them on a cookie sheet, and spoon some meatballs over the bread BOTTOMS (if you’re going to Sandwich it. We do tops and bottoms because we eat them open)–enough to get a bite of meat when you chomp into it.
9. Sprinkle some cheese over each sandwich half and place on the top rack under the broiler until the cheese is nice and melted, about 3 minutes. (Don’t over bake!!) Serve hot.

Source: A family recipe

~Kara

Apple Cobbler

Back in 1992 we moved from Winterville to Wilson, NC so that Mike wouldn’t have a 45 minute commute to work before the crack of dawn.  We had the most wonderful real estate agent helping us find a home.  Talk about service after the sale!  We moved into our  home in the summer and come Fall she brought several beautiful mums for me to put on my front steps.  Not long after that, she brought me the best apple cobbler I have ever had–she had made several for a church function and just thought I would like one–oh yeah!.  I called her and got the recipe and have used it all these years as a go-to, quick, yummy dessert for when I am in a hurry or when the family begs for this dish.  Sometimes I call this Apple Crisp, but Bea Newton–my realtor and friend–calls it a cobbler.  Whatever you call it, I call it scrumptious!  You will probably have everything on hand except maybe the apples.  Go out right now and buy some Fujis or Galas or Honeycrisps.  Just make this and enjoy!  And if you are ever in Wilson, run over to First Wilson Properties and say hey to Bea for me, if she hasn’t retired or isn’t on one of her many mission trips to a Third World country.  What a lady!

INGREDIENTS:
4 large apples, peeled and sliced
Cinnamon, to taste
Brown sugar, to taste
1 cup sugar
1 cup flour
1 tsp. baking powder
1/2 tsp. salt
1 large egg
1/2 cup chopped nuts
1 stick (1/2 cup) butter, melted

1.  Preheat oven to 375.
2.  Spray a 9×13 (or square) pan with cooking spray.  Add the apples and sprinkle generously with cinnamon and brown sugar (I get pretty heavy-handed here).
3.  Combine sugar, flour, baking powder, and salt in a medium bowl–this will be your crust.  Break the egg into this mixture and stir with a fork until crumbly.  Stir in nuts.
4.  Sprinkle crust mixture on top of apples.  Pour melted butter over crust.
5.  Bake for approximately 30 minutes or until lightly browned.

SOURCE:  Bea Newton, realtor extraordinaire!

Salisbury Steak

I can probably count on one hand just how many school luches I actually consumed. I was convinced that they were all “icky!” I can even remember how terrible the cafeteria smelled on salisbury steak day. Now that I’m a grown-up, I have decided to give certain foods another try. I found this recipe while searching through food blogs one day and after reading over the list of ingredients, I figured I was brave enough to give it a try. I was completely surprised that it was actually good, very good!

Ingredients:
1 lb. ground beef
1/2 package Lipton’s Onion Soup mix
1/4 cup bread crumbs
1 egg
1 package brown gravy mix, plus the required amount of water called for on the back
1/2 cup sour cream
1, 8 oz. package fresh mushrooms, sliced (optional)

1. Mix together ground beef, onion soup mix, bread crumbs and egg. Shape into 5 patties.
2. Fry patties in a skillet until brown, about 10 minutes on each side.
3. While the patties are cooking, mix together the dry gravy mix, water and sour cream.
4. Spray a 9×9 inch baking dish (or whatever you may have that’s about that size) with nonstick spray and arrange patties in a pan.
5. Cover patties with gravy mixture and sliced mushrooms.
6. Bake, covered, at 350 degrees for 40 minutes, turning patties halfway through.

* These are best served with rice or mashed potatoes.

Source: Mommy’s Kitchen

Cheesy Bread Sticks

These are just plain good! This is the same dough as used in my taco pizza that I posted a few weeks back. They are perfect!

1 tsp. active dry yeast
1-1/2 cup warm water
4 cups all purpose flour
1 tsp. kosher salt
1/3 cups of olive oil
1 cup monterey jack cheese, grated
1 cup sharp cheddar cheese, grated
a good marinara sauce, optional

Mix yeast with warm water and set aside for 8-10 minutes. mix flour, salt, and olive oil in a mixing bowl. With speed on low, drizzle in yeast/water mixture. Allow to mix until totally combined. Cover bowl with a towel and set bowl in a warm, draft free place. Allow to rise for 1-2 hours.
Place overn rack in the bottom position of oven. Preheat oven to 500 degrees. Remove half of the pizza dough from teh bowl. (save remaining dough or make more bread sticks!) With hands, spread pizza dough on an oiled baking sheet, making sure its relatively thin.
Sprinkle grated cheeses over the dough and bake for 9-12 minutes. Serve with or without marinara sauce.

Good Morning Pumpkin Pancakes

Really……I do try so hard not to be obsessed with pumpkin! This week I made pumpkin mac and cheese, pumpkin hot chocolate and these pumpkin pancakes that I’ve been making for decades. I like to put mini (as well as many) chocolate chips in them too! Don’t use regular size ones because it overwhelms the star of the show………the pumpkin of course!

Ingredients:

2 Cups biscuit mix
2 T. packed light brown sugar
2 t. ground cinnamon
1 12 oz. can evaporated milk
1 t. ground allspice
1/2 cup pumpkin
2 T. vegetable oil
2 eggs
1 t. vanilla

Directions:

1. In large mixer bowl combine biscuit mix, sugar, cinnamon and allspice.

2. Add evaporated milk, pumpkin, oil, eggs and vanilla; beat until smooth.

3. Pour 1/4 to 1/2 cup batter onto heated and lightly greased griddle. Cook until top surface
is bubbly and edges are dry. Turn, cook until golden.

Source: Pinehurst Inn Bed & Breakfast

Wiener Schnitzel

This is a German dish my father learned how to make on his mission to Austria. I ate it frequently at my house as a child, and recently rediscovered it.

Serves 6
Ingredients:
6 pork loin cutlets (or boneless pork chops)
1/4 C. flour
1 tsp. salt
1/4 tsp. pepper
1 egg, beaten
2 T. milk
3/4 C. dry breadcrumbs
1 tsp. paprika
1 tsp. shortening
Directions:
1. Pound pork thin to about 1/2 to 1/4 inch thickness. Cut small slits around the edges to prevent curling as it cooks.
2. In a shallow dish, combine the flour, salt, and pepper.
3. In a second dish, combine the egg and milk.
4. In a third dish, combine the breadcrumbs and paprika.
5. Coat both sides of the pork cutlets with flour mix, then egg mix, then breadcrumb mix.
6. Heat the shortening in a large skillet on medium heat. Cook the coated cutlets in the skillet 2-3 minutes each side. Remove from pan and serve immediately.
Source: My father, who has been known to wear a lederhosen.