How To: Freeze Avocado

I love, love, love avocado and guacamole.  But most of my kids haven’t quite come to appreciate this green miracle yet.  So I’m always stuck with too much and it always goes bad too quickly.

Enter:  Pinterest.

How many times has Pinterest come to the rescue?

Well, at least this once.

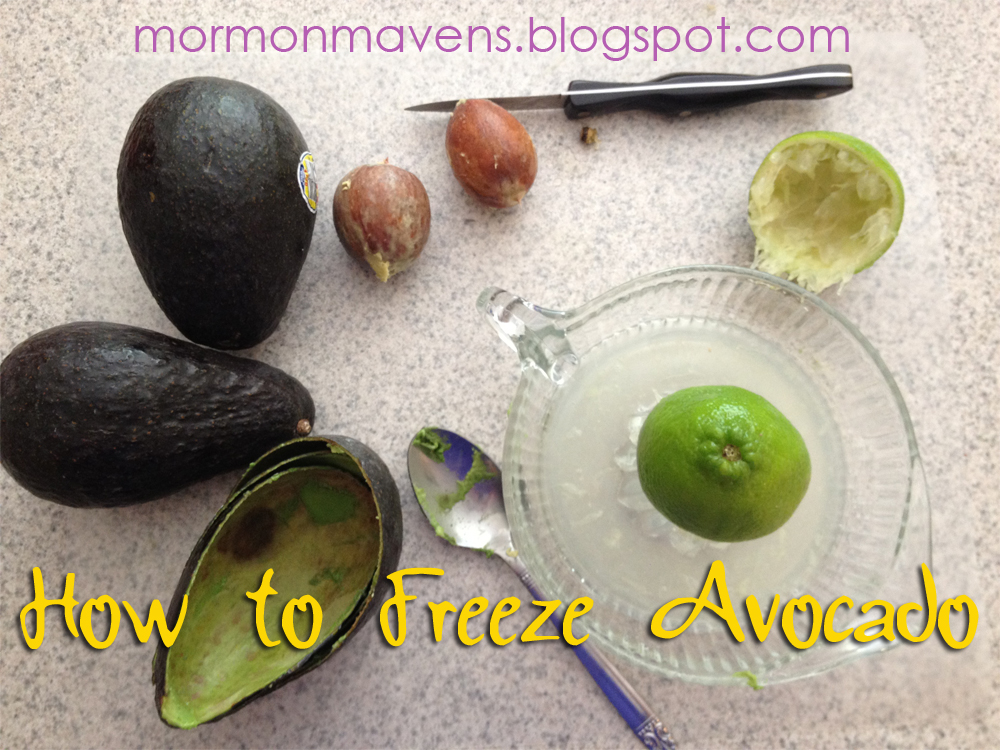
I found instructions on how to freeze avocado and I knew I had to try it.  Worked like a charm.  If you are a chunky guac fan, you may be disappointed in the puree texture; but it’s still a great way to preserve this luscious goody and I’ll suffer through using it to make smooth guac if it means no more throwing away avocado halves and leftover guac!

Ingredients/Supplies:
ripe avocado
fresh lime juice (1 Tbsp. per avocado)
blender
zip top sandwich bags
wide, short glass
chopstick or pencils
cookie sheet

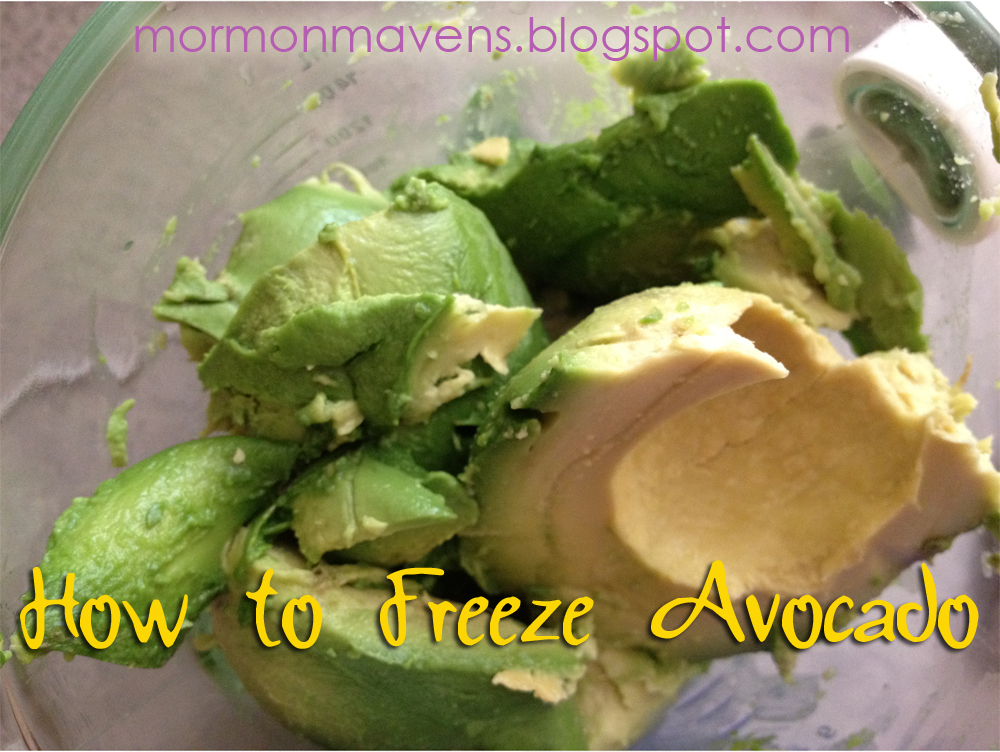
1.  Scoop avocado flesh into the blender.  To do this, I cut the avocado in half length-wise, around the pit.  Then I twist the two halves in opposite directions to separate them.  I cradle the pit half in my left hand and with my right hand I CAREFULLY chop down once into the pit to “grab it”…I use a small knife in case my insane klutziness gene decides to take over and dismember me.  With the knife embedded in the pit, I give it a slight twist and out pops the pit.  Usually.  Then I just scoop the flesh out with a spoon.

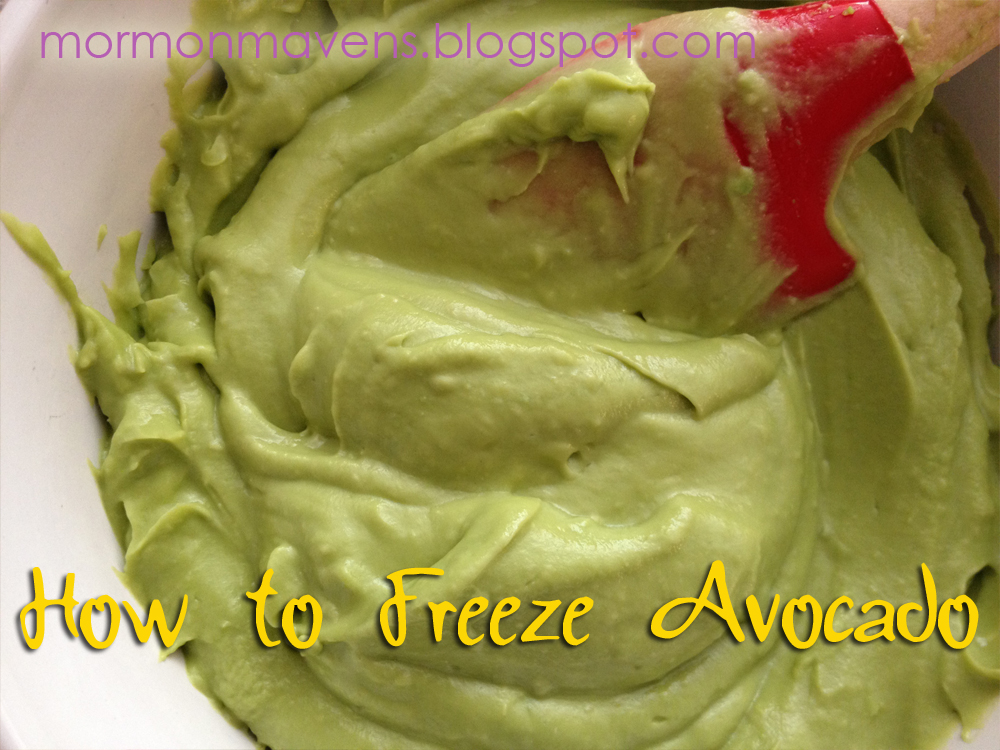
2.  Add the freshly-squeezed lime juice.  Puree until smooth.  Drool.  But not into the blender.  That’s gross.

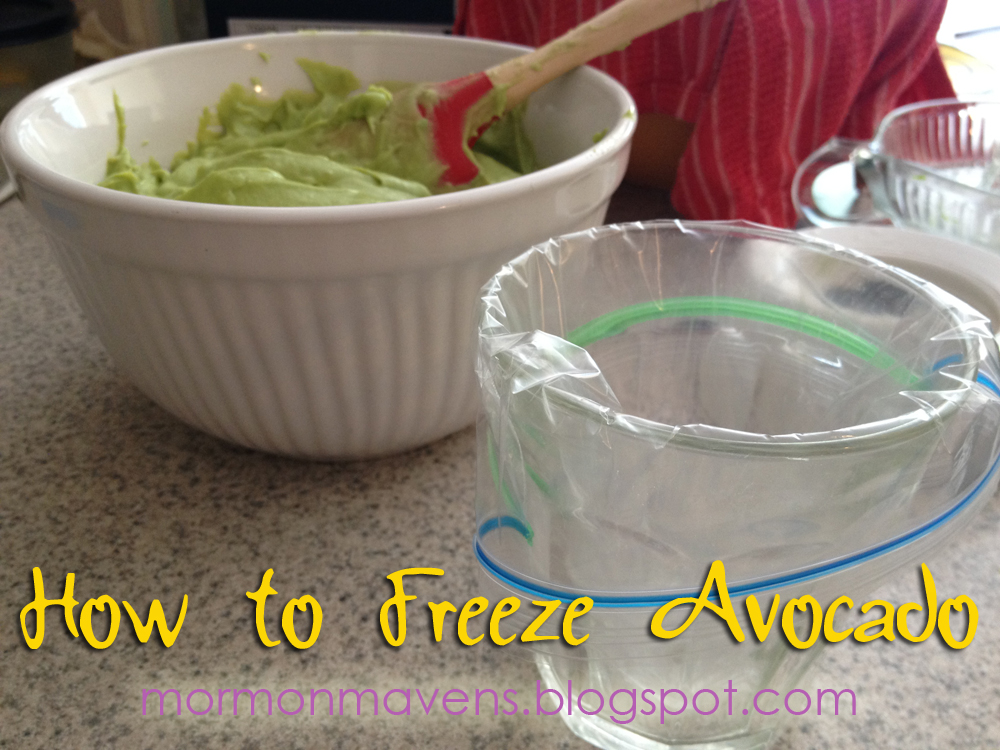
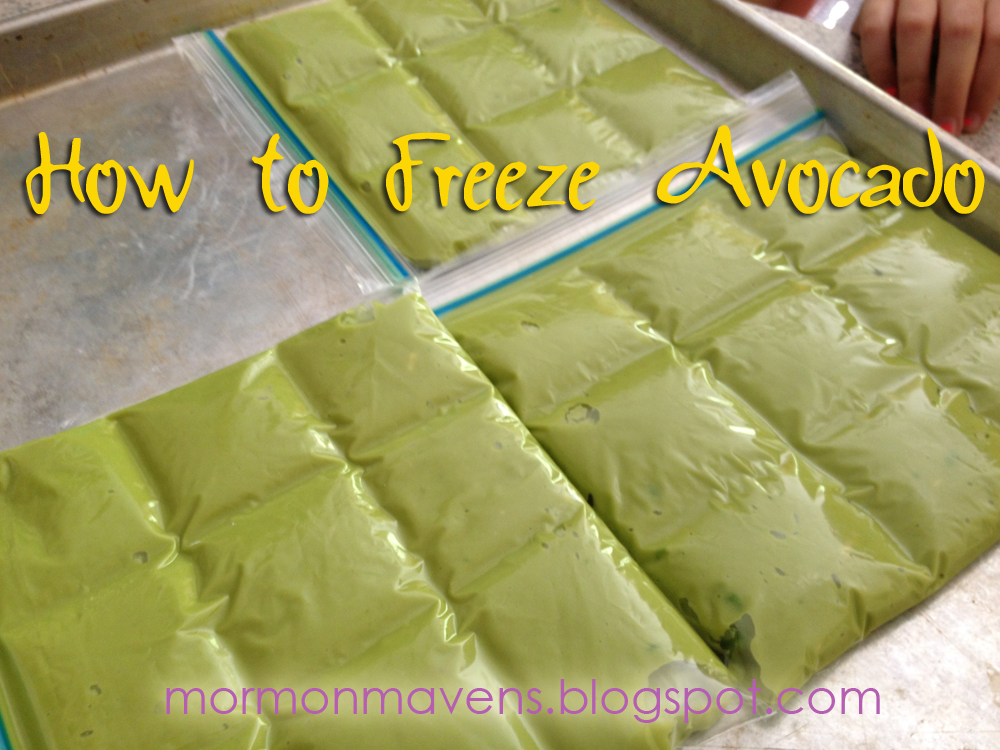
3.  Take the wide but short glass and place the zip top bag into it, then fold the zippy edges of said bag out over the edge of the glass.  Spoon some of the puree into the bag (just eyeball it being half to three quarters full).  Fold the edges back up, carefully squeeze out as much air as you can, and seal the bag.

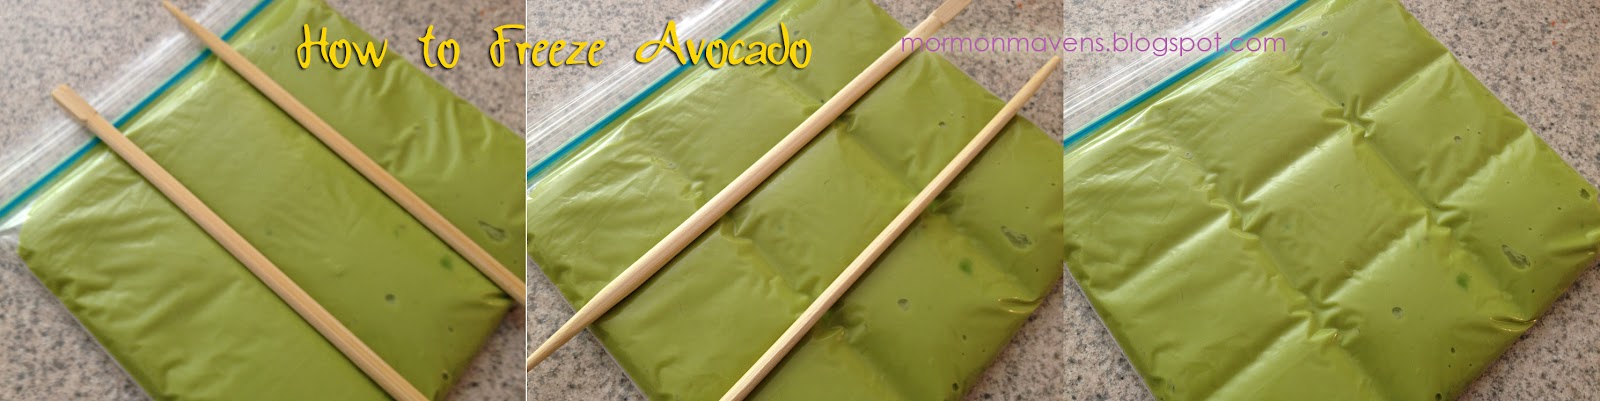
4.  Lay the bag flat on a cookie sheet, opening the bag a tad if you see anymore air trapped inside.  Using the chopsticks or pencils, make a tic tac toe board on the bag….two sets of parallel lines.  Is that too math-y?  Okay, just do like this:

5.  Place in freezer until totally firm.  Then you can take it out and store it vertically so it takes up less space.  (Incidentally, this is a great way to freeze and store soups, sauces, etc…..flat first, then vertically like files.  Not that I actually get around to doing that.  But I’ve thought of doing that.  And I think I should get credit for that.)

When ready to use, take out a bag and snap off as many squares as you think you’ll need (I used the edge of the counter as a fulcrum.  HA!  Fulcrum…that’s all science-y.  Did I just blind you with science?).  I ended up sacrificing the original bag this way, but that’s okay.  I just put the remaining squares into a new bag and placed them back in the freezer.

Source:  Traveling Spoon Blog via Pinterest

Cherry Bars


Photo by Anna

This is one of my favorite recipes and it survived from my college days in the 70s–okay I went to college in 1976 and graduated in 1980, if you must know.  I got it from my college roommate and it scores big time whenever I make it.  This is also really good with blueberry pie filling.  I am trying it with blackberry next time…

Ingredients:
1 cup butter, softened
1 1/2 cups sugar
4 eggs
3 cups flour
2 1/2 teaspoons baking powder
1/2 teaspoon salt
1 teaspoon vanilla
1 can cherry pie filling

Glaze: 1 cup powdered sugar, 1 teaspoon vanilla (or almond, a little less), 1 tablespoon water

1.  Mix all ingredients well, except cherry pie filling.

2. Spread 2/3 of mixture into buttered 9″ x 13″ pan–yes, buttered, not cooking spray.  There is a difference in taste if you spray.

3.  Pour pie filling on top and spread evenly.

4.  Spoon rest of dough, like dumplings, on top of pie filling.

5.  Bake at 350 for about 45-50 minutes .

6.  Let cool about 15 or 20 minutes and glaze while still warm.

Source:  Debbie Duke Cornell

Chocolate Covered Strawberry Shortcake

This is such a delicious idea that I don’t know why I didn’t think of it before.  The idea came from a dinner with our Sister Missionaries, one of which is allergic to strawberries.  I made a quick “chocolate sauce” for her pound cake and the rest of us wanted in on it.  This is the result.  You can spread the sauce over the cake, drizzle it over the top, or both.  It is a yummy twist to an already delectable dessert! 

Ingredients:
Cake – Pound Cake, Angela Food Cake or another cake of your choice cut into serving size pieces
1 Qt. Strawberries (fresh if available)
Sprinkle of sugar (optional)
2 cups Heavy Whipping Cream
1/2 tsp Vanilla
1/4 cup Powdered Sugar
1 cup milk chocolate chips
1/4 cup Heavy Whipping Cream

1.  Prepare Cake according to directions on package or recipe (or purchase pre-made) Let cool.
2.  Wash, Stem and slice strawberries.  Sprinkle with 1-2 TBLS sugar and stir with wooden spoon – this will cause the strawberries to “juice”
3.  Whip whipping cream until peaks start to form, add vanilla and powdered sugar, whip until stiff peaks form
(Note:  If you whip your cream too long, you will have a sweetened vanilla butter – not all “oops” are a bad thing)
4.  Heat Chocolate chips and cream in double boiler or in microwave just until melted – stirring to prevent burning let cool slightly
5.  Layer the dessert the way you like it.

Source:  A Jennie Original with a little help from my friends 🙂

Cinnamon Roll Pulls (aka cinnamon crack bread)

Ingredients:

1 unsliced round loaf sourdough bread

1/2 cup butter, softened
1/4 cup powdered sugar
1/4 cup honey
1 tsp pure vanilla extract

1 cup sugar
1 1/4 tsp cinnamon

1 cup powdered sugar
1-2 Tbsp milk

Directions:

1.  Preheat oven to 350 degrees.

2.  To make Vanilla Honey Butter: Whip butter and 1/4 cup powdered sugar together until smooth; stir in honey and vanilla.  Set aside.

3.  Cut the bread lengthwise into 1/2″ slices, without cutting through the bottom crust. Spread vanilla honey butter in between slices.  Rotate the bread 90 degrees and slice the bread again into 1/2″ pieces, without cutting through the bottom crust. Spread more vanilla honey butter in between new cuts. This doesn’t need to be perfect – just make sure there is lots of butter in between all the cuts. Combine sugar and cinnamon. Generously sprinkle in between all cuts. (You may have extra butter and cinnamon sugar.  It will just depend on how large your bread loaf is.)

4.  Wrap in foil; place on a baking sheet. Bake at 350 degrees for 25-30 minutes, until bread is warm.  Unwrap cinnamon bread and place on serving platter.  Combine powdered sugar and milk – adding milk until you get the consistency desired.  Drizzle icing over bread and serve immediately.

Source:  Pinterest

BBQ Pork Spare Ribs (Country Style Ribs)

This is one of those family “meat n’ potato” recipes that makes me really happy.  Nothing says Sunday dinner like the smell of this wafting through the house when you walk in the door after church.

5-6 servings

Ingredients:
2 – 3lbs of pork spare ribs (aka country style ribs)
5 medium russet potatoes, peeled and cut into 1-2-inch pieces
16 oz. bag baby carrots
1 T. vegetable oil
1 1/2 C. T Ketchup
1 tsp. Tabasco sauce
1 T. brown sugar
1 tsp. dry mustard
1/4 C. water
Kosher salt
pepper

Directions:
1. Preheat the oven to 325 degrees F.
2. In a medium bowl mix the ketchup, Tabasco, brown sugar, mustard, and water. Salt and pepper to taste. Set aside.

3. Add oil to a ceramic or cast iron dutch oven, and heat on stove (med-high).

4. Season ribs with salt and pepper on all sides.

5. Add ribs to hot dutch oven and quickly seer them on all sides (ends included) to lock in the juices.

6. You have 2 options at this point. You can throw the potatoes and carrots in now and pour the sauce over everything, or let the meat and sauce cook for an hour and then mix in the veggies. The difference is that when the potatoes and carrots cook for 3 hours, they get quite soft and mushy (which some people like), but when they cook for 2 hours, they are more firm and stay together better. I personally like to let the meat cook an hour before I put the veggies in.  

7. Cover with lid and place in 325 degree oven for 3 hours. Don’t forget to add your veggies after 1 hour of cooking if you reserved them- Take the dutch oven all the way out of the oven, place veggies inside and gently stir to get them down into the BBQ sauce.

Fresh Spinach Salad

 
This is a delicious recipe. Be sure to allow enough time to chill the dressing for 30 minutes. You can either prep the eggs, bacon, and onion during the chilling time, or you can prepare them in advance so those portions of the salad will also be chilled once the salad is assembled.
 
Ingredients:
1/2 C vegetable oil (I use EVOO)
1/4 C red wine vinegar (I prefer balsamic vinegar)
3/4 tsp. salt
1/8 tsp. dried whole oregano
1/8 tsp. black pepper
1 lb. fresh spinach (I use the bagged, prewashed kind)
6-8 slices bacon, cooked and sliced (or you can buy precooked bacon crumbles or pieces, though I don’t recommend bacon bits)
2 boiled eggs, peeled and diced
1 small red onion, sliced and separated into rings or chopped (I don’t use the whole onion b/c it has such a strong flavor–just use as much as your taste-buds like)
grape or cherry tomatoes as desired
 
1. Combine oil, vinegar, salt, oregano, and pepper in a jar. (I have this awesome dressing emulsifier from Williams Sonoma.) Cover tightly and shake vigorously. Chill at least 30 minutes.
 
[Photo from Williams Sonoma]
 
2. Combine spinach, bacon, eggs, and onion in large bowl.

3. Add tomatoes to the salad. (You might choose to halve them for easy stabbing.) I don’t toss the salad because doing so causes the toppings to collect at the bottom.

 
4. If you have a dressing dispenser, I recommend keeping the dressing in it and adding the dressing to the individual servings (rather than tossing the salad with the dressing until it’s well coated) because the salad shrinks dramatically once the dressing is added. You can imagine how soggy your leftovers will be if you add it all at once. If you don’t have a dressing dispenser, you can use something with a spout, like a liquid measuring cup, and just whisk the dressing with a fork as needed.
 
Makes 8 servings.
 
Source: Brew Family Cookbook (Tomatoes aren’t part of the original recipe; I add them for color and flavor.)
 

Mini Berry Tarts

I really love spring. A fresh start in so many ways! One of my favorite spring activities is going to the strawberry patch and picking big, juicy fruit right off the bush. Most of the strawberries make it into our basket, but I will admit that a fair share go from vine to mouth in one swift motion.

 
Once we get the berries home, it’s a race to see how may ways we can use them before they spoil. Among many of the strawberry dishes we have had over the past week were these little babies:
 
I bet you are glad you stopped by, because I am going to tell you how to make them!!! And once you do, share them at your spring brunch, or take some to a neighbor!
 
You will need some sort of tart pan, which looks a lot like a regular sized muffin tin, but with shallower pockets.
 

You could attempt to make the tart shells in a muffin tin, but I am not taking responsibility for stuck and broken shells. Just be sure to grease and flour the pan before you place your pastry in the cups.
 
Tart Shells:
6 T. sugar
2/3 cup margarine
1 1/2 T. cream
1 egg yolk
1/2 tsp. vanilla or almond extract
1 1/4 C. cake flour, plus extra if your dough seems too sticky
 
Directions:
1. Cream sugar and margarine together in a medium bowl. Add cream, egg yolk, and vanilla/almond extract and mix until well blended. Add the 1 1/4 cups of cake flour. If the dough is really sticky, and doesn’t come together or leave the sides of the bowl, add more flour in small increments until it does.
2. Remove dough from bowl and wrap it in plastic wrap. Refrigerate 30 min. to 1 hour.
3. Roll chilled dough out on a floured surface and use a cookie cutter or glass to cut circles about an inch larger than the tart pan cups. Transfer circles of dough to each cup, easing them into the bottom and up the sides. Press gently around the sides and cut away the excess dough on top. Cover the pan with foil and bake at 350 degrees F. for 10 minutes. Remove the foil and bake for 5-10 minutes more or until golden brown (watch them carefully for the color you want, they can over-brown quickly). You want the shells to be crunchy though, not soft.
Allow to cool before filling.
Makes 24 mini tart shells or one 9-inch tart shell*
 
* If you would like to make one large tart shell, roll out dough to 1 inch larger than the pan and gently lay the dough into the bottom and up the sides. Roll the rolling pin over the top of the pan to seal the edges and cut away excess. Lay foil over the dough, gently pressing it against the bottom and sides. Pour 1 1/2 cups baking beads, dry beans, or rice on top of the foil (this is to prevent the dough from rising during baking) Bake this way at 350 degrees F. for 15 min. Remove foil and return the crust to the oven for 10 minutes until golden brown.
 
Tart Filling:
1 C. strawberries
1 C. blueberries (*if you are making a 9-inch tart add another cup of berries)
3 oz. cream cheese, room temperature
4 T. sugar, divided
4 oz. frozen whipped topping, thawed in the refrigerator (that’s 1/2 of an 8 oz. container)
 
Directions:
1. Rinse the berries and dry on paper towels. Cut the strawberries into quarters.
2. Beat cream cheese and 1 T. sugar until smooth. Add whipped topping and mix until well blended.
3. Spread filling into tart shells, and arrange berries on top of filling.
4. Sprinkle with the remaining 3 T. of sugar.
 
Source: adapted from a Lion House Pies recipe.

Navajo Tacos

Mr. Blue Eyes tells a story about how one of his history teachers was teaching them about the Sioux Native American Tribe. The teacher got up and wrote “Sew” on the black board (this was before white boards–when did I get so old?). No kidding. The man should have been fired on the spot. I know a regular Joe could have made that same mistake, but this guy was TEACHING the class. Fired.

What does this have to do with cooking? Absolutely nothing. But if you’re going to make Navajo Tacos, you have to know how to say it. The “j” says the “H” sound. Don’t let it tell you otherwise. Nava-hoe. Say it with me, now. Nava-hoe. Let’s try it with the correct spelling. Navajo. Good.

Also, before we begin: I am not using native Navajo Fry Bread. It’s fairly easy to do and maybe someday I’ll make a post of it, but today is not that day. I am not an experienced Fry Bread maker and so I stick to what I know–regular old yeast-risen dough.

Let’s begin, shall we?

Meat Mixture Ingredients*:
1 Medium Onion
1 lb Ground Beef
2.5 – 3 cups Chicken Broth
1 Tbsp Chili Powder
2 cloves Garlic, chopped (or use powdered)
2 tsp ground cumin
2 tsp dry oregano
2 tsp dry basil
2 cans Pinto Beans

1. In a Large pot, saute the onion in a Tbsp butter or oil, about 3 minutes, until limp.
2. Add ground beef and brown. Drain off any fat.
3. Add the chicken broth and all the herbs. Stir until combined. Add beans.
4. Set to simmer and stir occasionally. (I also do this in the morning and put it in my crock pot on Warm for dinner in the evening.)

Fried Scones Ingredients**:
Bread Dough: I use this recipe. You can also use Frozen Rolls–thawed, or whip up some fry bread yourself.
2 – 4 cups Vegetable Oil

1. In a Large Skillet, pour oil in until there’s about 1/2″+ in the bottom. Heat the oil over med/high heat.
2. While the oil is heating, roll out a portion of bread dough on a slightly floured surface. Using a pizza cutter or knife, cut into sections. OR take a large handful of dough and work it flat into a disc shape (if you are using frozen rolls, for example).

3. When the oil is hot (and not until then!), gently place a section of bread into the oil. Let it cook about 1 minute or until lightly browned. It will puff up–and it’s supposed to! Using tongs or two forks, gently turn it over. Be CAREFUL! Oil burns are NO FUN.

4. Remove onto a paper towel and keep warm in the oven, if needed.

Don’t be fooled! I used paper towels between each layer, but that wouldn’t look very good in a picture, would it?

Topping Ingredients:
1-2 Large ripe tomatoes, chopped
3/4 lb cheese, shredded (we use Cheddar)
1 sm bag (or 1/2 head) Lettuce, shredded
1 C sliced green onions
1 C sour cream
Salsa (if preferred. I like it. Mr. Blue Eyes does not.) 🙂

Layer a Scone, a ladle full of meat sauce, and the toppings you want onto a plate. Cut into it with a fork, or eat it by hand.

*I have found that sometimes the chicken broth needs a little thickening. It tastes great without the thickening, but it can be a little runny. This leads to soggy scones. Gross! Use a little corn starch and cold water (maybe 1/3 C corn starch to 1/4 C water).

**Scones are DELICIOUS lathered in a layer of honey/butter, too! We always leave some room for this delectable dessert!

Source: Modified from a good family friend, Janet

~Kara

Glazed Berry Medley Cake

I found this recipe on Pinterest! (where else?!) The recipe on Pinterest called for strawberries only. I had a bag of mixed berries…so that is what I used. I liked it, but I like all sweets! My kids thought this tasted kind of like Fruit – Loops! I think that was because I used the mixed berries. So, you choose what berries you’d like to use and see how you like it. It’s a pretty cake, isn’t ? And, it is yummo!

1 cup (2 sticks) butter, softened
2 cups sugar
3 eggs
zest of 1 lemon
2 1/2 cups all-purpose flour, divided
1/2 tsp. baking soda
1/2 tsp. salt
8 oz plain or vanilla, greek yogurt
12 oz fresh strawberries (or frozen, or frozen medley of berries)
1 cup powdered sugar

Preheat oven to 350 degrees. Grease and flour a 10 inch bundt pan. Sift together the 2 1/2 cups flour, baking soda and salt. Mix in the lemon zest and set aside. ( I didn’t have any lemons handy that day, so I used orange zest. It was pretty good. I think I might have liked the lemon zest better)

With an electric mixer, cream together the butter and sugar until light and fluffy. Beat in the eggs on at a time, then stir in 1 TB. lemon juice. As always, alternate beating in the dry ingredients, flour, with the wet ingredients, yogurt, mixing just until incorporated.

Toss the berries of your choice with the remaining 1/4 cup of flour. Carefully mix them into the batter so they don’t turn to mush.

Pour the batter into the bundt pan. Bake in the preheated oven for 60 min., or until a toothpick inserted into the center of the cake comes out clean.

Allow to cool 10 minutes in the pan, then carefully turn out onto a wire rack and cool completely!!! If you can’t stand it any longer and you glaze this baby without letting it cool completely, the cake will soak up the glaze. So, let it cool completely!

Once cooled whisk together the remaining 2 TB of lemon juice and the powdered sugar, drizzle over the top of the cake, and voila!e

Sweet Tamale Corn Cakes

Ingredients:

SALSA VERDE

2 tomatillos, chopped (remove papery skin)
1 4 oz. can mild green chilies
1 green onion, chopped
2 T. fresh cilantro
1 1/4 t. granulated sugar
1/4 t. ground cumin
1/4 t. salt
1/8 t. ground black pepper

TOMATO SALSA

1 medium tomato, diced
1 T. minced Spanish onion
1 T. minced, fresh cilantro
1/4 t. lime juice
1/2 small fresh jalapeno, minced
dash salt
dash ground black pepper

SOUTHWESTERN SAUCE

1/2 cup mayonnaise
1 t. white vinegar
1 t. water
3/4 t. granulated sugar
1/2 t. chili powder
1/4 t. paprika
1/8 t. cayenne pepper
1/8 t. onion powder
dash salt
dash garlic powder

CAKES

1 1/2 cups frozen sweet corn
1/2 cup butter, softened (1 stick)
3 T. granulated sugar
1/8 t. salt
1/2 cup masa harina (corn flour)
2 T. all-purpose flour

GARNISH

1/4 cup sour cream
1/2 avocado, chopped
2 T. coarsely chopped, fresh cilantro

Directions:

1. Prepare salsa verde by combining all ingredients in a food processor on high speed. Cover and chill.

2. Prepare tomato salsa by combining all ingredients in a small bowl. Cover and chill.

3. Prepare Southwestern sauce by combining all ingredients in a small bowl. Cover and chill.

4. Preheat oven to 400 degrees.

5. Prepare the tamale cakes by chopping 1 cup of the frozen corn in a food processor until it’s coarsely pureed. Combine pureed corn with softened butter, sugar and salt. Blend well with electric mixer until smooth.

6. Add masa and flour and blend well. Mix in the remaining 1/2 cup of frozen corn kernels by hand.

7. Measure 1/2 cup portions of the mixture and form it into 3-inch wide patties with your hands. Arrange the patties on a baking sheet and bake for 25 to 30 minutes or until the cakes are browned on the bottom. Carefully flip all cakes with a spatula and bake for an additional 5 to 7 minutes or until other side is browned.

8. While the cakes are baking, spoon a portion of the salsa verde onto a plate or platter (you may want to heat up your plate in the oven for a bit to help warm the sauce). You’ll need to use enough salsa verde to coat the entire plate—it should be about 1/4 inch deep. Arrange the tamale cakes side-by-side on the salsa verde. Spoon a dollop of sour cream onto each tamale cake. Drizzle the Southwestern sauce over the cakes in a criss-cross pattern (use a squirt bottle if you’ve got one). Spoon some tomato salsa over the cakes, followed by the chopped avocado. Finish off the plate by sprinkling the coarsely chopped cilantro leaves over the top.

***FOR A QUICKER, EASIER VERSION THAT STILL TASTES GREAT TRY THIS METHOD:

1. Use canned salsa (verde and tomato).
2. Make a “Southwestern sauce” using sour cream mixed with taco seasoning or other bottled
Southwestern condiment.
3. Make the El Torito Sweet Corn Cake recipe previously posted on this blog for the “cakes”.

Source: Top Secret Recipes by Todd Wilbur