Slow Cooker Chicken Chile Verde

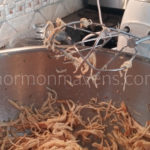
If you follow us on Instagram, you have already seen this picture.  Not your typical beautifully crafted finished product recipe image, right?  But, the technique used to shred this chicken is such a game changer, you will appreciate why I shared this.  

Besides, there wasn’t a particular dish that I was preparing this chicken for.  There are many ways you can use this Chicken Chile Verde.  Let your imagination run wild with that.

When I made this yesterday, I just scooped some of the chicken into a couple of romaine lettuce leaves and added chunks of avocado–low carb diet is happening right now.  Sort of.  You know what I mean.  My husband, however, made a burrito with his portion.

So, enjoy this recipe and the many ways in which you can use it. I would bet you could freeze it, as well, for future use.  

Slow Cooker Chicken Chile Verde
Write a review
Print
Ingredients
  1. 4 boneless, skinless chicken breasts*
  2. 1 medium onion, diced
  3. 1 bottle Herdez Salsa Verde
  4. 2 t. chili powder
  5. 1-2 t. ground cumin
  6. 2 cloves garlic, minced
Instructions
  1. Rub the chicken with the chili powder and cumin. Place in a covered dish and marinate overnight in the refrigerator.
  2. When ready to cook, place chicken in slow cooker; add garlic, onion and then top with the Salsa Verde.
  3. Turn slow cooker to low and cook for 8 hours.
  4. To shred, remove the chicken from the slow cooker to a large mixing bowl, leaving the liquid inside.
  5. With a mixer (I used a hand mixer) shred the chicken--literally takes less than 10 seconds. I think I had my setting on about 2 or 3.
  6. Return shredded chicken to the slow cooker and toss to coat with the liquid.
  7. Serve in a variety of ways.
Notes
  1. Original recipe calls for 6-8 chicken breasts, but I used a pack of 4. You may want to increase your seasonings if you use that much chicken.
Adapted from PaleoBurn Fat Burning Cookbook
Mormon Mavens https://www.mormonmavens.com/

Scotch Eggs


Originally published on May 9, 2013. 

Do people still do “Throw-back Thursday” on Facebook?  It’s kind of a fun thing to do and so I thought I would do that today by bringing back an oldie but a goodie.  Seriously, if you have never tried Scotch Eggs before, you should.  The first time I had one was at Disney World…


My daughter ordered Scotch Eggs at an English Pub at Epcot.  She went bonkers over them so, of course, I had to have a taste.  I was gobsmacked!  Could not believe how yummy they were!  She asked our waitress for the recipe and she was happy to share how she, personally, makes them at home in England.  Did we find the napkin she wrote the recipe down on?  I don’t think so.  So, the other day I was looking through a magazine and I found a recipe!  Yahoo!   Chasity LeGrand shared this recipe via allrecipes.com.  I have made my variations to her recipe, below:

Ingredients:
1 quart oil for frying
4 hard-boiled eggs, cooled and peeled
1 pound pork sausage
1/3 cup all-purpose flour
3 eggs, beaten (did not take that much so I scrambled the rest for someone else to eat while I was making this)
2 cups dried bread crumbs, seasoned


1.  Preheat oven to 350 degrees F.  Heat oil in deep-fryer to 375 degrees.

2.  Flatten the sausage and make a patty to completely cover each egg and gently shape into a ball.  Very lightly flour the sausage and coat with beaten egg.  Roll in bread crumbs to cover evenly.


3.  Deep-fry until golden brown, then bake in preheated oven for 20 minutes.

4.  Cut eggs in half to serve.  I served mine with spring mix salad and coarse ground mustard.

Source:  Chasity LeGrand via www.allrecipes.com

Sweet Corn Cakes


Hello from the other side!  We have certainly missed our food blogging with all of you.  As you know, we thought our site may have been hacked, so we took it down for a bit.  Well, for a long bit. Anywho, whatever the issue was it has certainly been resolved through no effort on our part.  We went back in to fix the issues and they were gone.  Thank goodness, because we have been away far too long and are anxious to get back into it.

Today’s post is a favorite comfort food of mine.  I got the recipe from my sister, Amy, who lives in a neighboring state.  We took a trip up to help with some outside projects at their house and she had Slow Cooker Taco Soup simmering away while we worked.  Every once in a while I would come inside to thaw out and the aroma was amazing.  And, as if that wasn’t enough to tempt me to stay inside, I found out she was making Sweet Corn Cakes as a side.  What?!  Oh my goodness, y’all, what a perfect meal for a frigid day full of outside work “fun”.  It’s super easy, too.  

Right at the moment I wanted to post this we discovered that there are still issues with our Recipe Card format, so for now we are going Old School…

Ingredients:
1 box Sweet Corn Muffin Mix
1 15 oz. can cream-style corn
1/4 c. water
1/4 c. sugar
1/4 c. melted butter

  1. Mix all ingredients together and pour into a greased loaf pan.

  2. Bake for 40 minutes at the temperature suggested on your box of mix.


Notes:  This will be bit squishy, but that’s the beauty of it–and that’s why you use a cookie scoop to serve it.  Double the recipe.  Seriously, it is that good.

Source:  Amy Eason


Salsa Verde

salsa-verde


Saucy Recipe #2!  Okay I warned you last week we would have two sauces in a row.  Can I just say QUE RICO!  That means, another yummy recipe for you to try  out.  This is a tasty, fresh, cooked version of what you might have had in your favorite Mexican restaurant.  Hope you enjoy this dish!  Adios!

Salsa Verde
Write a review
Print
Ingredients
  1. 2 lbs. green tomatillos, husks removed and rinsed
  2. 2 garlic cloves peeled
  3. 2 serrano chilies, or more for taste
  4. 1 c. cilantro leaves
  5. 1/4 c. white onion, roughly chopped
  6. 1 t. kosher or sea salt, to taste
  7. 2 T. safflower or corn oil
Instructions
  1. Place the tomatillos, garlic cloves, and chilies in a pot and cover with water. Place over high heat until it comes to a boil. Simmer at medium for about 10 minutes, or until tomatillos change color from a bright to a pale green, are cooked through and are soft but are not coming apart.
  2. Place tomatillos, garlic and chile (start with one and add the other if you need more "heat") and 1/2 cup of the cooking liquid in the blender and puree until smooth.
  3. Add the cilantro leaves, onion and salt and process again. Adjust for taste with salt.
  4. Heat the oil in a pot over medium heat. Once it is hot, but not smoking, pour in the sauce and bring it to a boil. Simmer over medium heat for 6 to 7 minutes, until it thickens and deepens its flavor and color. Turn off the heat.
Notes
  1. Sauce can be stored in a closed container in the refrigerator for weeks. However, the heat level of the sauce will fade with time.
Adapted from Pati's Mexican Table
Mormon Mavens https://www.mormonmavens.com/

Fast & Creamy Polenta

fast-creamy-polenta


Ever have one of those weeks where you feel like you just can’t breathe, but you know you have to get certain things done come heck-or-high water?  This week.  Yep.  Pretty much.  For today’s post I thumbed through my magazine clippings for a quick and easy recipe to share with you and found one that I have been wanting to try for quite a while.  How do you feel about polenta?  I have had some yummy versions over the past couple of years and found this recipe in our local paper supplement. Hope you enjoy it!

Fast & Creamy Polenta
Serves 4
"Creamy polenta (cornmeal) is to Italians what mashed potatoes are to Americans." -- relish.com
Write a review
Print
Ingredients
  1. 4 cups water
  2. 1 t. coarse salt (I used sea salt on hand)
  3. 1 cup instant polenta
  4. 1/2 cup mascarpone cheese or cream cheese (where in my store is the mascarpone? I used Neufschatel)
  5. Chopped parsley
Instructions
  1. Bring water to a boil in a heavy saucepan. Add salt.
  2. Whisk in the polenta in a steady stream until well combined.
  3. Remove from heat. Stir in cream cheese. Top with parsley.
Notes
  1. Okay, so this doesn't look so creamy. Apparently I thought that the tube of polenta was the instant. LOL! There is obviously another version of polenta that I did not see, and the Walmart guy and I searched everywhere! But this was still good. See how we learn as we go?
Adapted from relish.com
Mormon Mavens https://www.mormonmavens.com/

Enchilada Sauce

enchilada-sauce

So, this beach trip my son-in-law wanted me to mentor him in making Chile Rellenos from scratch.  I was glad to do it, since no one realizes how much work that is and having another family member aware of that will score more points for me on Christmas Eve when I am in the kitchen all day preparing our traditional Mexican meal.  I told Allen I would provide the sauce if he would do everything else.  I found this recipe on my Thrive website and I already had all of the ingredients, so it was easy to take the ingredients to the beach and make the sauce there.

Enchilada Sauce
Write a review
Print
Ingredients
  1. 2 1/2 c. water
  2. 1 t. chili powder
  3. 1 t. cumin
  4. 1/8 t. cayenne (or chipotle powder)
  5. 1/4 t. THRIVE Chef's Choice
  6. 1 T. THRIVE Chopped Onions, Freeze Dried (I had to use fresh onion this time)
  7. 1 T. minced garlic
  8. 1 t. THRIVE Tomato Powder
  9. 2 T. THRIVE Green Chili Peppers, Freeze Dried
  10. 1/3 c. THRIVE Espagnole (Savory Beef Gravy)
  11. 1 1/2 t. lime juice
  12. 1 T. THRIVE Cilantro
  13. 14 c. sour cream
Instructions
  1. Combine all ingredients in a small pan, except sour cream, bring to a boil, reduce heat and simmer 4-5 minutes.
  2. Puree sauce in blender until smooth.
  3. Return to pan and heat to a simmer. Turn off heat and fold in the sour cream.
  4. Use as a sauce for enchiladas or chile rellenos.
Adapted from Thrive Recipes
Mormon Mavens https://www.mormonmavens.com/

Fish Tacos with Lime Sauce

fish tacos with lime sauce


Who doesn’t love a good fish taco?  They can be hard to find–can’t stand when they are too fishy.  The tilapia in this recipe is so mild you will swear you are eating chicken.  I kept snatching nuggets and snacking on them while I was frying up the other batches.  A nice healthy alternative to fast food tacos.  Now, authentic Mexican tacos…that’s another thing all together.

Fish Tacos with Lime Sauce
Que rico!
Write a review
Print
Ingredients
  1. 1 lb. fresh tilapia fillets
  2. 3 limes (I used Thrive Limeade powder instead--a tsp. or so should be enough.)
  3. 1/2 cup mayonnaise
  4. 1 t. chili powder
  5. 2 T. olive oil
  6. 1/3 cup all-purpose flour
  7. 1/2 t. salt
  8. 8 6-inch flour tortillas
  9. 1 cup shredded angel hair cabbage (I prefer it thin)
  10. 1/4 cup shredded carrots
  11. 1 jalapeno or serrano pepper, thinly sliced
Instructions
  1. Rinse fish and pat dry. Cut into 1-inch pieces.
  2. For lime sauce, juice two of the limes into a bowl (cut your 3rd lime into wedges for serving). Stir mayonnaise and chili powder into juice. Transfer 1/3 cup of the sauce to another bowl; toss fish in this. Set remaining sauce aside.
  3. In a medium to large skillet, heat oil over medium heat. Combine flour and salt in a shallow dish. Work with about 1/3 of the fish chunks at a time, toss them in the flour and add to hot oil. Cook for 2-4 minutes or until fish flakes easily, turning to brown evenly. Add more oil as needed. Drain fish on paper towels.
  4. Wrap tortillas in paper towels (loved this. worked great!); heat in microwave oven for 30 seconds. Top tortillas with fish, cabbage, carrots and jalapeno. Drizzle with Lime Sauce. Serve with lime wedges.
Notes
  1. Add lime juice to mayo gradually and to taste.
  2. Thrive Limeade powder is available seasonally, so may not be listed on my consultant site.
Mormon Mavens https://www.mormonmavens.com/

Shawarma-jo Tacos

 shawarmajo tacos labeled


Thank you, Disney Cruise Line!

Why?  Well, it was there–by the pool deck–that I had my first taste of shawarma.  I thoroughly enjoyed the shaved, slow-roasted chicken with its unusual spice set.  The fresh fixins and delicious garlic aioli made it a special treat.

I’ve been wanting to figure out how to recreate it but, doggone it, I don’t have a roasting spit or the patience for all-day roasting!  And ever since I started using Thrive Life foods, I’m been a little spoiled in the quick meal prep department.  I want it.  And I want it now.  

So I combed the internet, looking for just the right recipe to “Thrive-alize”.  After a less than stellar attempt, I found a recipe that fit just right.  Thrive’s Seasoned Chicken Slices make it super fast.  They are freeze dried and reconstistute quickly.  Once the spices have been added to them, they really only need to heat through!  

Why the funky name?  Well, I thought I’d use my Thrive dough mix to try and simulate naan bread.  Didn’t work.  But what happened was a scone-like bread circle that my family has previously used for Navajo Tacos.  So I thought, well…..let’s mix the two.  Add a little garlic sauce, and there you go!

If you don’t want to try this recipe with Thrive foods (why wouldn’t you, though?  It’s so super fast!) then I encourage you to visit the recipe site that I used as a springboard for my Thrive-alized version, Jo Cooks.  And if you don’t have time to do the bread, pick up some naan bread in your grocery store.

Give shawarma a try.  Your hunger will be AVENGED!  

Shawarma-jo Tacos
Serves 8
Deliciously unusual spiced chicken piled with fresh fixins and garlic sauce atop a circle of bread.
Write a review
Print
Prep Time
1 hr 10 min
Cook Time
20 min
Total Time
1 hr 30 min
Prep Time
1 hr 10 min
Cook Time
20 min
Total Time
1 hr 30 min
Taco Bread
  1. 2 1/4 tsp. THRIVE Instant Dry Yeast
  2. 1 tsp. THRIVE Iodized Salt
  3. 4 c. THRIVE Honey Whole Wheat Dough Mix
Chicken Shawarma
  1. 4 c. THRIVE Seasoned Chicken Slices - Freeze Dried
  2. 2 c. hot water
  3. 1/4 c. fresh lemon juice
  4. 1/2 c. Olive Oil
  5. 2 tsp. Paprika
  6. 1/2 tsp. Ground Turmeric
  7. 2 tsp. cumin
  8. 1/2 tsp. Ground Cinnamon
  9. 2 tsp. ground black pepper
  10. 1 tsp. THRIVE Iodized Salt
  11. 4 clv. Garlic, minced
Garlic Yogurt Sauce
  1. 1/3 c. fresh lemon juice
  2. 1 c. Vegetable Oil
  3. 1/4 c. plain Greek yogurt
  4. 6 clv. Garlic, peeled
  5. 1 tsp. THRIVE Iodized Salt
  6. 1 tbsp. THRIVE Parsley
Toppings
  1. diced hothouse cucumbers
  2. halved grape tomatoes
  3. iceberg lettuce, sliced thinly
Taco Bread
  1. Dissolve yeast in hot water (hot from the tap). Add salt. Whisk. Stir in Thrive dough mix.
  2. Knead for 5 minutes. Lightly cover dough with a little vegetable oil, place in bowl, cover with towel, and allow to rise until dough has doubled in size.
  3. Punch dough down. Divide into 8 equal pieces.
  4. Place nonstick or cast iron skillet on stove on medium heat.
  5. Take one piece of dough, roll into ball, then flatten as thin as possible with your hands. Place on skillet and cook on each side until golden brown and cooked through.
  6. Repeat with remaining dough pieces. Set aside and cover to keep warm.
Chicken Shawarma
  1. Put the chicken into a bowl and add the 2 cups of water. Toss with a spoon every few minutes while you let it reconstitute (about 15 minutes).
  2. Put remaining shawarma ingredients into a small bowl, whisk well, and pour over the chicken (after the chicken has sat for 15 minutes). Toss to coat the chicken well.
  3. Drizzle a little vegetable or olive oil in a large skillet and heat to medium high on the stove. Pour in the chicken and allow it to heat through for about 5 minutes.
Garlic Yogurt Sauce
  1. Place all sauce ingredients in a blender and process for 1-2 minutes. Allow to rest while you prepare the toppings.
Assembling the Taco
  1. Place a bread circle on a plate and top with some chicken.
  2. Add toppings and drizzle with sauce.
Notes
  1. This recipe is highly customizable; reduce or increase the shawarma spices as you see fit.
  2. Too much garlic? Simply reduce.
  3. Want a creamier sauce? Increase yogurt and decrease oil.
  4. Play around with it and make it your own!
Adapted from Jo Cooks
Mormon Mavens https://www.mormonmavens.com/

Chicken Satay and Thai Peanut Sauce

For this post, you get two recipes in one! The chicken satay recipe came from here. And the most amazing Thai Peanut Sauce recipe came from here.

Thai Chicken Satay:

2 normal to large sized chicken breasts
1/2 cup coconut milk
1 tablespoon curry powder
1 teaspoon turmeric powder
1 teaspoon sugar
1/2 teaspoon salt
12 wooden skewers
Directions:
1. Soak the skewers in water while prepping your chicken and sauce. This will help keep the skewers from burning when you place them on the grill. 

2. Cut the chicken into thin slices. 

3. Mix all of the ingredients together in a bowl, add the chicken and massage. The chicken does not need to marinate in the sauce for very long, in fact only a few minutes. Place the chicken on skewers and drop them on the grill at medium heat. Flip the skewer just before you start to see grill marks on the chicken. This makes for the perfect “doneness” without drying it out. 
This marinade also goes great with shrimp! 
For the Thai Peanut Sauce:

One 13.5-ounce can of full-fat, unsweetened coconut milk
2 ounces (approximately ¼ cup) of Thai red or Massaman curry paste
¾ cup unsweetened (natural) creamy peanut butter (Do not use regular peanut butter or anything with added emulsifiers. I get mine fresh ground in the bulk section at Winco.)
½ tablespoon salt
¾ cup sugar
2 tablespoons of apple cider vinegar or white vinegar (Do not use white wine, red wine, balsamic, or anything else — not even rice vinegar)
½ cup water
Instructions:
Put everything into a medium heavy-bottomed pot and bring to a very gentle boil over medium heat, whisking constantly.
Let the mixture simmer for 3-5 minutes over low heat; be careful not to let the mixture scorch at the bottom of the pot.
Take the pot off the heat, let the sauce cool down to room temperature (or slightly warmer), and serve the sauce with satay or fried tofu.
Notes
This peanut sauce keeps in a glass container in the refrigerator for weeks. Refrigerated sauce will thicken up considerably. All you have to do is thin it out with a little bit of water to desired consistency, reheat, and serve. The sauce also freezes beautifully.


Mushroom Marsala Risotto

I found this recipe a couple years ago. It takes some time (like most Risottos) and is a labor of love, but it is so very very worth it! It is absolutely delicious. It is one of my favorite things to eat. I normally double the recipe too.

Serves 2 as a main course or 4 as a side dish.
Ingredients:
2 tablespoons unsalted butter
1 medium shallot, minced
2 cloves garlic, minced
1 tablespoon tomato paste
3/4 cup Arborio rice
1 cup Marsala wine, divided
3-4 cups low-sodium broth (chicken or vegetable)
2 cups cremini or baby bella mushrooms, sliced
1/4 cup freshly grated parmigiano-reggiano (I used a lovely grana padano cheese)
2 tablespoons fresh basil, minced (additional whole leaves for garnish, if desired)
kosher salt and fresh ground pepper to taste
Instructions:
Melt 1 tablespoon of butter in a large heavy-bottomed skillet or saute pan over medium heat until foaming subsides.

Add shallots and saute until soft, 2-3 minutes.

Add garlic, tomato paste, and 1/4 teaspoon each of salt and pepper and stir to combine. Cook until fragrant, 1 minute.

Meanwhile, heat the chicken stock in a separate medium saucepan until simmering.
Add the Arborio rice to the skillet and toast until opaque around the edges, 3-5 minutes.

Add 3/4 cup of the Marsala wine and cook, stirring often, until absorbed, approximately 5 minutes.

Stir in 1 cup of the broth, and stir occasionally until almost absorbed, 8-12 minutes.

Working 1 ladle of broth at at time, continue to add broth, stirring constantly.  Add the next ladle when the broth is almost completely absorbed.

After you have been cooking the risotto for 10 minutes, stir in the mushrooms.  Continue to cook risotto, stirring constantly, until it is al dente, a total of 20-25 minutes.

Remove from heat, and stir in remaining 1/4 cup of Marsala wine, Parmigiano-Reggiano (or Grana Padano) cheese, basil, and remaining 1 tablespoon butter.  Season with salt and pepper, to taste, if necessary.

Garnish with basil leaves.  Serve immediately.

Source