- Please use butter. Please, please, please!
- The original recipe calls for 12 ounces of chocolate but that always leaves a LOT leftover.
- *Don’t freak out about eating wax. I have checked on this and it’s fine. It’s completely edible. I promise. Plus the amount per ball is so tiny. It will make the Mud Balls shiny and smooth and they will dry better with it than without. (I use GULF brand…it comes in a small box and has 4 rectangular bricks in it…you can find it in the canning aisle usually.)
- If you want the taste of Mud Balls without the work, make Mud Bars. Instead of making the “dough” into balls, press the mixture into a 9×13-inch pan. Then melt the chocolate chips (without the wax) and pour over the top, spreading evenly. Allow to set before cutting into bars.
Parties and Entertaining
Sweet Potato Bread
Happy New Year, Everyone! Having a New Year’s Eve party? Try serving this yummy quick bread; it’s full of flavor. The taste reminds me more of Amish Friendship Bread than of sweet potato, but the yams make it healthier–or at least make you think it is so you don’t feel as guilty when you eat half a loaf in one day…
Butterfly Crescent Rolls
Nothing takes me back “home” more than the smell of freshly baked bread permeating the air. Grandma and Mom are the best bread bakers I know and, with Grandma’s permission, I share this delicious recipe. Big holiday dinners just would not be the same without these rolls!
*If you don’t have a mixer, that’s fine! I used to make these by hand. When you get the kneading part, turn the dough out onto a floured surface and knead by hand, turning about 200 times or for 10 minutes.
Source: My wonderful grandma, KaraLyn Taylor
Butter Brickle Bars
Yet another I don’t make very often because I can’t leave them alone. My mom made some of these for my wedding reception and though not a true “freezer item” it froze pretty well. Maybe that’s what I should do to “ration them out” for myself.
Butter Brickle Bars
1 box graham crackers
1 stick butter
1 stick margarine
1/2 c. sugar
Slivered or sliced almonds (I usually use slivered-almonds are not pictured above)
milk chocolate chips (can also use milk chocolate melting wafers)
1-Break graham crackers on lines to get 58 rectangles.
2-Lay rectangles on a greased pan.
3-Bring butter, margarine, and sugar to an easy boil.
4-Boil for 3 minutes.
5-Spoon the mixture over the rectangles.
6-Sprinkle sliced almonds on top
7-Bake at 350 for 10+ minutes.
8-Separate bars.
9-Put bars on aluminum foil.
10-Melt chocolate chips and drizzle over top of bars.
Source: Lollita Riley
Chocolate Raspberry Cupcakes
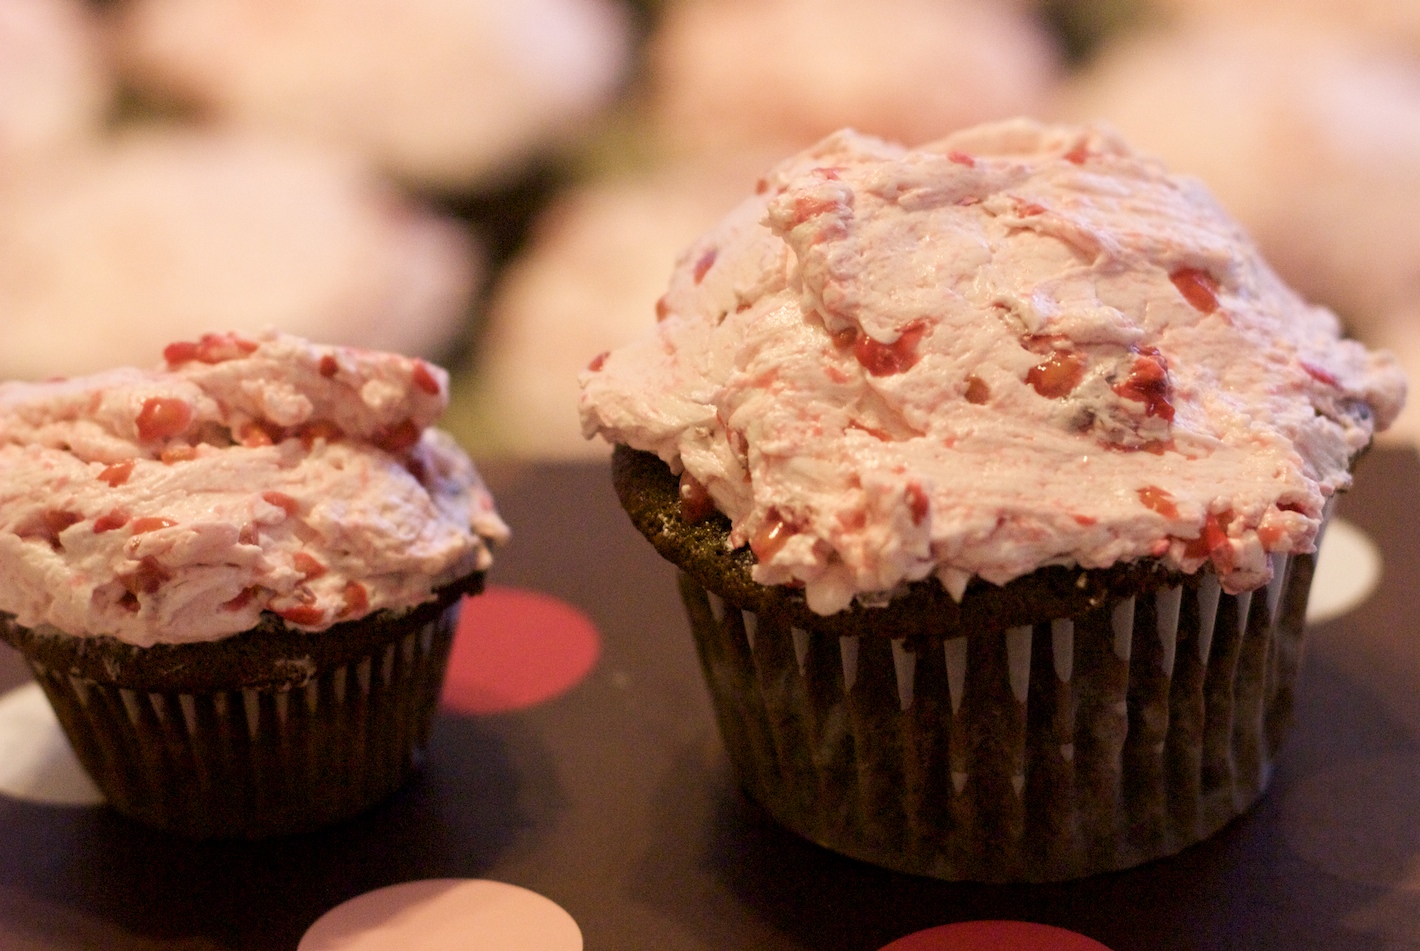
Mr. Blue Eyes (yes, my husband cooks!–Thankfully!) and I made these earlier this month for my birthday. They. were. DELISH! You must try them! The frosting was a little complicated for us, being our first time using a meringue-type, but it was worth it! I don’t generally care for frosting. I’m the weirdo at all the parties who scrapes the frosting off the cake to eat it plain. But I’m telling you I REALLY liked this frosting. Very light. Truly worth every minute!
Chocolate Cupcakes
Ingredients:
18 Paper Cupcake Liners (plus a few extra…we needed them)
1 1/2 Cups all-purpose Flour
1/2 Cups Dutch-processed cocoa powder (we used Hersey’s Cocoa Powder)
3/4 tsp Baking Soda
1/4 tsp Salt
1/2 Cup (1 stick) unsalted butter, at room temp, cut into small pieces
1 1/3 Cups Sugar
1 tsp Vanilla Extract
2 Large Eggs
1 Cup Milk, at room temp
*3/4 – 1 Cup Fresh Raspberries (or frozen, thawed and well drained)–OPTIONAL
1. Preheat oven to 350 degrees F. Place paper liners in all wells of Cupcake Tins (we used one 12 cup tin, and one 6 cup tin.)
2. In a small bowl, sift together Flour, Cocoa Powder, Baking Soda, and Salt. Set aside.
3. In a Large bowl with an electric mixer, beat butter until creamy–about 2 minutes. (We used our Kitchen Aide for this.) Add sugar gradually, beating until light and fluffy, about 3 minutes. Be sure to scrape the bowl once or twice. Beat in the vanilla and eggs, one at a time until they are each mixed in well.
4. Alternating about 4 times, mix in the flour mixture and the milk. Beat briefly between each add-in to make sure it’s well incorporated and the batter is smooth.
5. If you’re using Raspberries, this is where you fold them into the batter. We only did 3/4 Cup, but next time I think we’ll do a full 1 cup.
6. Divide batter evenly among the cupcake wells. Bake for 22 minutes, or until a toothpick inserted in the center shows a few moist crumbs.
7. Cool on racks for 5 minutes, then remove cupcakes to cooling racks to cool completely.
Italian Meringue Butter Cream Frosting
Ingredients:
Scant 2/3 Cup, plus 3 Tbsp Sugar
1/4 Cup water
4 Large egg whites, at room temperature
1/2 tsp cream of tartar
1 1/2 Cups (3 sticks) unsalted butter, at room temp, cut into small pieces
*3/4 Cup Raspberries (OPTIONAL)
1. Place 2/3 Cup Sugar and the water in a small saucepan. Stir to wet the sugar. Bring to a boil over medium-high heat, stirring constantly. Dip pastry brush in cold water and wash down the sugar crystals from the sides of the pot once or twice. Turn down the heat to simmer gently.
2. Place the egg whites in a clean, grease-free mixing bowl and whip until frothy on low speed using balloon whip attachment to your standing mixer. Add cream of tartar and turn speed to medium-high. When soft peaks form add remaining 3 Tablespoons sugar gradually. (This is the meringue part of the butter-cream, and the frosting may be used at this point for low-fat, marshmallow-like frosting; it must be used immediately.)
3. Bring the sugar-water mixture to a rapid boil and cook until it reaches 248 – 250 degrees F. (We don’t have a thermometer *GASP!* and so the following directions were vital.) As syrup cooks, look for visual clues to assess temperature. It starts out thin with many small bubbles over the surface. The water will begin to evaporate and the mixture will become thicker. The bubbles get larger and sticky and pop more slowly. At this point the syrup looks thickened, but it has not begun to color. If you drop a bit of the syrup into a glass of cold water it will form into a ball. This is the firm-ball stage, and the syrup is ready.
4. Pour a thin, steady stream over meringue, without pouring any on the rotating whip or the sides of the bowl. (Be quick! We didn’t do it fast enough and had to make the syrup a 2nd time.) Whip meringue on high speed until cool. When the bowl is no longer warm, stop the machine and touch the surface of the meringue with your finger to check that it is cooled. With mixer on medium speed, add the butter, a couple Tablespoons at a time. Keep beating until the buttercream is completely smooth. It is now ready to use. Any flavorings or variations can be added at this time.
5. This is where you beat the raspberries into the frosting. Just keep the beater going and add the berries. The buttercream will turn pink and you will see bits of fruit (YUM!) suspended here and there. (Beautiful!)
6. Frost cupcakes smoothly using an icing spatula or a spoon. Top with garnish, candles, or whatever you prefer!
*You don’t have to use Raspberries. Use the cupcake and frosting recipes as is, or with your own variation. That’s what I love about these recipes! Make them your own.
Yield: The recipe says 18 cupcakes, but we got 18 big cupcakes + 10 small ones, and we weren’t skimpy when filling either!
Notes:
~Like I said before, the frosting was a little more difficult than we expected and we had a few hiccoughs in the procedure. Mr. Blue Eyes was in charge of the syrup, while I did the meringue. Having four hands worked well for us first-timers.
Source: A Baker’s Field Guide to Cupcakes: By Dede Wilson
~Kara
One-Ingredient Cinnamon Roll Waffles (and our FIRST GIVEAWAY!!)
![]() |
| Couldn’t be easier! |
Ingredient:
refrigerated, uncooked Cinnamon Rolls
1. Place one roll on each square or section of your waffle iron. Close the lid and cook until the done (when they don’t wiggle when you press on them).
2. Drizzle with the icing that came with them (or make your own).
DONE!! Seriously…is that not amazing? They taste really good too. I bought two packages (8 rolls in each can) and that wasn’t enough for my family. Next time I’d do 3-4 packages. They cook up so quickly that they would be great for a family get-together. They’re not very big, so they look like baby waffles. Great for a brunch! Oh, and by the way, you can also use any other refrigerated sweet roll or biscuit. I think I need to try Orange Roll Waffles next…….<drool>
One serving is 2-4 rolls, depending
![]() |
| Oh my. |
Source: A Hen’s Nest
GIVEAWAY IS NOW CLOSED.
To celebrate Christmas, the Mormon Mavens are hosting a great giveaway from Pampered Chef consultant Heather Lima. Heather has graciously agreed to offer some great Pampered Chef products that are sure to help you with your holiday baking!
Get on with it, you say? Okay, okay…..here’s what Heather is giving away to ONE lucky Mormon Mavens reader:
- one set of Bamboo Prep towels–soft, plush, and absorbent towels; 22″ x 14″; machine washable and made from renewabale/sustainable bamboo; sells for $17.50
- a set of Easy Read Measuring Cups–so great for measuring liquids (no more bending over and looking sideways); standard and metric measures that you can read from above, flared rims prevent drips; set of 3 cups–1-cup, 2-cup, and 4-cup; microwave- and dishwasher-safe; sells for $23
- You can have up to 5 entries.
- Continental U.S. residents only (sorry!).
- YOU MUST LEAVE A SEPARATE COMMENT FOR EACH ENTRY. Leaving one comment with all your stuff in it counts as one entry!!
- Giveaway will run from Monday, December 12 through Friday, December 16.
- Winner will be announced on Saturday, December 17. (If we can get your address before Monday, we can get these goodies shipped to you by Christmas Eve!)
- You MUST include your email address in each entry you submit so that we have a way of contacting you if you win!
- Entries that don’t meet the above requirements will not be considered.
- Winner will be chosen using random.org.
- Be a follower of the Mormon Mavens in the Kitchen (and leave a separate comment telling us that you are).
- “Like” Heather’s Pampered Chef page on Facebook (and then come back here and leave a separate comment here telling us that you did).
- Leave a comment on Heather’s Pampered Chef page on Facebook telling her what Pampered Chef product you wish was under the Christmas tree for you (and then come back here and leave a separate comment here telling us that you did)!
- Leave your contact info for Heather on her “Contact Me” page (and then come back here leave a separate comment here telling us that you did).

Cookies and Cream Oreo Bark
This may be one of the easiest treats I’ve ever made! Two ingredients = Perfect, stress-free Christmas treat!
Ingredients:
10 oz Ghirardelli white chocolate chips
15 regular size Oreos, chopped
3 regular size Oreos for topping, finely chopped
1. Place chocolate in a double boiler and melt, stirring continuously, over low heat. If you don’t have a double boiler (like me) you can melt the chocolate in a small saucepan. Just be very, VERY careful! Once chocolate has melted completely, transfer to a heat proof bowl. Cool for 5 minutes.
2. While chocolate cools, line an 8×8 pan with parchment paper. Leave at least a 1″ overhang on each side.
3. Add chopped Oreos to cooled chocolate and mix. Pour mixture into prepared pan and smooth out the top using a spatula. Sprinkle the finely chopped Oreos on top.
4. Chill the bark in the fridge until chocolate becomes solid. When ready, hold the overhang pieces of parchment paper and carefully lift the bark out. Split bark into pieces with a fork. Enjoy!
Source: Bakers Royal
* To save on time you could easily melt the chocolate in the microwave!
* Next time I make these I won’t chop up my Oreos so much…my bark looks a little too gray.
Easy-Peezy Chicken Salad
Ingredients (all to taste):
Sticky Gooey Monster Jaws
- Quarter your apples and remove the seeds.
- Then cut a wedge out of the center of the side with the peel still on it.
- Now, dip the apple quarters in the water/lemon mixture to keep them from browning.
- Smother some PB into that monster mouth and give him/her some teeth of your liking.
- Give it some eyes using PB to make ’em stick.
Taco Pizza
This is easy and yummy! The kids will love this crust, and ask you to make cheesy breadsticks with the leftovers for an after school snack!
1 tsp Active Dry Yeast
1-1/2 c warm water
4 cups all-purpose flour
1 tsp. kosher salt
1/3 cup olive oil
1 can (14 ounce) Black Beans
1 tsp. Taco seasoning
4 whole corn tortillas, sliced into thin strips
1/2 cup canola oil, for frying
1 cup grated sharp cheddar
1 cup grated monterey jack cheese
1 head green leaf lettuce, sliced/shredded thin
2 whole rip tomatoes, diced
1/2 cup cilantro leaves
1/4 cup sour cream
3 Tbsp. hot sauce (more to taste)
Sprinkle with tortilla strips. Cut into squares and serve immediately with good quality salsa.


