Sweet Tamale Corn Cakes

Ingredients:

SALSA VERDE

2 tomatillos, chopped (remove papery skin)
1 4 oz. can mild green chilies
1 green onion, chopped
2 T. fresh cilantro
1 1/4 t. granulated sugar
1/4 t. ground cumin
1/4 t. salt
1/8 t. ground black pepper

TOMATO SALSA

1 medium tomato, diced
1 T. minced Spanish onion
1 T. minced, fresh cilantro
1/4 t. lime juice
1/2 small fresh jalapeno, minced
dash salt
dash ground black pepper

SOUTHWESTERN SAUCE

1/2 cup mayonnaise
1 t. white vinegar
1 t. water
3/4 t. granulated sugar
1/2 t. chili powder
1/4 t. paprika
1/8 t. cayenne pepper
1/8 t. onion powder
dash salt
dash garlic powder

CAKES

1 1/2 cups frozen sweet corn
1/2 cup butter, softened (1 stick)
3 T. granulated sugar
1/8 t. salt
1/2 cup masa harina (corn flour)
2 T. all-purpose flour

GARNISH

1/4 cup sour cream
1/2 avocado, chopped
2 T. coarsely chopped, fresh cilantro

Directions:

1. Prepare salsa verde by combining all ingredients in a food processor on high speed. Cover and chill.

2. Prepare tomato salsa by combining all ingredients in a small bowl. Cover and chill.

3. Prepare Southwestern sauce by combining all ingredients in a small bowl. Cover and chill.

4. Preheat oven to 400 degrees.

5. Prepare the tamale cakes by chopping 1 cup of the frozen corn in a food processor until it’s coarsely pureed. Combine pureed corn with softened butter, sugar and salt. Blend well with electric mixer until smooth.

6. Add masa and flour and blend well. Mix in the remaining 1/2 cup of frozen corn kernels by hand.

7. Measure 1/2 cup portions of the mixture and form it into 3-inch wide patties with your hands. Arrange the patties on a baking sheet and bake for 25 to 30 minutes or until the cakes are browned on the bottom. Carefully flip all cakes with a spatula and bake for an additional 5 to 7 minutes or until other side is browned.

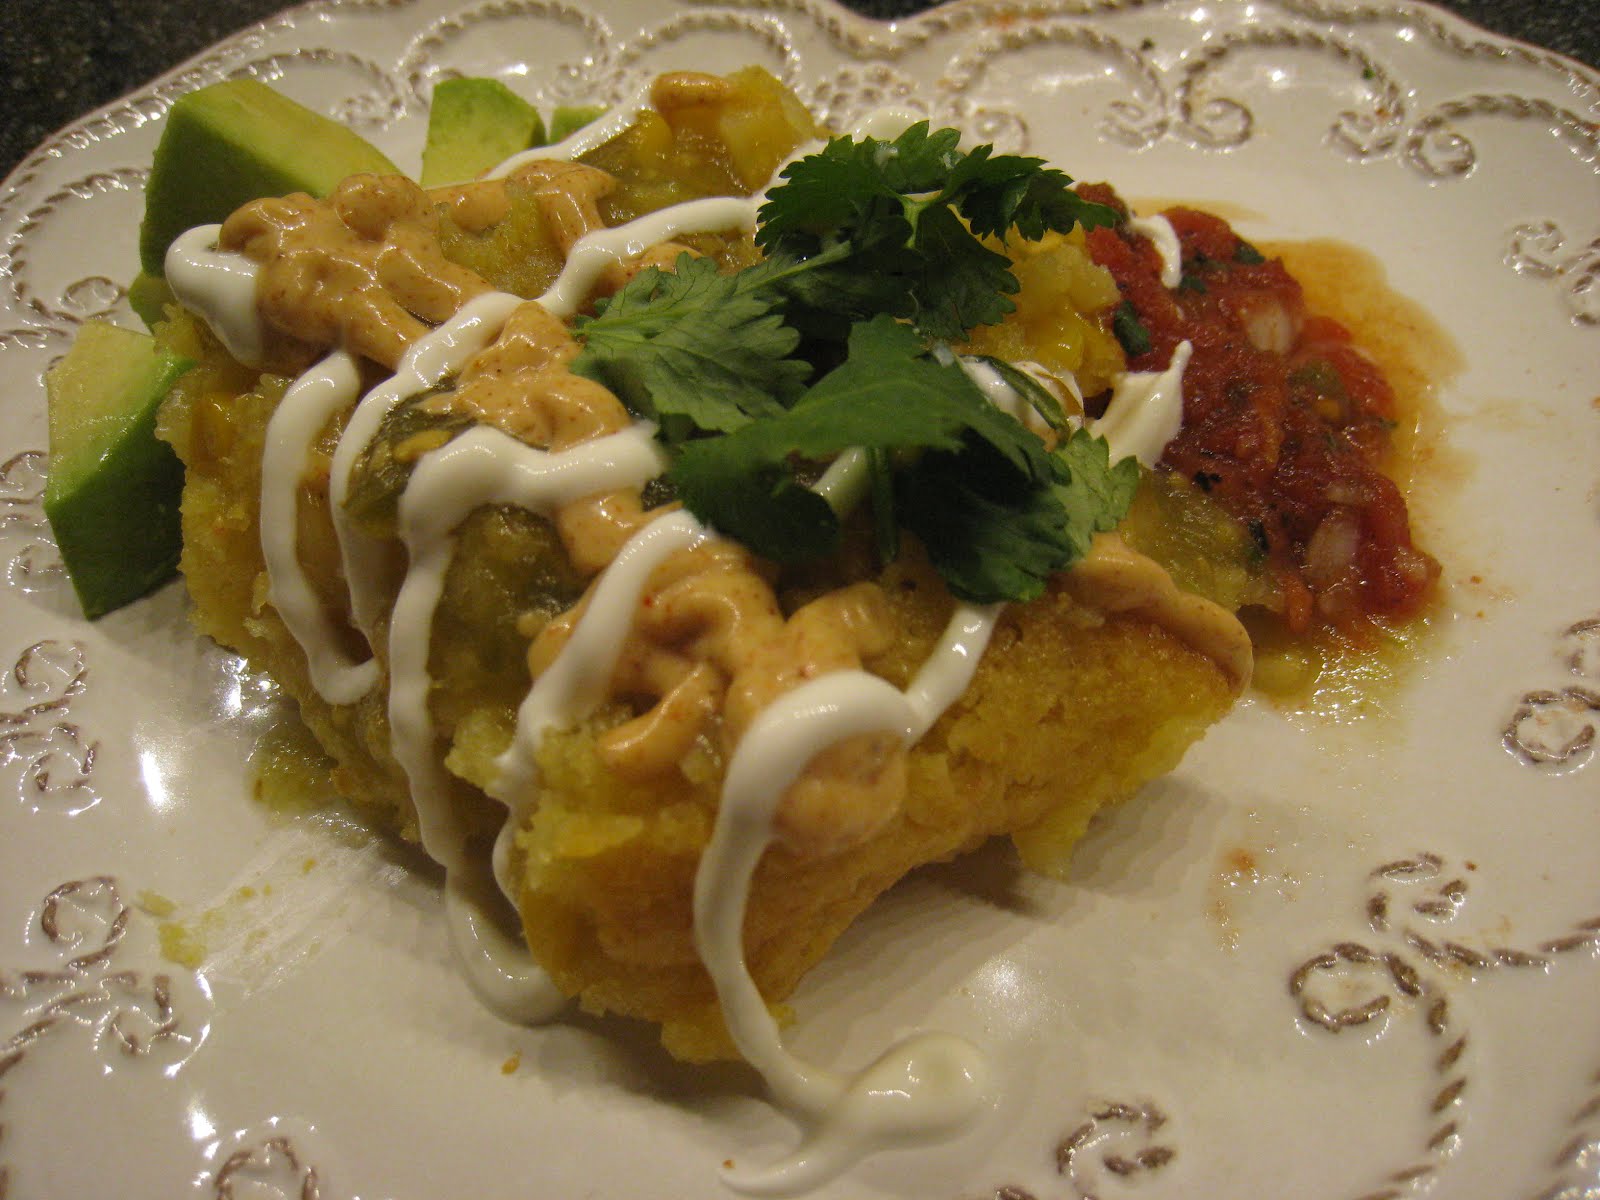
8. While the cakes are baking, spoon a portion of the salsa verde onto a plate or platter (you may want to heat up your plate in the oven for a bit to help warm the sauce). You’ll need to use enough salsa verde to coat the entire plate—it should be about 1/4 inch deep. Arrange the tamale cakes side-by-side on the salsa verde. Spoon a dollop of sour cream onto each tamale cake. Drizzle the Southwestern sauce over the cakes in a criss-cross pattern (use a squirt bottle if you’ve got one). Spoon some tomato salsa over the cakes, followed by the chopped avocado. Finish off the plate by sprinkling the coarsely chopped cilantro leaves over the top.

***FOR A QUICKER, EASIER VERSION THAT STILL TASTES GREAT TRY THIS METHOD:

1. Use canned salsa (verde and tomato).
2. Make a “Southwestern sauce” using sour cream mixed with taco seasoning or other bottled
Southwestern condiment.
3. Make the El Torito Sweet Corn Cake recipe previously posted on this blog for the “cakes”.

Source: Top Secret Recipes by Todd Wilbur

Hot Dog Buns

I’d been wanting to try this recipe for a while, since first seeing it on Annie’s Eats (one of my favorite cooking blogs).  When I saw an idea for Mexican-inspired hot dogs on Pinterest, I figured now was as good a time as any to give it a shot!  (Incidentally, those Mexi-Dogs are coming in a recipe post soon.)

Ingredients:
1 Tbsp. sugar
2 1/4 tsp. instant yeast
1/4 cup warm water (105-110 degrees F)
1 cup warm milk
1 Tbsp. vegetable or canola oil
1 tsp. salt
3-4 cups all-purpose flour
1 beaten egg with 1Tbsp. water
sesame seeds, optional

Directions:

  1. In the bowl of a stand mixer, combine the sugar, yeast, and warm water.  Stir in the milk, oil, salt, and 3 cups of the flour.  Using the dough hook, mix until well combined.
  2. One tablespoon at a time, add in more flour (up to one cup) until dough pulls away from the side of the bowl or until it is no longer wet/sticky.  The full cup may not be needed.  I used about 7 tablespoons this time.  Machine-knead on low for 5-7 minutes; the dough should be smooth and elastic at this point.
  3. Turn the dough into a lightly-oiled bowl, turning over to coat the entire surface.  Cover the bowl and let the dough rise until doubled, about an hour.
  4. Line your baking sheet with parchment paper.  Turn the dough out onto a work surface sprayed with nonstick cooking spray (I used a flexible cutting mat).  Use your kitchen scale (I used mine on “grams” for easier math!) to divide the dough into 9 equal portions.  Shape each portion into a ball, and then into a cylinder about 4 1/2″ long.  Place on the parchment paper, flattening each bun just slightly.  Place the buns next to each other to where they almost touch.  (They’ll kind of morph into each other as they sit there.)  Cover with a clean kitchen towel and allow to rise until almost doubled, about 45 minutes.
  5. Preheat oven to 400 degrees.  Brush bun tops with the egg wash; then sprinkle with sesame seeds, if desired.  Bake for 18-20 minutes or until golden brown.  Place the buns on a wire rack to cool.

Notes:
  • Upon sampling the buns plain, we all thought they needed a bit more salt.  But eaten with the actual hot dog and fixin’s, we didn’t even notice.  Still I may try a little more salt next time.
  • If you don’t have a kitchen scale, you really should get one.  I used to scoff at celebrity chefs who used them, but I’m a believer now.  I got an inexpensive one at Target that can be read with either grams or ounces/pounds.  I use both, depending on what I’m doing.
  • Parchment paper, too, seemed unnecessary to me at one time;  but after trying it, I have to admit that I love it.  Clean up is a breeze.  No more scraping things off the cookie sheet!
  • You can either cut the tops or the sides of these buns, but I prefer top-cut.
Source:  Annie’s Eats

Banana Date Muffins

I’m always looking for good recipes to use dates in because I ALWAYS have dates on hand for these.  I guess it’s not a bad thing to only eat dates paired with bacon.  However, I’m trying to branch out.  These were easy to make and tasted yummy!

Ingredients:
2 ripe bananas
1/2 cup vegetable oil (next time I’ll try replacing the oil with applesauce)
2 eggs
3/4 -1 cup chopped dates
3/4 cup brown sugar
1 1/2 cups self rising flour
1 tsp. baking soda
1/2 tsp. of cinnamon (optional)
1 tsp. vanilla (optional)

1.  Preheat oven to 300 degrees.  Lightly grease a muffin pan and set aside; you could also use baking cups if you like. 
2.  Mash bananas with a fork and mix well with remaining wet ingredients.  In a separate bowl, mix dry ingredients and add to wet ingredients until just combined.
3.  Fill muffin cups 1/2-2/3 full.  Bake for 18-20 minutes or until done.
4.  Serve muffins with butter/jam or dress them up with some cream cheese frosting!

*While I thought these were moist and delicious, they tasted pretty close to regular banana muffins.  The date flavor was very mild.  Next time I make them I’m going to add at least 1 1/4 cups of chopped dates.

Source: Nigella.com

Pam Rojas’ Black Beans and “butter/oil” replacement tip

This is one of the best recipes that I have had for Black Beans. You can use Navy, Pinto, and Great Northern Beans as well and they are yummy. The health benefits of legumes and lentils is amazing. They are also a great source for lean protein.
This recipe comes from a friend (that obtained it from a friend) and put it in our Relief Society Cookbook. This is great as a side, in many Mexican dishes, wraps, salads etc. It also freezes well – just place desired amount in a zippy bag and Viola’.
Ingredients:
1 – 16 oz bag dried beans Black, Navy, Pinto, or Great Northern Beans
3-4 garlic cloves minced
1-2 ribs of celery chopped
1 TBLS salt
1 1/2 tsp oregano or fresh equivalent
1/2-1 bunch of chopped cilantro (optional
6-7 cups water – Northern Beans take 9-10 cups

1. Rinse Black Beans in cold water removing any dirt or bad beans.
2. Place rinsed beans into large crock pot.
3. Add all ingredients in order to the crock pot and stir thoroughly.
4. Cover and cook on low 6-8 hours stirring every once in awhile

Butter/Oil Replacement Tip:
This tip comes from my friend Sarah and I have expanded it a bit.

I substitute 1/2 or more of the fat in many cookies, cakes and some times brownies with dried beans. They work best in Oatmeal, pumpkin, and other “soft” cookies. This work very well in all types of cake.

1. Prepare beans as above leaving out all spices etc.
2. Freeze beans in zippy bags until needed.
3. When needed – thaw beans, puree in blender. Use euqal amounts to substitute (ie: If you are replacing 1/2 cup butter use 1/2 cup bean puree before the liquid is added). Puree pureed beans with at least 1 egg or other liquid in the recipe. This will help it incorporate better. Add to the recipe as usual.

Enjoy

Source: Sue Paries (beans)

Oatmeal Chocolate Chip Cookies

My friend Saren posted this family recipe on her blog last week.  I finally got a chance to make them and they are really good and have a healthy twist.  You can read her cookie story HERE.  I am only including the version that I used, but she has a lot of tips on add-ins and stuff.  After I finish this post, I have some dough to bake and then I am putting my cookies in the freezer for future enjoyment! 

Ingredients
2 sticks (1 cup) butter, softened
1/2 cup ground flax seed
1 1/2 cup brown sugar, loosely packed
1 cup white sugar
3 large eggs
2 teaspoons vanilla
1 1/2 cups white flour
3/4 cup whole wheat flour
1 teaspoon baking soda
1 teaspoon baking powder
1 teaspoon salt
3 1/2 cups quick oats
1 cup chocolate chips

1.  Preheat convection oven to 330 degrees. 
2.  Mix first 6 ingredients together.
3.  Add next 5 ingredients and mix well.
4.  Next add the oats and chocolate chips, one cup at a time, and mix.
5.  Drop by spoonful (or scoop) onto a cookie sheet.
6.  Bake for 8-9 minutes.  Take out when slightly brown on edges but still a little doughy in the middle.  Let cool on wire rack.

Source:  Saren Eyre Loosli, used with permission.

How To Make A Better BLT


Directions:

1. Cut bacon in half.
2. Weave into a lattice pattern (either using 4 or 6 slices, depending on your bread size).
3. Place on a foil lined baking sheet.
4. Bake at 350 for 20-25 minutes (depending on level of crispness desired).

Voila! No more bacon to come tumbling out of your BLT sandwich. Genius!

Source: Pinterest

Cast Iron Chocolate Chip Cookie

 We’re big fans of Chocolate Chip cookies. Bigger the better, right? This cookie is so scrumptious, and… you can’t go wrong with a Martha recipe.  It’s crisp on the outside and chewy on the inside. It’ll be a while until I make cookies any other way…

Also, don’t be afraid. Pull out your trusty cast iron skillet. It makes the edges so crispy!


Cast Iron Chocolate Chip Cookie

Ingredients
2 cups all purpose flour
1 teaspoon baking soda
1/2 teaspoon salt
3/4 cup (1 1/2 sticks) unsalted butter, softened
1/2 cup granulated sugar
3/4 cup packed light brown sugar
1 large egg
2 teaspoons of pure vanilla extract
1 1/2 cups chocolate chips (9 ounces)

Directions
-Preheat oven to 350 degrees.
-In a medium bowl, whisk together flour, baking soda, and salt; set aside. In the bowl of an electric mixer fitted with the paddle attachment, cream butter and sugars until mixture is light and fluffy, about 2 minutes.
-Add egg and vanilla; mix until they are fully incorporated.
-Add flour mixture, and beat until just combined.
-Stir in chocolate chips.
-Transfer dough to a 10-inch ovenproof skillet (I sprayed mine with just a little cooking spray), and press to flatten, covering bottom of pan.
-Bake until edges are brown and top is golden, 40 to 45 minutes. Don’t overbake; it will continue to cook a few minutes out of the oven. Transfer to a wire rack to cool in pan, 15 to 20 minutes. Cut into wedges.

This cookie would taste great with some Vanilla Ice Cream and Chocolate Sauce. Yum!

Danny’s Macaroni and Cheese

Have you ever had tomatoes in your mac and cheese? I hadn’t until this recipe. I wasn’t sure how I felt about the idea, but I love it!

Ingredients:
1 8-0z. package elbow macaroni (I used corkscrew for fun)
1 14.5-oz. can stewed tomatoes
1 8-oz. package shredded sharp Cheddar cheese
1. Preheat oven to 350 degrees F.
2. Bring a large pot of lightly salted water to a boil. Add macaroni and cook until almost done–about 8 minutes; drain.
3. Mix cooked macaroni with tomatoes and shredded cheese. Pour into a baking dish and bake in preheated oven for 30 minutes.
The original recipe doesn’t instruct you to spray the baking dish, but you may want to.
Source: Submitted to Allrecipes.com by Debby. See her quote for an explanation about its name. (I’m guessing her husband is Danny.)

Blueberry Banana Smoothie

Just call me the Smoothie Queen. I can’t get enough of them.
Here’s one that I’ve made up…. it’s quickly become a favorite of my husbands. (Go figure. He’s from Maine. Anything with Maine Blueberries, he loves!!)

Blueberry Banana Smoothie
Serves 2
Ingredients
1 Banana
1 1/2 cup Frozen Blueberries (If you have a Costco close by, they carry frozen Wild Maine Blueberries, Wlyer’s Brand… these are naturally sweeter and SO tasty!)
1/2 C. Vanilla Yogurt (if you have a 6 oz. container, that works too!)
1 C. apple juice

Directions

Blend.
Enjoy!

Cinnamon Rolls

These are one of my weaknesses. I don’t know why I don’t make them more often since they really aren’t  hard. Most times I just throw my bread dough ingredients in the bread maker and push a button. Then, an hour and a half later (you know, when the bread machine beeps telling me the dough is done), I roll the dough out and voila! I’m on my way to gaining 100 pounds. 🙂 Just kidding. Moderation in all things, right? That’s why I have to give them away. Makes you look like an AWESOME neighbor. Except when I’m greedy and keep them all to myself. Then I make my family happy because they get some, too. It’s win/win, really.

Ingredients*:
Your favorite bread dough–from scratch or a thawed, frozen loaf of dough works too.
1/4 Cup (1/2 stick) Butter
Several Tbsp Ground Cinnamon
1/2 Cup Brown Sugar
Chopped Walnuts, Pecans, and/or Raisins (optional)
18″ piece of thread

1. Preheat oven to 400 degrees F.
2. On a lightly floured surface, roll out the dough into a Large Rectangle, about 1/4 inch thick.
3. Using a rubber spatula, paint the butter over the dough. Leave 1/2 inch unbuttered on one of the long sides of the rectangle.
4. Sprinkle cinnamon all over the butter. Keep it fairly light and remember to leave that unbuttered portion “clean”.
5. Sprinkle Brown Sugar all over the cinnamon. I don’t know if 1/2 Cup will do it. I just grab handfuls out of the bag and have learned how much I like. Experiment until you find how you like it. Just remember all your neighbors will love you for it.
6. If you want, now is the time to add the nuts and raisins. We do it both ways at our house.
7. Beginning on one long side, begin to roll the dough toward the unbuttered 1/2 inch seam. Once you reach the seam, fold it up and pinch along the roll so you close all the cinnamon-sugar in.
8. Take the thread and slide it under one end of the roll–about 2-3 inches. Cross the string over the top of the roll (like the very first step to tying your shoe) and pull the ends until the string cuts through the roll completely. Repeat till you have the whole roll cut into cinnamon rolls. I don’t know why, but this is my very favorite step. Don’t judge.
9. Lay the Cinnamon Rolls in a 9×13″ pan about 1 – 2 ” apart. (I actually use an 11×15 glass pan, but you don’t have to). Cover and let raise for 1/2 hour.
10. Bake for 15 – 20 minutes.

Glaze*:

2 Tbsp Butter, softened
2 Cups Powdered Sugar
1/2 tsp Vanilla
1/4 – 1/3 Cup Milk

1. In a small bowl, cut together the butter and the powdered sugar until the sugar takes on a slightly yellow hue.
2. Add the vanilla.
3. Gradually add milk and stir with a fork until you get a runny consistency. If the glaze is “gritty” add more powdered sugar and mix till smooth.
4. Drop spoonfuls of the glaze on each cinnamon roll right after they come out of the oven.

*You should know that I really just eyeball most of this stuff. Once you’ve made the recipe a few times, you’ll know how each step should look according to your taste. And don’t be afraid to play around a little. One friend told me she uses white sugar and orange peel zest instead of brown sugar and cinnamon. I’ve never tried it, but it sounds great!

Source: Adapted from a good family friend

~Kara