Ghost Cupcakes

We brought in October by serving these little babies at a lunch date. My four-year-old daughter was SO EXCITED to help me with the eyes. They turned out cute and were a tasty treat for all!

Ingredients:

1 (15.25 oz) box chocolate cake mix with pudding added (I used Betty Crocker’s Devil’s Food Cake)
1 Cup Buttermilk
1/2 Cup Vegetable Oil
3 Eggs
1 Cup Mini Chocolate Chips
4.5 Cups white candy melts or coating wafers
24 Large Marshmallows
48 Mini Chocolate Chips (about 1 Tbsp)

1. Preheat oven to 350 degrees F. Place paper baking cups in 24 regular-sized muffin cups.
2. In a medium bowl, mix cake mix, buttermilk, oil, and eggs on low speed about 30 secs, then increase the speed to Medium for 2 minutes.
3. Stir in 1 cup mini chips. Divide batter evenly between the muffin cups
4. Bake 18 – 20 mins, until toothpick inserted comes out clean. Cool for 10 minutes. Remove muffins from the tins and cool completely on a wire rack.
5. In a large microwavable bowl, microwave the white candy according to package directions until nice and smooth.
6. Place one marshmallow on each cupcake and spoon the white chocolate over to cover letting the excess drip down on the cupcake. Cool slightly. This “cooling slightly” is essential to success. If you put the eyes in too quickly, you’ll end up with LAAA-AAAZZZZY EEEYYYEEES.
7. Press two mini chocolate chips into the side for eyes.
8. Let stand, until set–about 15 minutes.

HAPPY HAUNTING!!

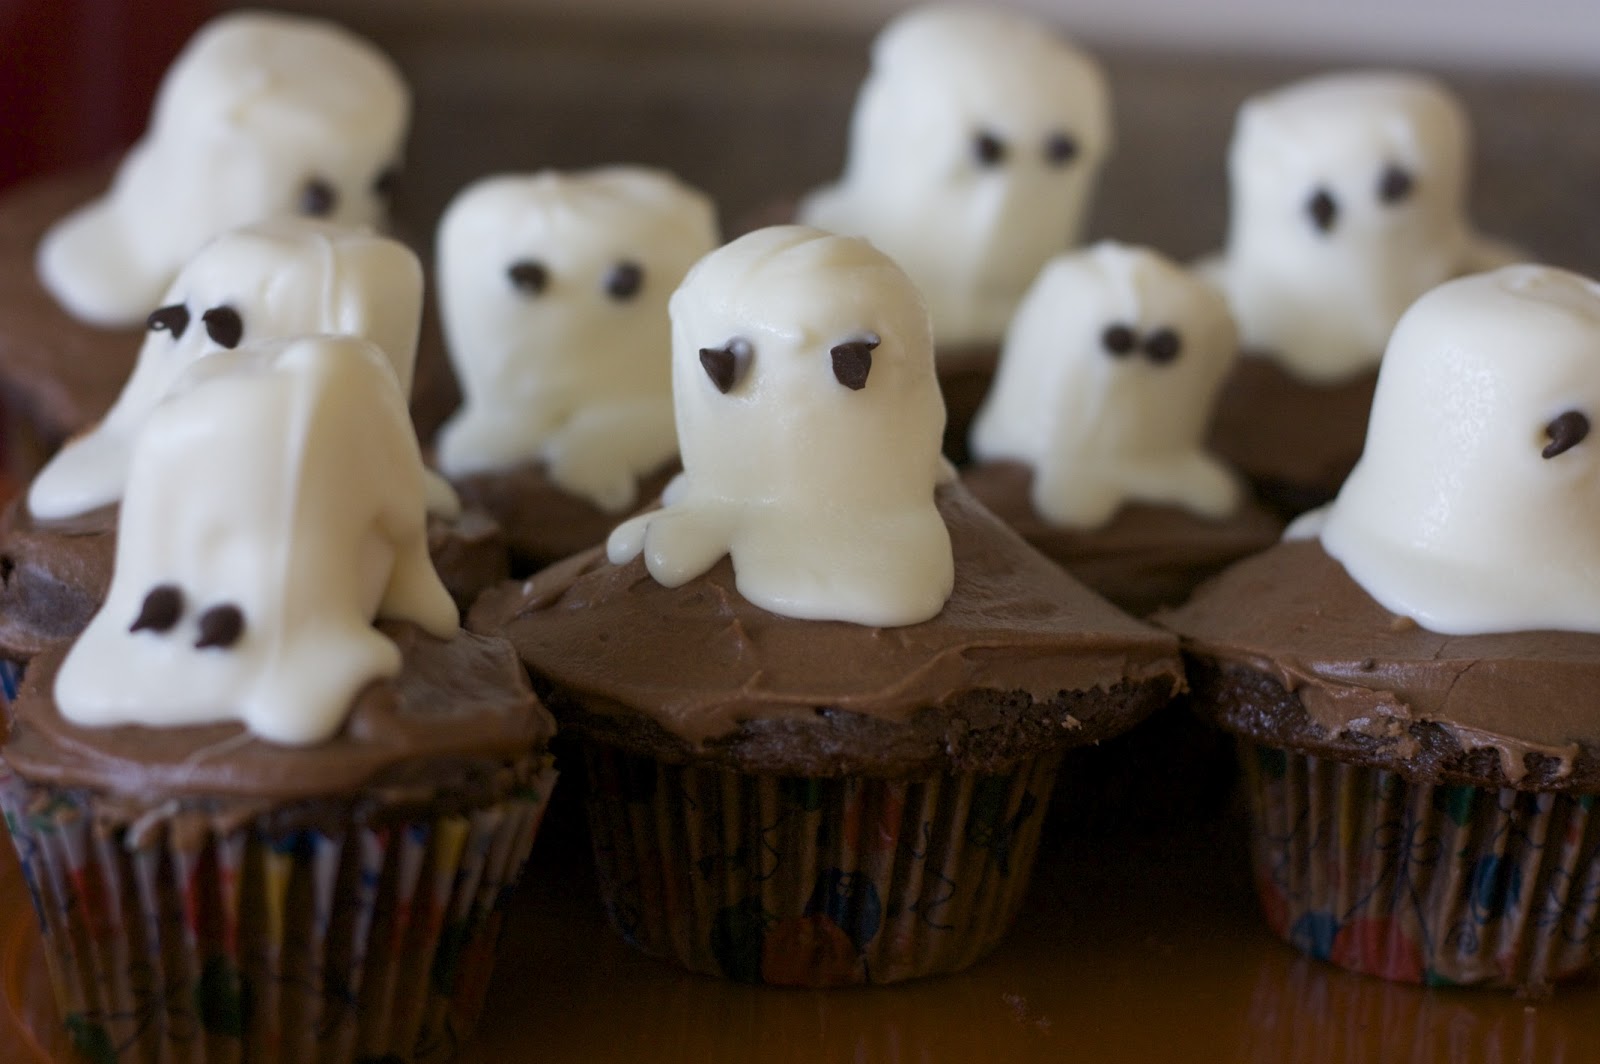
Note: I frosted my cupcakes (as you can see) before I put the mallows on so they would stay in place. It worked well, but the original instructions did not say to do that.

Source: Pillsbury

Veggie Shooters

These are so cute and good for you as well. Plus it was a good way for me to use up some homemade Ranch dressing–which made a ton, or a half gallon at least.  Really, it filled a half gallon pitcher.  You can get that recipe HERE.  Tasty.  I could not really tell you a source for the shooters as I have had them in several different venues–our blog launch party (made by Julie), at an ice cream social (yes, we needed the contrast.  Opposition in all things, right?) and most recently at an Arts Council board meeting (made by me).  See how versatile these are?  And I had enough left over (because I forgot where to turn on the way to the host’s home and almost everyone had “helped their plate” by the time I got there) to serve to some of the Young Women at church after a yoga class!  Awesome.  Love to get more bang for my buck.  Who doesn’t these days?

Ingredients:
Celery, cut into 3-4 inch sticks
Baby Carrots, cut in half, lengthwise
Ranch Dressing
1.  You will need to purchase plastic “shot” glasses.  I got mine locally at Party City . These glasses are so versatile and come in several colors but you will want to use clear.
2.  Squirt about a tablespoon of Ranch dressing into the bottom of each glass.  Next, stand the celery and carrots into the dressing.  I used 5 celery sticks and the two carrot halves, but play with it and see what you like. It’s also really good with zucchini, yellow squash, red or green bell peppers, etc.
3. Serve these in a fun way or just on a tray.  I used my chips/salsa basket.  Looks really festive, don’t you think?

My Best Mac & Cheese

    
   How many recipes have you tried for mac & cheese? Seriously, I have tried too many.  Look no further! This is the one!  Totally delicous! My kids totally asked for 2nds and 3rds!   There are 4 differents cheeses in this and seasonings that you already have handy. You are going to make this your go to recipe for homemade mac & cheese. I promise!

This recipe makes a 13″x9″ casserole dish full! 

2 TBSP. butter, melted
1/2 cup all-purpose flour
1/4 tsp. ground black pepper
4 cups milk
1 cup grated parmesan cheese
1 cup shredded sharp cheddar cheese
1- 1/2 cup cubed velveeta cheese
1/2 cup cubed cream cheese
1-1/2 boxes of Rotini pasta, cooked
onion powder
italian bread crumbs, or your favorite
Pam

Spray your casserole dish with pam, and set it aside. Preheat your oven to 350 degrees.

Cook your pasta and drain. Set it aside.

In a good sized pot melt the butter over medium heat. Add in the following: flour, pepper and milk. Slowly add the milk using a whisk until mixture is smooth. Bring this to boil over medium heat; cook for one minute, stirring constantly so your sauce doesn’t stick! Immediatly reduce heat; add cheeses, stirring in until melted. Remove from the heat and add in the pasta. Stir until the pasta is coated well and pour into the casserole dish. 

(If youhave a bigger dish it might be a good idea to use it. My 13x 9 overflowed! But man, was it good!)

Sprinkle over the onion powder over the top, generously, but don’t go crazy! The sprinkle the bread crumbs over the top. You can add as much or as little as you want.

Bake for 30 minutes or until bubbly.

Recipe seriously adapted from Gooseberry Patch.

“I Love You” Cookies

School starts here on August 27th!  We are all excited! I have two kiddos that don’t enjoy school lunches at all,  and the other two pack a lunch when there is something yummy from home they would rather have!  I always send love notes, and special treats but,this year I wanted to do something special for the first day of school. These are soo yummy!  Peanut butter cookies and a dove heart ontop!  Easy peasy!  You can make the cookie from scratch or buy the cookie mix for an even easier time of it!

1 package of peanut butter cookie mix
1 package of Dove milk chocolate hearts
white granulated sugar

Follow the peanut butter cookie instructions. After you have formed the cookie roll it in some sugar and place on the cookie sheet or stone…whatever you have for baking.  Then bake according to directions. It will take about 8 -10 minutes. Don’t let them get to brown. 
When the cookies come out, press the chocolate hearts into the center and the cookie will spread out a bit.  Let them stay on the cookie sheet for a while cooling off. The heart will melt a bit, as you can see in the picture, but it will cool and stick to the cookie just fine.
 After they have cooled completly, remove them from the pan and place them on a rack to let the chocolate set a bit more.  It should be comepletly back to normal before you pack them up.

Banana Pops

When I was a kid my mom used to make a version of these as an occasional treat for me.  I make them now with just a couple of slight changes, but they are still just as tasty.

Ingredients:
bananas
creamy peanut butter
Nutella
wheat germ
popsicle sticks

1.  Peel bananas, then slice in the middle to make 2 equal sections.  Carefully insert a popsicle stick into the cut end of each banana half.  Place on cookie sheet lined with wax paper and place in freezer for 30 minutes.
2.  While bananas are freezing, melt peanut butter for about 15-20 seconds in a microwave-safe bowl.  Add Nutella and stir well to combine; set aside.  Pour wheat germ onto a small plate and set aside.
3.  Remove bananas from freezer.  “Frost” each banana with the PB/Nutella mixture.  Roll the frosted banana gently in the wheat germ and place back on wax paper.  Repeat with each banana pop.  Return pops to freezer until ready to serve.
4.  Remove from freezer for 10-15 minutes before eating (to allow bananas to soften a bit).

Notes:

  • Amounts:  I end up using about 1 Tbsp. peanut butter, 1/2 Tbsp. Nutella, and 1/2 Tbsp. wheat germ per banana pop.
  • You can use just peanut butter or just Nutella.  You could also try different nut butters like almond or cashew.
  • You can roll the frosted banana in nuts, coconut, sprinkles, anything you want.
  • It may not necessarily be a “lite” recipe, but it’s better for you than an ice cream binge!
Source:  adapted from my mom

Brownie Bites

I think I found this recipe on Pinterest way back in February.  I used it then to send in for a Valentine party at school for one of my girls.  But, this would be a great end of school party treat!  This is soo easy!

Mini Muffin pan
Pam
Box of your favorite Brownie Mix
Reese’s Peanut Butter chips
Semi-sweet chocolate chips
Peanut Butter

Set oven to 350 degrees. Grease muffin pan. Mix up the brownie mix by the box directions. Fill the muffin pan cups to about 3/4 of the way up. Bake until done…about 15-20 min (depends on how chewy you want them) When they come out of the oven use the back of your spoon, or something rounded that you can press down into the brownie, to form a little cupped space for the peanut butter. (This step must be done immediatly after you remove them from the oven.)  Then let them cool for a bit, and dump them out to finish cooling.  Melt your peanut butter in the microwave until you could pour it!  Then spoon into the brownie cup tops and quickly add the chips.  As they cool the peanut butter will stiffen back up and the chips will be set!

Apple Nachos

Contrary to what you may think, there is no cheese involved in this recipe…but lots of gooey PB and other crunchy toppings to satisfy your snacky cravings. Thanks to Pinterest and Manifest Vegan we now have another healthy (not to mention FUN) morsel to make with the kids. 😉


Ingredients
Apples (we usually have Gala or Pink Lady…but use your fav.)
Lemon Juice/Fruit Fresh/or Lemon Lime Soda (if you don’t want them to brown)
Peanut Butter (about 1/2 C per 2 apples), Warmed
Craisins (Dried Cranberries)
Shredded Sweetened Coconut
Slivered Almonds (or any other type of chopped nut)
 
 
The best part about Apple Nachos is that you can use 
as much or as little of your choice of ingredients as you would like! 
And the kids LOVE to help!
First, just get your apples washed and sliced.  
If you want to prevent them from browning, put the apples in a bowl 
or ZipLock bag and pour either lemon juice, a Fruit Fresh solution 
or some lemon lime soda (like 7Up or Sprite) over them and stir 
or shake to coat them completely.
Warm up the PB in a microwaveable cup or dish. 
I did 1/2 C for about 30-40 seconds.
When you get the apples on the plate, just start piling it on!
We started with the Craisins, then drizzled that melty PB all over.
Mmmmmmm. Melty Goodness.
Some how those little people always make their way into my pics. 😉
 

And…….Voila! Apple Nachos!

Mmm Hmmm…They’re sticky, alright! 


Pepperoni Roll Ups

These pepperoni roll ups are delicous! We have added this recipe to our list of family favorites. I can see so many possibilities with this roll up! You can add anything to these, and everyone will love them!

Pam
cling wrap
Rhodes White Bread Loaves
Olive Oil
1/2 lb. Pepperoni Slices, thin slices from the DELI

*if too spicy for you, then use salomi slices – not spicy and delicous!
1 bag grated mozzarella cheese
1/2 cup of less of parmesean cheese, or romano
Italian Seasonings, a light sprinkle is all you’ll need
Garlic powder
4 TBSP melted butter
marinara suace, optional

Spray baking sheet with Pam and place two frozen loaves onto pan. Spray cling wrap with pam and place over top of the loaves. Let loaves rise for about 7 hours.
Roll dough out to 11×11 square. Brush with olive oil. Lay pepperoni slices out cover the entire square. Sprinkle mozzarella and parmesean cheeses over the pepperoni slices. Don’t over do the parmesean cheese. Sprinkle, very lightly, the italian seasoning over the square. Sprinkle garlic powder over the square. Roll up loaves. Brush butter over tops of the pepperoni Rolls.
Bake in preheated oven at 375 degrees. for 15-25 min. The tops of the pepperoni rolls should be lightly brown and hollow when you thump them.
Serve immediatly. You may serve this with marinara suace for dipping.

Homemade Magic Shell

Not that I’m a huge fan of Magic Shell, but I have to admit the coolness of instant-hardening chocolate sauce is pretty hard to resist.  The kids think this is pretty awesome.  And truth be told, so do I.

Ingredients:
1/2 cup coconut oil
1 1/4 cups semisweet chocolate chips

1. Place coconut oil and chocolate chips in a microwave safe bowl and cook on HI for 1 minute.  Allow the bowl to set for just a minute or two so the hot oil can melt the chips.  Stir well with a whisk.
2.  Pour sauce over ice cream servings!

Notes:

  • Coconut oil is a solid at room temperature so look for a jar of it, not a bottle.  The brand I bought is Spectrum.
  • Store your leftover sauce in something that you can microwave later.  It helps to have a bottle that is microwave safe so you can pour easily, but you don’t have to.  We just spooned it on.
  • Store in the fridge.  To use, reheat in microwave at 30 second intervals until it’s liquid again.
Source:  alphamom.com, who has way cooler photos than I do

Real Banana Muffins

I guess its the “purist” in me that loves these Banana Muffins, because they taste like bananas! Don’t get me wrong, I like the traditional banana bread. But, this,…its just so great! The muffins are moist, and the flavor of the banana is awesome! These would be great to serve for breakfast over the holiday vacation!
1/2 cup butter
1 cup sugar
2 eggs
3 ripe bananas, 2 mashed & one chunked
1-1/4 cup flour
1/2 tsp. baking soda

Beat butter and sugar until creamy. Add eggs until light and fluffy. Stir in 2 mashed bananas and mix well. Add flour and baking soda, stirring enough to moisten. Stir in 1 chunked banana. Bake for 25-30 minutes at 350 degrees. Start watching at 25 minute mark and check with toothpick to see if its done.

Recipe adapted from Stephanie Daniels