One-Ingredient Cinnamon Roll Waffles (and our FIRST GIVEAWAY!!)

Okay, I know this is a really easy recipe since you don’t have to actually make anything.  But when I saw it on Pinterest I just had to try it.  You see, I love to have supplies on hand for emergency meals.  You know, when you don’t have time to cook but don’t want to get junky fast food or when someone comes over for a meal unexpectedly…..it’s nice to have a few quick-fix meals on hand.  THIS is an amazing quick-fixer.  In fact, I think this would be a fantastic Christmas morning breakfast.  I love cinnamon rolls on Christmas morning, but who has time to make those amidst all the other goings-on?


Couldn’t be easier!

Ingredient:
refrigerated, uncooked Cinnamon Rolls

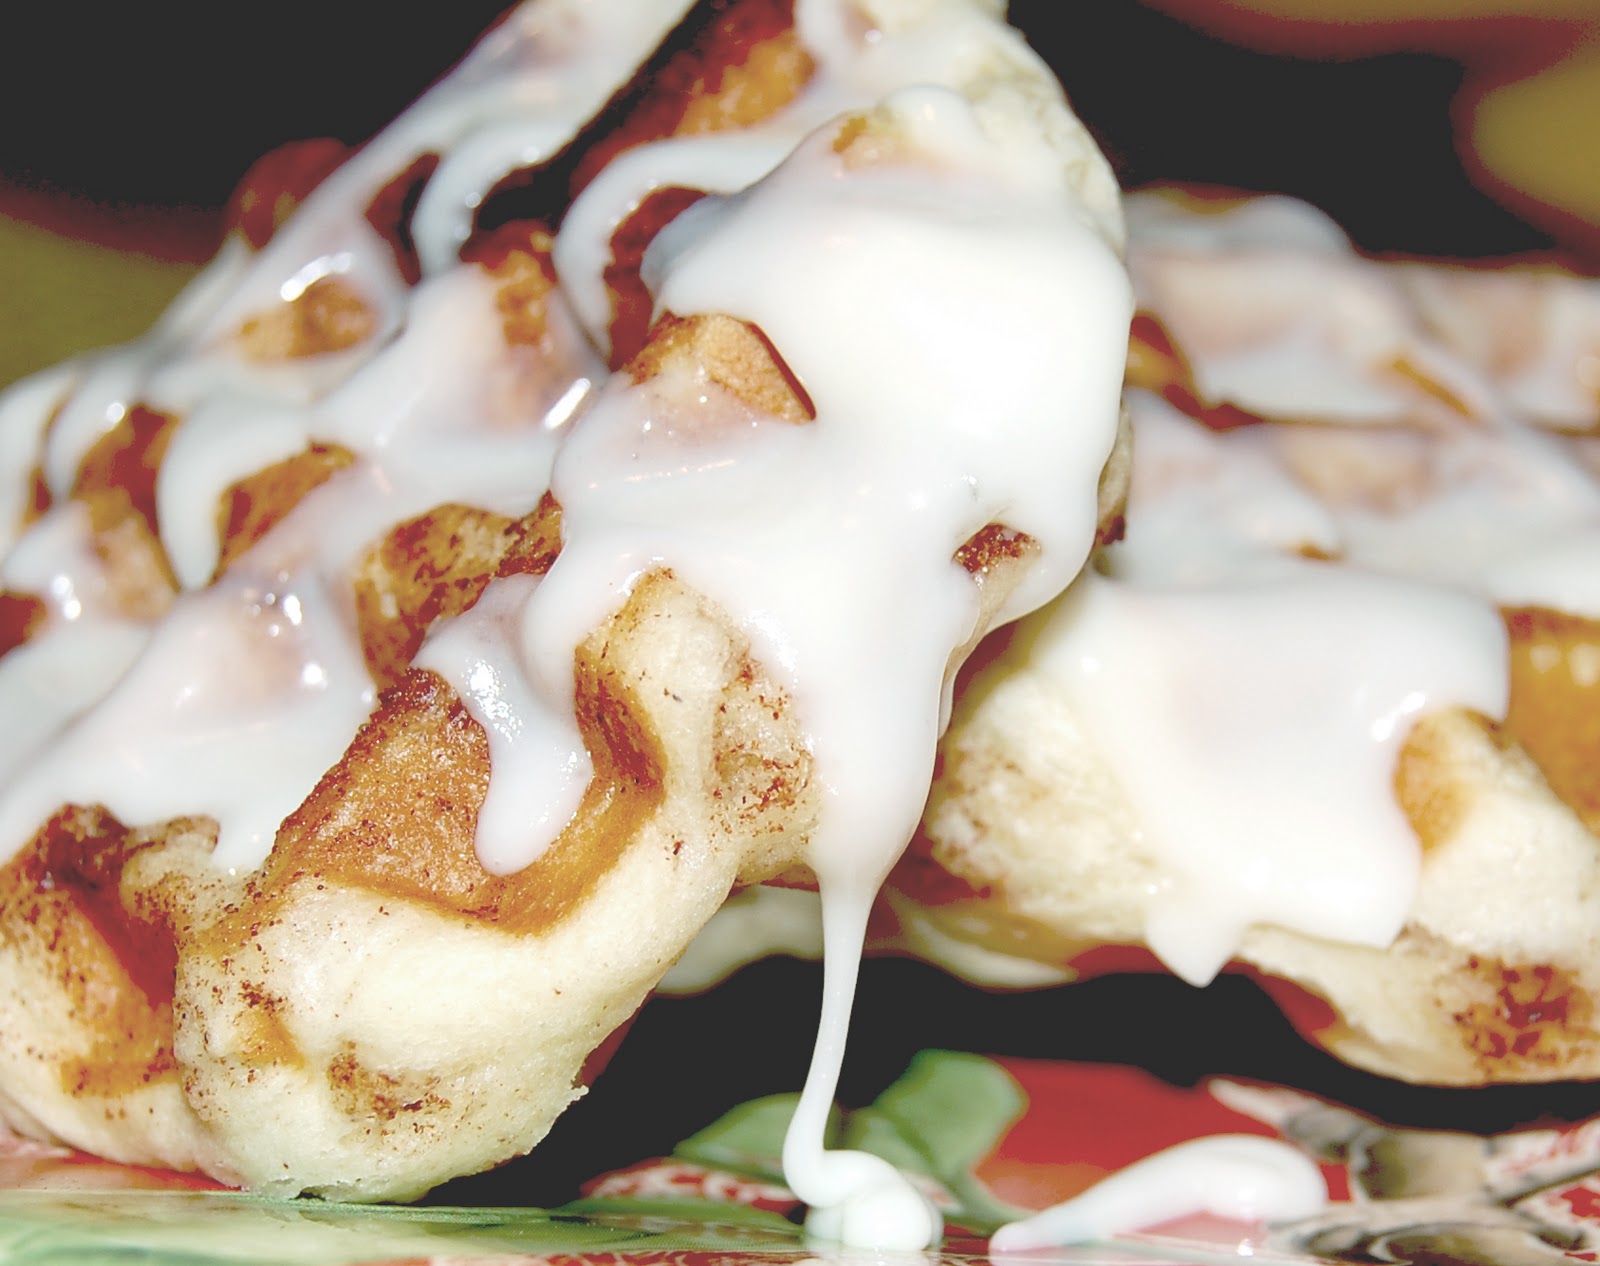
1. Place one roll on each square or section of your waffle iron.  Close the lid and cook until the done (when they don’t wiggle when you press on them).
2.  Drizzle with the icing that came with them (or make your own).

DONE!!  Seriously…is that not amazing?  They taste really good too.  I bought two packages (8 rolls in each can) and that wasn’t enough for my family.  Next time I’d do 3-4 packages.  They cook up so quickly that they would be great for a family get-together.  They’re not very big, so they look like baby waffles.  Great for a brunch!  Oh, and by the way, you can also use any other refrigerated sweet roll or biscuit.  I think I need to try Orange Roll Waffles next…….<drool>

One serving is 2-4 rolls, depending
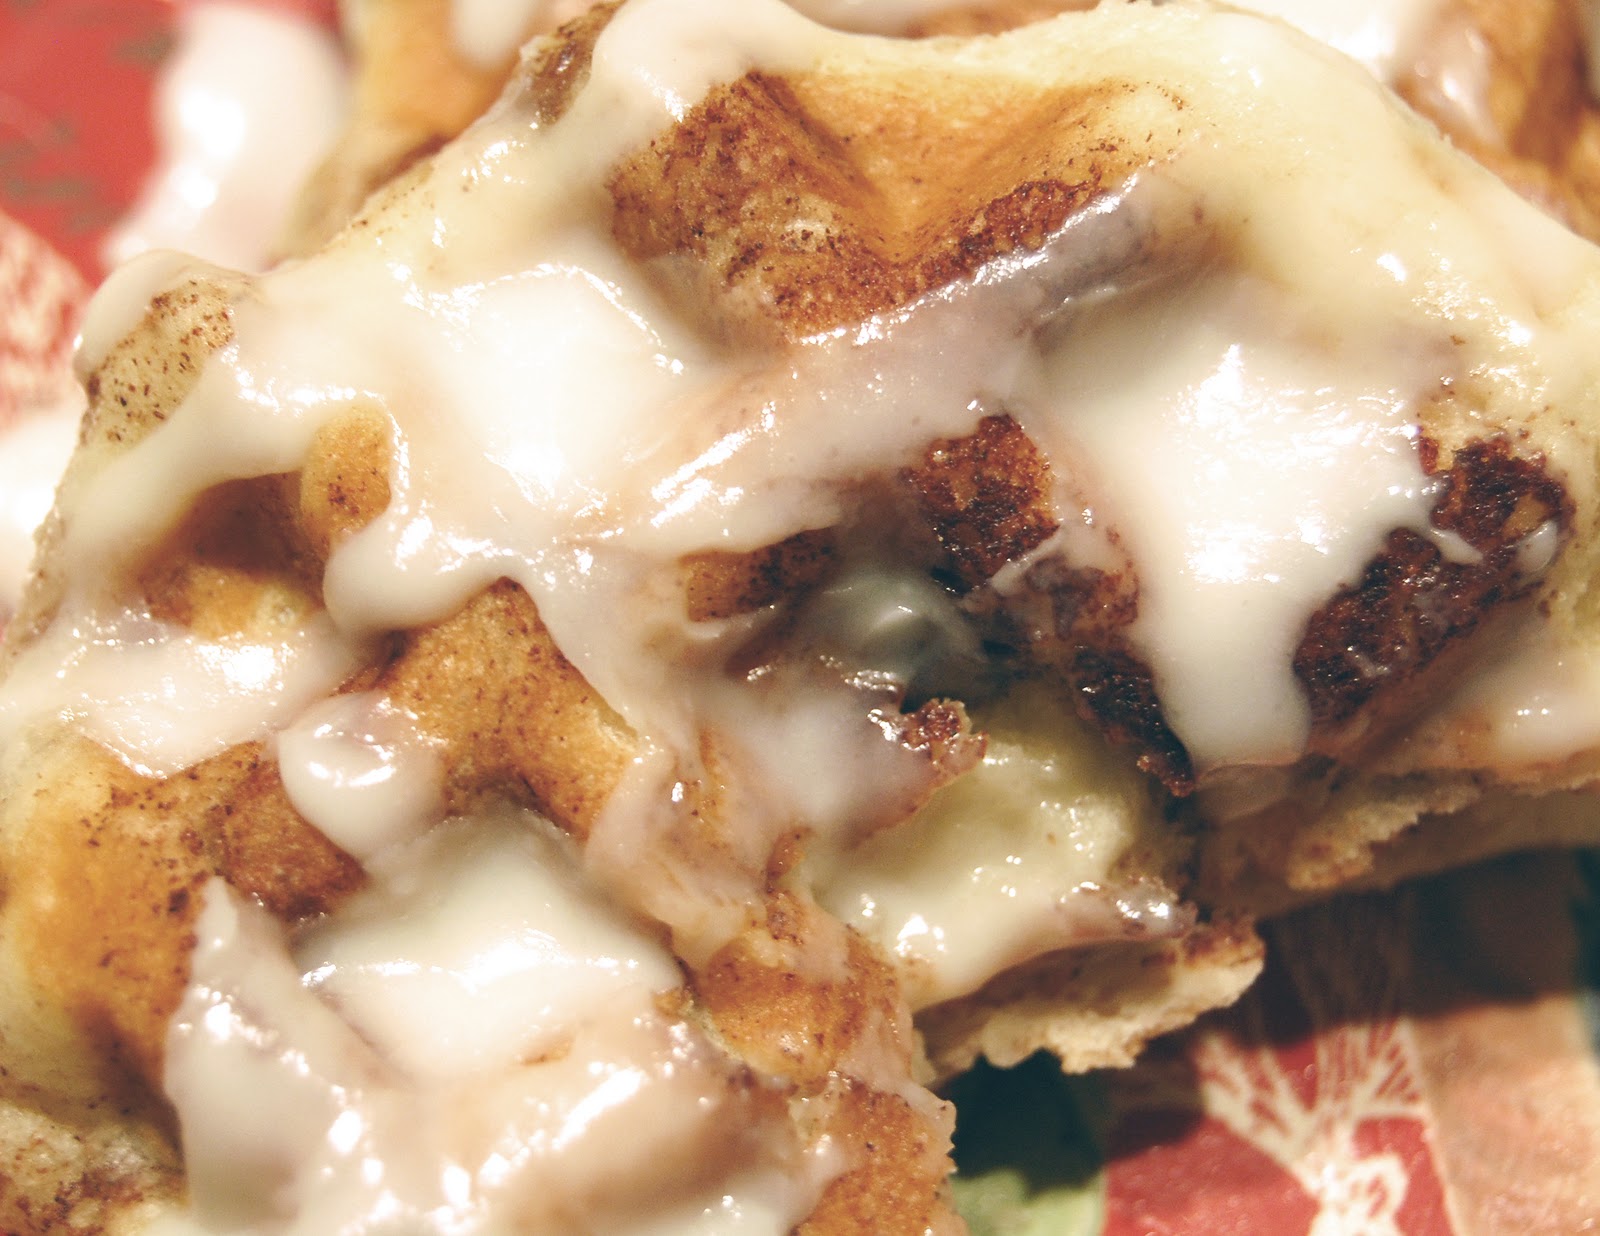
Oh my.

Source:  A Hen’s Nest

GIVEAWAY IS NOW CLOSED.

And now, what you have been waiting for:  The giveaway!  

To celebrate Christmas, the Mormon Mavens are hosting a great giveaway from Pampered Chef consultant Heather Lima.  Heather has graciously agreed to offer some great Pampered Chef products that are sure to help you with your holiday baking!

Get on with it, you say? Okay, okay…..here’s what Heather is giving away to ONE lucky Mormon Mavens reader:


  • one set of Bamboo Prep towels–soft, plush, and absorbent towels; 22″ x 14″; machine washable and made from renewabale/sustainable bamboo; sells for $17.50
  • a set of Easy Read Measuring Cups–so great for measuring liquids (no more bending over and looking sideways);  standard and metric measures that you can read from above, flared rims prevent drips; set of 3 cups–1-cup, 2-cup, and 4-cup;  microwave- and dishwasher-safe; sells for $23
 
I don’t know about you, but I am drooling over those measuring cups!
 
Interested?  Yeah.  We thought you would be.  
 
Here are the details:
  • You can have up to 5 entries.
  • Continental U.S. residents only (sorry!).
  • YOU MUST LEAVE A SEPARATE COMMENT FOR EACH ENTRY.  Leaving one comment with all your stuff in it counts as one entry!!
  • Giveaway will run from Monday, December 12 through Friday, December 16.
  • Winner will be announced on Saturday, December 17. (If we can get your address before Monday, we can get these goodies shipped to you by Christmas Eve!)
  • You MUST include your email address in each entry you submit so that we have a way of contacting you if you win!
  • Entries that don’t meet the above requirements will not be considered.
  • Winner will be chosen using random.org.
 
Here’s how you can enter:
 
MANDATORY ENTRY:  Send an email to Heather at heather_lima@yahoo.com and request a subscription to her Pampered Chef newsletter, then come back here and leave a comment telling us that you did so.  (make sure and tell her your first name so she knows how to greet you in your newsletter)
 
OPTIONAL ENTRIES:  
  • Be a follower of the Mormon Mavens in the Kitchen (and leave a separate comment telling us that you are).
  • “Like” Heather’s Pampered Chef page on Facebook (and then come back here and leave a separate comment here telling us that you did).
  • Leave a comment on Heather’s Pampered Chef page on Facebook telling her what Pampered Chef product you wish was under the Christmas tree for you (and then come back here and leave a separate comment here telling us that you did)!
  • Leave your contact info for Heather on her “Contact Me” page (and then come back here leave a separate comment here telling us that you did).
Good luck, everyone!  And MERRY CHRISTMAS!!


Cookie Cake

Who doesn’t love to see a giant chocolate chip cookie sitting on the table in front of them!? Everyone loves a giant cookie! Try this, it’s this is really delicious!

1 cup butter, softened
3/4 cup white sugar
2/4 cup brown sugar
1 (8oz) package cream cheese
1 teaspoon vanilla extract
2 eggs
2 1/4 cups all-purpose flour
1 tsp. baking oda
1/4 tsp salt
2 cups semisweet chocolate chips
1 cup chopped walnuts (optional)

Preheat oven to 375 degrees. Lightly grease two 12 inch pizza pans. (or just grease one and plan to save half of the dough for later.)

In a medium bowl, cream together the butter, brown sugar and white sugar, until smooth. Beat in the cream cheese, then the eggs, one at a time, then stir in the vanilla. Combine the flour, baking soda and salt; gradually stir into the creamed mixture. Fold in the chocolate chips and walnuts. Divide the dough in half and press each half onto a prepared pizza pan.

Bake for 20 – 25 minutes in the preheated oven, until golden at the edges. Cool completely in pans. Cut into wedges like a pizza and serve. Don’t forget the frosting! Chocolate and or buttercream.

allrecipes.com

Semi-homemade Caramel Apples

I love caramel apples, like REALLY love them. I’ve never made them, but decided that this was the year. It was so easy and fun. It’ll definitely become a yearly tradition in our home.

Ingredients Needed:
– Apples, make sure they are really cold. 
– Kraft Caramel bits (one bag per 5 apples)
– 2 Tbsp. milk per bag of caramels
– Popsicle sticks
– White chocolate chips (I used Nestles)
– Bittersweet chocolate chips (I used Nestles)
– 1 Tbsp. of Shortening per cup of melted chocolate
– Cinnamon sugar

In just a few steps, you  can have chocolate-shop worthy caramel apples.

First, CLEAN your apples. My apples came from the grocery store – which means tons of wax and who knows what chemicals.

 I use a fruit/veggie wash to rid my produce of the gunk that’s on them at the store. I highly recommend this brand. I get it at Trader Joe’s.  Nice scrub with this wash, and it’s completely noticeable that a lot of the wax is washed away.

Once the apples are washed, make sure they become completely dry. Caramel will not stick to wet apples! While drying – stick them back in the fridge to make sure they are extra cold.

While the apples are drying empty the bag of caramels into a pot on the stove. Add 2 Tbs. of milk per bag of caramels. Cook on medium-low. Stir often. Do not allow your caramel to boil. (it’ll take a while to melt)

Once the caramel is melted transfer to a smaller container. I used a glass 2-cup liquid measuring cup. Doing this will make it easier to get the caramel higher on the apple.

Once you have the craft sticks stuck in your apples… dip your apples! Shake off excess caramel, use a butter knife to scrape it off the bottom. You don’t want too heavy of a coat. Transfer to either wax paper or a greased cookie sheet.

Let the caramel set.

 While the caramel is setting melt your chocolate (and shortening) in either a double boiler or in the microwave. I used the microwave. Cook it 30 seconds at a time, stir. Transfer white chocolate to a smaller container for dipping.

For an Apple Pie style caramel apple – dip the caramel apple in white chocolate, scrape of excess. Then while chocolate is still wet – shake cinnamon sugar on the chocolate.

For a Chocolate Lover’s Apple, transfer white and bittersweet chocolate to plastic bags. Cut a TINY corner off and drizzle the chocolate over the apple.

Let the apples completely cool and set in the fridge. I allowed them to set overnight.

Then… most importantly…. ENJOY! These are great neighbor gifts. I wrapped each apple up in cellophane wrap and tied them with a ribbon. Make sure to chill them until you deliver or eat them.

And please…. use a knife to cut into them! Save your precious teeth!! I hope you enjoy them as much as I have!!

Sticky Gooey Monster Jaws

You’d better take a bite before they do!  I adapted this from a cute idea found on Our Best Bites Easy Halloween Party Food, using a few of my kids’ favorite ingredients! But by all means…have fun and make it your own…I DARE you! 
Ingredients:
Apples (1 apples serves 4)
Water with a little lemon juice for dipping 
Peanut Butter
Raisins, chocolate chips, slivered almonds…any of these things could work for teeth
  1. Quarter your apples and remove the seeds.  
  2. Then cut a wedge out of the center of the side with the peel still on it.  
  3. Now, dip the apple quarters in the water/lemon mixture to keep them from browning.
  4. Smother some PB into that monster mouth and give him/her some teeth of your liking.  
  5. Give it some eyes using PB to make ’em stick.  
*The eyes look super cute when they’re buggin’ out on 2 pretzel sticks…too bad I didn’t have any.  =( HAPPY HALLOWEEN!  =)

Sugar Cookies with Marbleized Icing


A good sugar cookie can be hard to come by. Who wants to eat cookies that are to floury, cakey or dry? This is a great basic sugar cookie recipe that is sure to be a hit! Crunchy on the outside and tender in the middle.

Ingredients:
1 C. real butter
1 C. sugar
1 egg
1 1/2 t. vanilla or almond extract
3 C. flour
1 1/2 t. baking powder
1/2 t. salt
Directions:
1. Cream butter and sugar until light and fluffy (about 2 minutes). Add in egg and extract and mix until incorporated.
2. In a separate bowl combine flour, baking powder and salt. Slowly add the flour mixture to the butter mixture and mix until completely combined.
3. Separate the dough into 2 balls and wrap each in waxed paper or plastic wrap. Flatten to speed up chilling time. Place in the fridge to chill about 1-2 hours.
4. When the dough is properly chilled, sprinkle a small amount of flour on a work surface and roll dough out with a rolling pin. Roll to about 1/4 inch thick. (don’t use excessive amounts of flour while rolling. It toughens the dough.)
* lets take a break for some sugary cuteness!
5. Use cookie cutters or a paper pattern and knife to cut out your cookies to desired shapes.
*So easy a toddler can do it!

6. Place on an ungreased baking sheet and bake at 350 degrees F. for 8-12 minutes. The longer you bake, the crunchier your cookies will become. For soft cookies, go for about 7-8 minutes. Remove from pan to cool completely on a wire rack.

Now let’s get to the marbleized icing technique! The icing is a powdered sugar glaze, which stays bright and slightly glossy when it dries. Gorgeous!

Ingredients:
1 lb. powdered sugar
6 T. whole milk
6 T. light corn syrup (gives it that nice gloss)
1 t. vanilla or almond extract.
food coloring of your choice
Directions:
1. Wisk sugar and milk until smooth. Then stir in the corn syrup and extract. Glaze should be slightly thin and slowly run off a spoon.
2. Separate glaze to desired containers before adding different food colorings. If you want to have brown icing, use a spoonful of cocoa powder.
To marbleize the icing, start by spreading a base color all over the cookie.
Lightly drizzle a second color in a random stripes or dots on top of the base color. Then, run a toothpick through the glaze in several stripes diagonally, then again in the opposite direction diagonally. The glazes will run together and make a marbleized effect.
Let the icing dry completely, about 2-3 hours before trying to package them. Have fun and be creative!!
Sources: www.ourbestbites.com and Martha Stewart

Franken-Fingers

I saw something like this last October passing by a Singles Ward Potluck.  “That’s too cool!”  I said to myself.  So here it is:  a simple spooky snack!

Ingredients:
Pretzel Rods
Vanilla Almond Bark
1 T Crisco (vegetable shortening…not oil, butter or margarine.  It says so on the almond bark package =)
Green food coloring
Twizzlers Nibs

  1. Have a piece of wax paper ready on a cookie sheet or such. 
  2. Melt the candy coating and shortening using your preferred method (microwave/double boiler) and stir in a few drops of green food coloring to form a Frankenstein skin tone.
  3. Dip the pretzel rods into the candy coating, leaving about an inch or more for holding onto
  4. Lay the pretzel rod out on the wax paper to dry and immediately press 1 “Twizzlers Nibs” onto the end of the pretzel rod for the red fingernail.  Dry at room temperature or in the refrigerator.  

Enjoy…Mwaaa ha ha ha ha!

      Ghostly Cereal Treats

       This recipe would be great to make with your kids. I’ve made these before, but am excited to get my three year old involved.

      Ghostly Cereal Treats

      Ingredients:
      6 c. Count Chocula Cereal
      1/4 c. butter
      1 (10 1/2 oz.) bag miniature marshmallows
      2 Packages (16 OZ) Vanilla  Candy Coating
      1 tube black decorating icing
      12 (3 oz.) Dixie Cups

      Directions:

      1. Prepare Dixie cups with nonstick cooking spray.
      2. Microwave butter in large mixing bowl on high for 45 seconds or until melted.
      3. Add marshmallows; stir to combine.
      4. Microwave 1 1/2 minutes or until smooth, stirring after 45 seconds.
      5. Add cereal; stir until well coated.
      6. Press mixture into Dixie cups.
      7. Cool for at least one hour.
      8. Use scissors to cut along the sides of the Dixie cups, and peel the cups away to remove the cereal treats.
      9. Place cereal treats on wax paper.
      10. Melt candy coating according to package instructions.
      11. Using a spoon, coat cereal treats until they are fully covered.
      12. Let dry for 1-2 hours.
      13. Use black icing to create eyes and mouths on the ghosts.
      14. Store leftover ghosts in an airtight container.
      15. Enjoy!

      (recipe from bettycrocker.com)

      Hawaiian Tuna Melt

      A delicious twist on the old grilled tuna! This makes for a great lunch at home. I recommend using a thicker bread for this sandwich, so you can pile on the ingredients. A wheat ciabatta bread is pictured here, but you could use a hoagie roll, english muffin or thick sliced french bread.
      Servings: 3-4
      Ingredients:
      2 (5 ounce) cans Tuna, drained and flaked
      2 T. mayonaise
      1 celery stalk, finely chopped
      2 green onions, chopped
      1/2 C. crushed pineapple
      1/2 t. salt
      1/4 tsp. lemon pepper seasoning
      1/2 C. shredded cheddar cheese
      Your favorite bread
      1 T. butter
      Directions:
      1. Combine tuna, mayonaise, celery, green onion, pineapple, salt, and lemon pepper in a bowl.
      2. Spread tuna mix over bread slice and sprinkle with cheese. Spread a small amount of butter on the top slice of bread.
      3. Broil 6 in. from heat for 2 minutes or until cheese is melted and top slice of bread is toasted. Serve immediately.
      Source: my variation of an allrecipes.com recipe

      Chicken Tortilla Soup

      A very easy and delicious version of tortilla soup that can be made with food storage ingredients. Your kids will love helping with this one.  And guess what? 
       It has a hint of lime!  
      Ingredients
      2 cans (28oz or 3 1/2c) Chicken Broth
      1/8c Taco Seasoning (or to taste)
      A few shakes of garlic powder =)
      Juice of 1 lime
      2 chicken breasts, cooked and cubed*
      1 can of corn with liquid
      1 can of black beans, drained and rinsed
      1 can of diced tomatoes with green chiles (Rotel offers Mild, Medium and Hot!) 
      1 large avocado, peeled and diced
      1. Pour broth into soup pot, add taco seasoning, garlic powder and lime juice.  Stir until well blended.
      2. Add all other ingredients except avocado.  Bring to a boil, lower heat and simmer for 15 min or so.   
      3. Add avocado just before serving.  
      4. Serve with shredded cheddar cheese, sour cream and some crispy tortilla chips.  Mmmmm.  

      Adapted from AllRecipes.com Six Can Chicken Tortilla Soup


      *The original recipe calls for canned chicken, which works if you’re going for a food storage friendly recipe.  But I would argue that it’s much better with fresh or frozen chicken breasts.  =)  
      *The amount of taco seasoning you add will add or decrease the spiciness of the soup, so if you like it spicy….bring it on!  
      *ALSO…if you have Kids in the kitchen, they will love helping you empty the cans into the pot!  

      No Bake Cookies


      These are great for people who aren’t a huge fan of peanut butter. They are so easy and it’s nice not to have to heat your kitchen up with an oven in order to get a sweet treat sometimes! Children love to get in on the “dropping” step of making these.

      2 cup sugar

      1/2 cup fat-free milk

      1/2 cup butter or margarine (I usually stick with butter)

      3 cups quick-cooking oats

      1 cup flaked coconut

      6 tbs. baking cocoa

      1/2 tsp. vanilla extract

      1-In a saucepan combine the sugar, milk and butter.

      2-Bring to a boil, stirring constantly.

      3-Boil for 2 minutes. Remove from heat.

      4-Stir in the oats, coconut, cocoa, and vanilla.

      5-Drop by rounded spoonfuls onto waxed paper (I also use parchment paper if that’s what I have on hand-it works fine).

      6-Let stand until set.

      *You can also freeze these.

      Source: allrecipes.com