Bittersweet Chocolate Sauce


Bittersweet-Chocolate-Sauce.jpg

Originally posted on July 29, 2011.

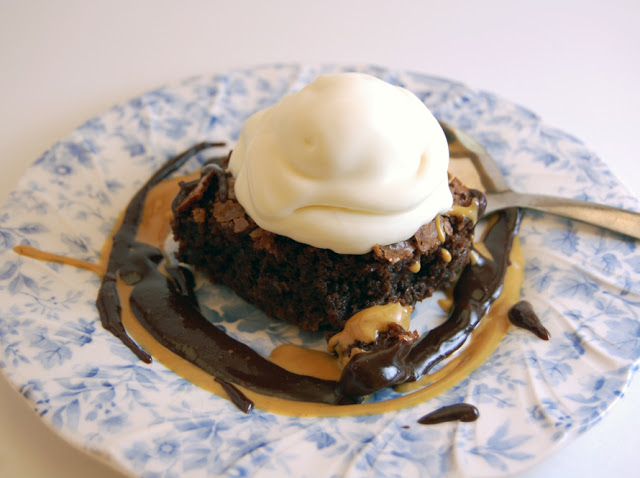
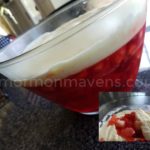
This is great served over vanilla ice cream with toasted coconut and toasted almonds.  Or on a Chewy Brownie sundae with 3 Ingredient Ice Cream and warmed peanut butter as a second sauce.

And by the way, this peanut butter thing is one of the most amazing secrets I’ve ever found.  While on vacation at Disney World one year, we visited the wonderful ice cream parlor, Beaches and Cream.  I ordered something with hot fudge and peanut butter sauce and was in utter ecstasy!  When I asked how they made the peanut butter sauce I was floored when they said it’s just warmed up peanut butter.  Now whenever we have sundaes at home, we always have this peanut butter “sauce” with this chocolate sauce recipe.  Yeah.  Utter ecstasy.
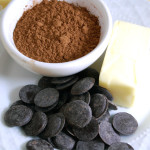
Brownie-Sundae.jpg


Bittersweet Chocolate Sauce
Write a review
Print
Ingredients
  1. 1/4 c. butter
  2. 1 1/2 ounces unsweetened chocolate
  3. 3/4 c. sugar
  4. 1/4 c. cocoa
  5. 1/4 c. half and half, whole milk, or heavy cream
  6. 1/8 tsp. salt
  7. 1 tsp. vanilla
Instructions
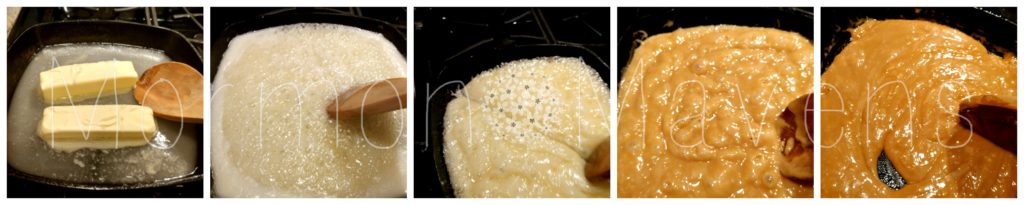
  1. Place butter and unsweetened chocolate in a small saucepan and melt over low heat, stirring constantly.
  2. Add sugar, cocoa, half and half, and salt. Stir until combined. Bring slowly to a gentle boil withOUT stirring (well, maybe you could stir a couple of times). If you let it go too long, the sides begin to burn; but if you don’t let it go long enough, the sugar crystals won’t dissolve and the sauce will be gritty.
  3. Remove from heat and add vanilla.
Adapted from Betty Crocker Chocolate Cookbook
Mormon Mavens https://www.mormonmavens.com/


Sticky-Buns in Cast Iron

sticky buns in cast iron

Buns of Iron?

Okay, that was pretty lame.  But I couldn’t help it.

I’ve never made sticky buns before but when I saw a recipe making them in a cast iron skillet I knew I had to try it.  I love my cast iron cookware and use it all the time.  I especially love finding recipes where I can bake with it.

I followed the original recipe directions and made 9 large buns, but next time I will make smaller ones.  I think the sticky-to-bun ratio is better that way.  I also used my Thrive Life Country White Dough Mix for the bread.  Use any basic bread dough recipe you like.  Or maybe you love the frozen roll dough!  That’s even easier than using a mix.  Whatever works for you!  My dough mix recipe is for one loaf’s worth of dough.

I used a 9″ square cast iron skillet (my grandmother’s).  So to make it mathematically easy, I’ll divide the dough into 16 equal pieces and do a 4×4 arrangement.

Do you like cast iron?  If so, what’s your favorite piece?

Sticky Buns in Cast Iron
Bread, butter, sugar.....like seriously....do I need to say more?
Write a review
Print
Prep Time
1 hr 20 min
Cook Time
25 min
Prep Time
1 hr 20 min
Cook Time
25 min
Ingredients
  1. The Bun Dough
  2. 1 c. warm water
  3. 2 tbsp. warm water
  4. 2 1/4 tsp. Active Dry Baker's Yeast
  5. 2 tbsp. honey
  6. 3 3/4 c. THRIVE Country White Dough Mix
  7. The Sticky Stuff
  8. 1/2 c. butter, softened
  9. 1/2 c. brown sugar
  10. 1 tsp. Ground Cinnamon
  11. 3 tbsp. honey
  12. 1 pn. salt
  13. 1/4 c. pecan halves
Instructions
  1. Prep the Dough
  2. Add the water, yeast, and honey to the bowl of a stand mixer equipped with the dough hook. Slowly add in the dough mix. Once it's all incorporated, knead in mixer for about 5 minutes.
  3. Spray a medium bowl with cooking spray. Form the dough into a ball and place in the bowl, turning to coat it with the cooking spray. Cover and allow to rise for about 40 minutes.
  4. When dough has doubled in size, punch it down and divide it into 9 pieces (or 16 as mentioned in the description). Set aside while you prep the sticky stuff.
  5. Prep the Sticky Stuff
  6. Combine all but the pecans in a medium bowl and stir well to combine everything.
  7. Spread this onto the bottom and up the sides of the cast iron skillet.
  8. Place the pecan halves evenly over the sticky stuff. (If you want it to be pretty, make sure you have the flatter side of the pecan facing up.)
  9. Dough + Sticky Stuff
  10. Take the dough pieces and roll into balls. Place these evenly over the sticky stuff. Cover and allow to rise about 30 minutes.
  11. Preheat oven to 375 degrees.
  12. Bake the skillet, uncovered, for 20-30 minutes or until rolls are golden and dough is cooked through. Allow to sit for 15 minutes once you remove it from the oven.
  13. Place a large plate upside-down over the skillet and carefully flip so that the rolls release onto the plate. Enjoy!
Notes
  1. Makes 9 large rolls, but you could make smaller rolls. I would make 16 for my square skillet.
Adapted from Rie McClenny
Mormon Mavens https://www.mormonmavens.com/

Kim’s Yummy Cake


You can pick up the best recipes at baby & bridal showers, don’t you think?  That’s where I got this yummy, fresh recipe from my friend Kim, who used to work for a caterer.  Just sayin’.  

I just recently made this for a Cinco de Mayo-themed church dinner because it LOOKS like a tres leches cake.  Do not be fooled into thinking it will be oozing with all those milks in it, but it is still very good.

My favorite topping is a combination of fresh strawberries, mango and kiwi.  I tried to use mango on this one, but it was just way too ripe.  I guess I could have put shredded mango on there…nah.  The blueberries were a nice substitute.

And please don’t use canned frosting.  Ew.

Kim's Yummy cake
Write a review
Print
Ingredients
  1. 1 white cake mix
  2. 8 oz. pkg. cream cheese @ room temperature
  3. 8 oz. (1 cup) of powdered sugar
  4. 8 oz. Cool Whip
  5. Fresh fruit for topping--suggested: mango, strawberries, kiwi
Instructions
  1. Make cake according to directions on the box. Don't over bake! Cool completely.
  2. Mix the cream cheese, powdered sugar and Cool Whip until well blended, then spread on cake.
  3. Done!
Notes
  1. I have always made this in a glass 9 x 13 pan. But wouldn't it look cool as a naked layer cake with the frosting in between layers and on top and then the fruit? Yeah, I think so.
Adapted from Kim Henderson, Lewisville, NC
Mormon Mavens https://www.mormonmavens.com/

Frosted Salad


This Frosted Salad is delicious!  To tell the truth, I would just eat the topping and leave the rest, but that wouldn’t be fair to anyone else.

I cannot for the life of me remember where I got this recipe–maybe a magazine–and it has been DECADES since I made it.  A browsing session through our family cookbook brought back the memories of that topping and I was like “oh yes, this will be made for our Father’s Day dinner.”


Frosted Salad
Write a review
Print
Ingredients
  1. 2 pkg. strawberry Jello
  2. 2 cups lemon-lime soft drink
  3. 1/2 pt. whipping cream
  4. 2 cups boiling water
  5. 1 (20-oz.) can crushed pineapple, drained, reserve juice
  6. 2 large bananas, diced
  7. 1/2 cup reserved pineapple juice
  8. 1/2 cup sugar
  9. 2 T. flour
  10. 2 t. butter
  11. 1 egg, well-beaten
Instructions
  1. Drain pineapple and save juice for the topping.
  2. Dissolve Jello in boiling water. Stir in lemon-lime drink. Chill until partially set.
  3. Add pineapple and bananas and stir well. Chill until set.
  4. In a small saucepan, combine reserved pineapple juice, sugar, flour, butter and egg and cook until thickened.
  5. Remove from heat and allow to cool (you can put this in fridge).
  6. When cooled, add 1/2 cup WHIPPED cream and spread on salad. Refrigerate until ready to serve.
Notes
  1. Don't forget to whip the whipping cream before adding to topping mixture.
Adapted from unknown
Mormon Mavens https://www.mormonmavens.com/

Lemon Pie Tarts


lemon pie tarts
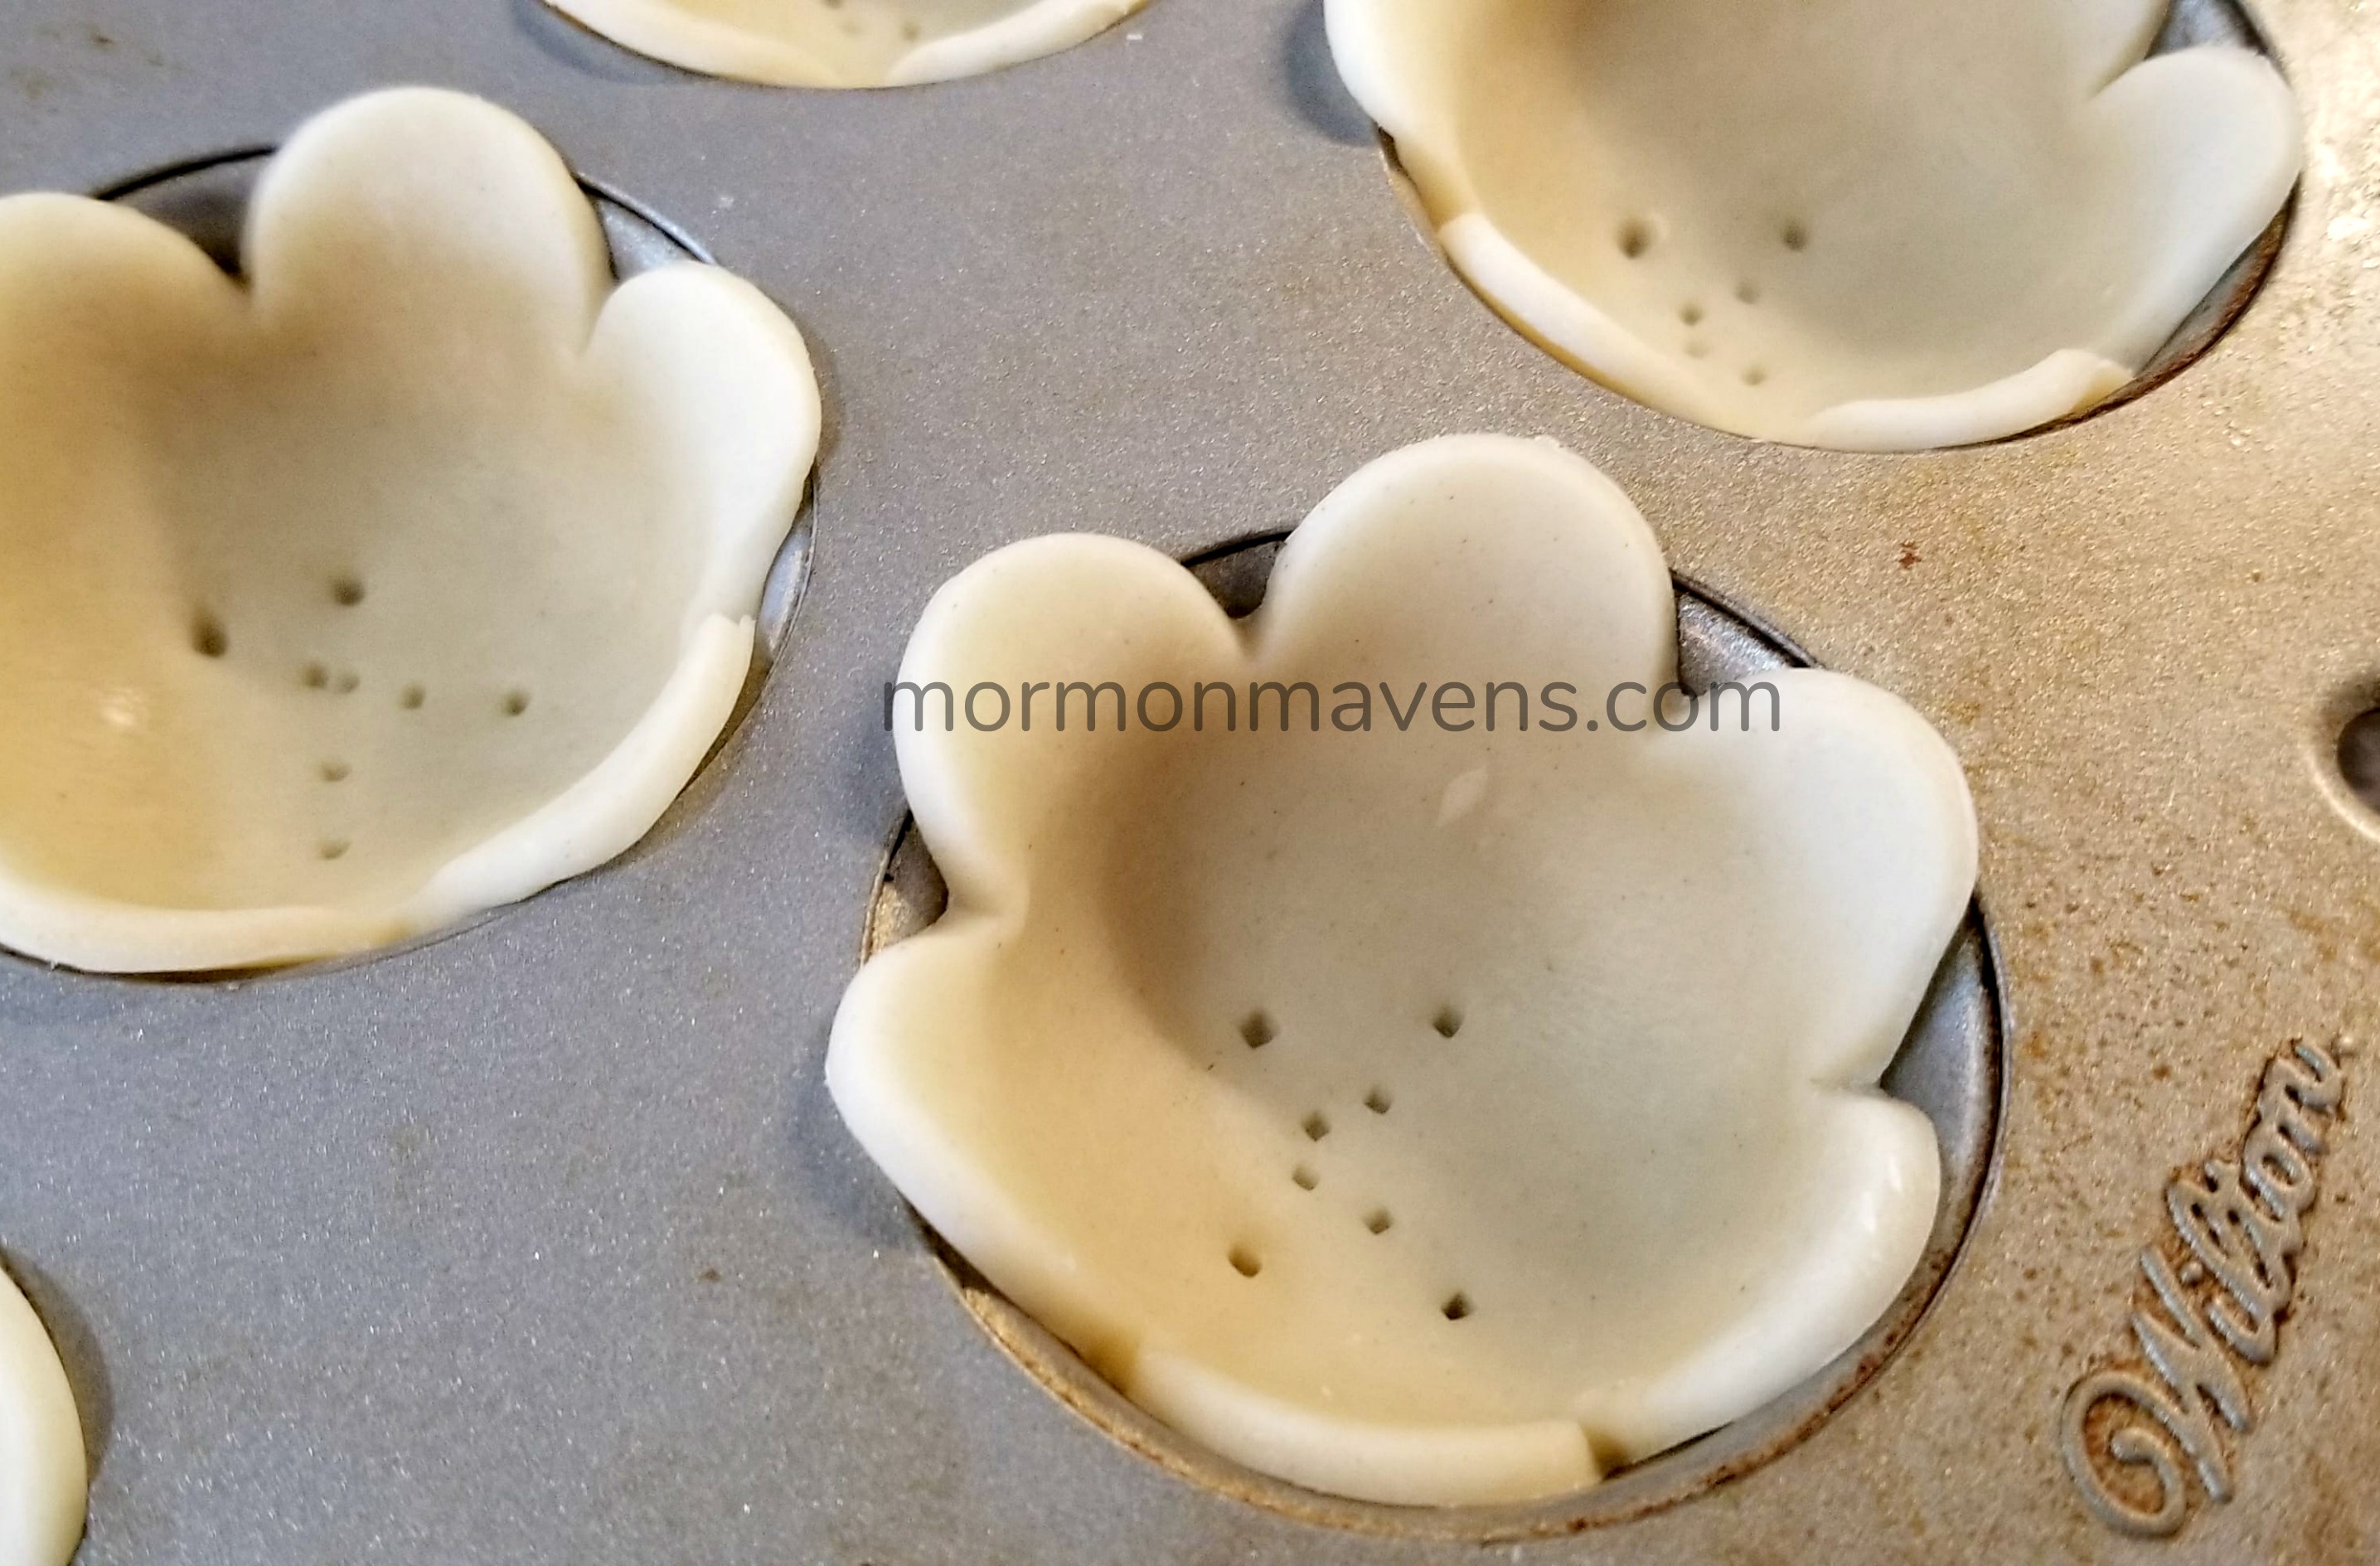
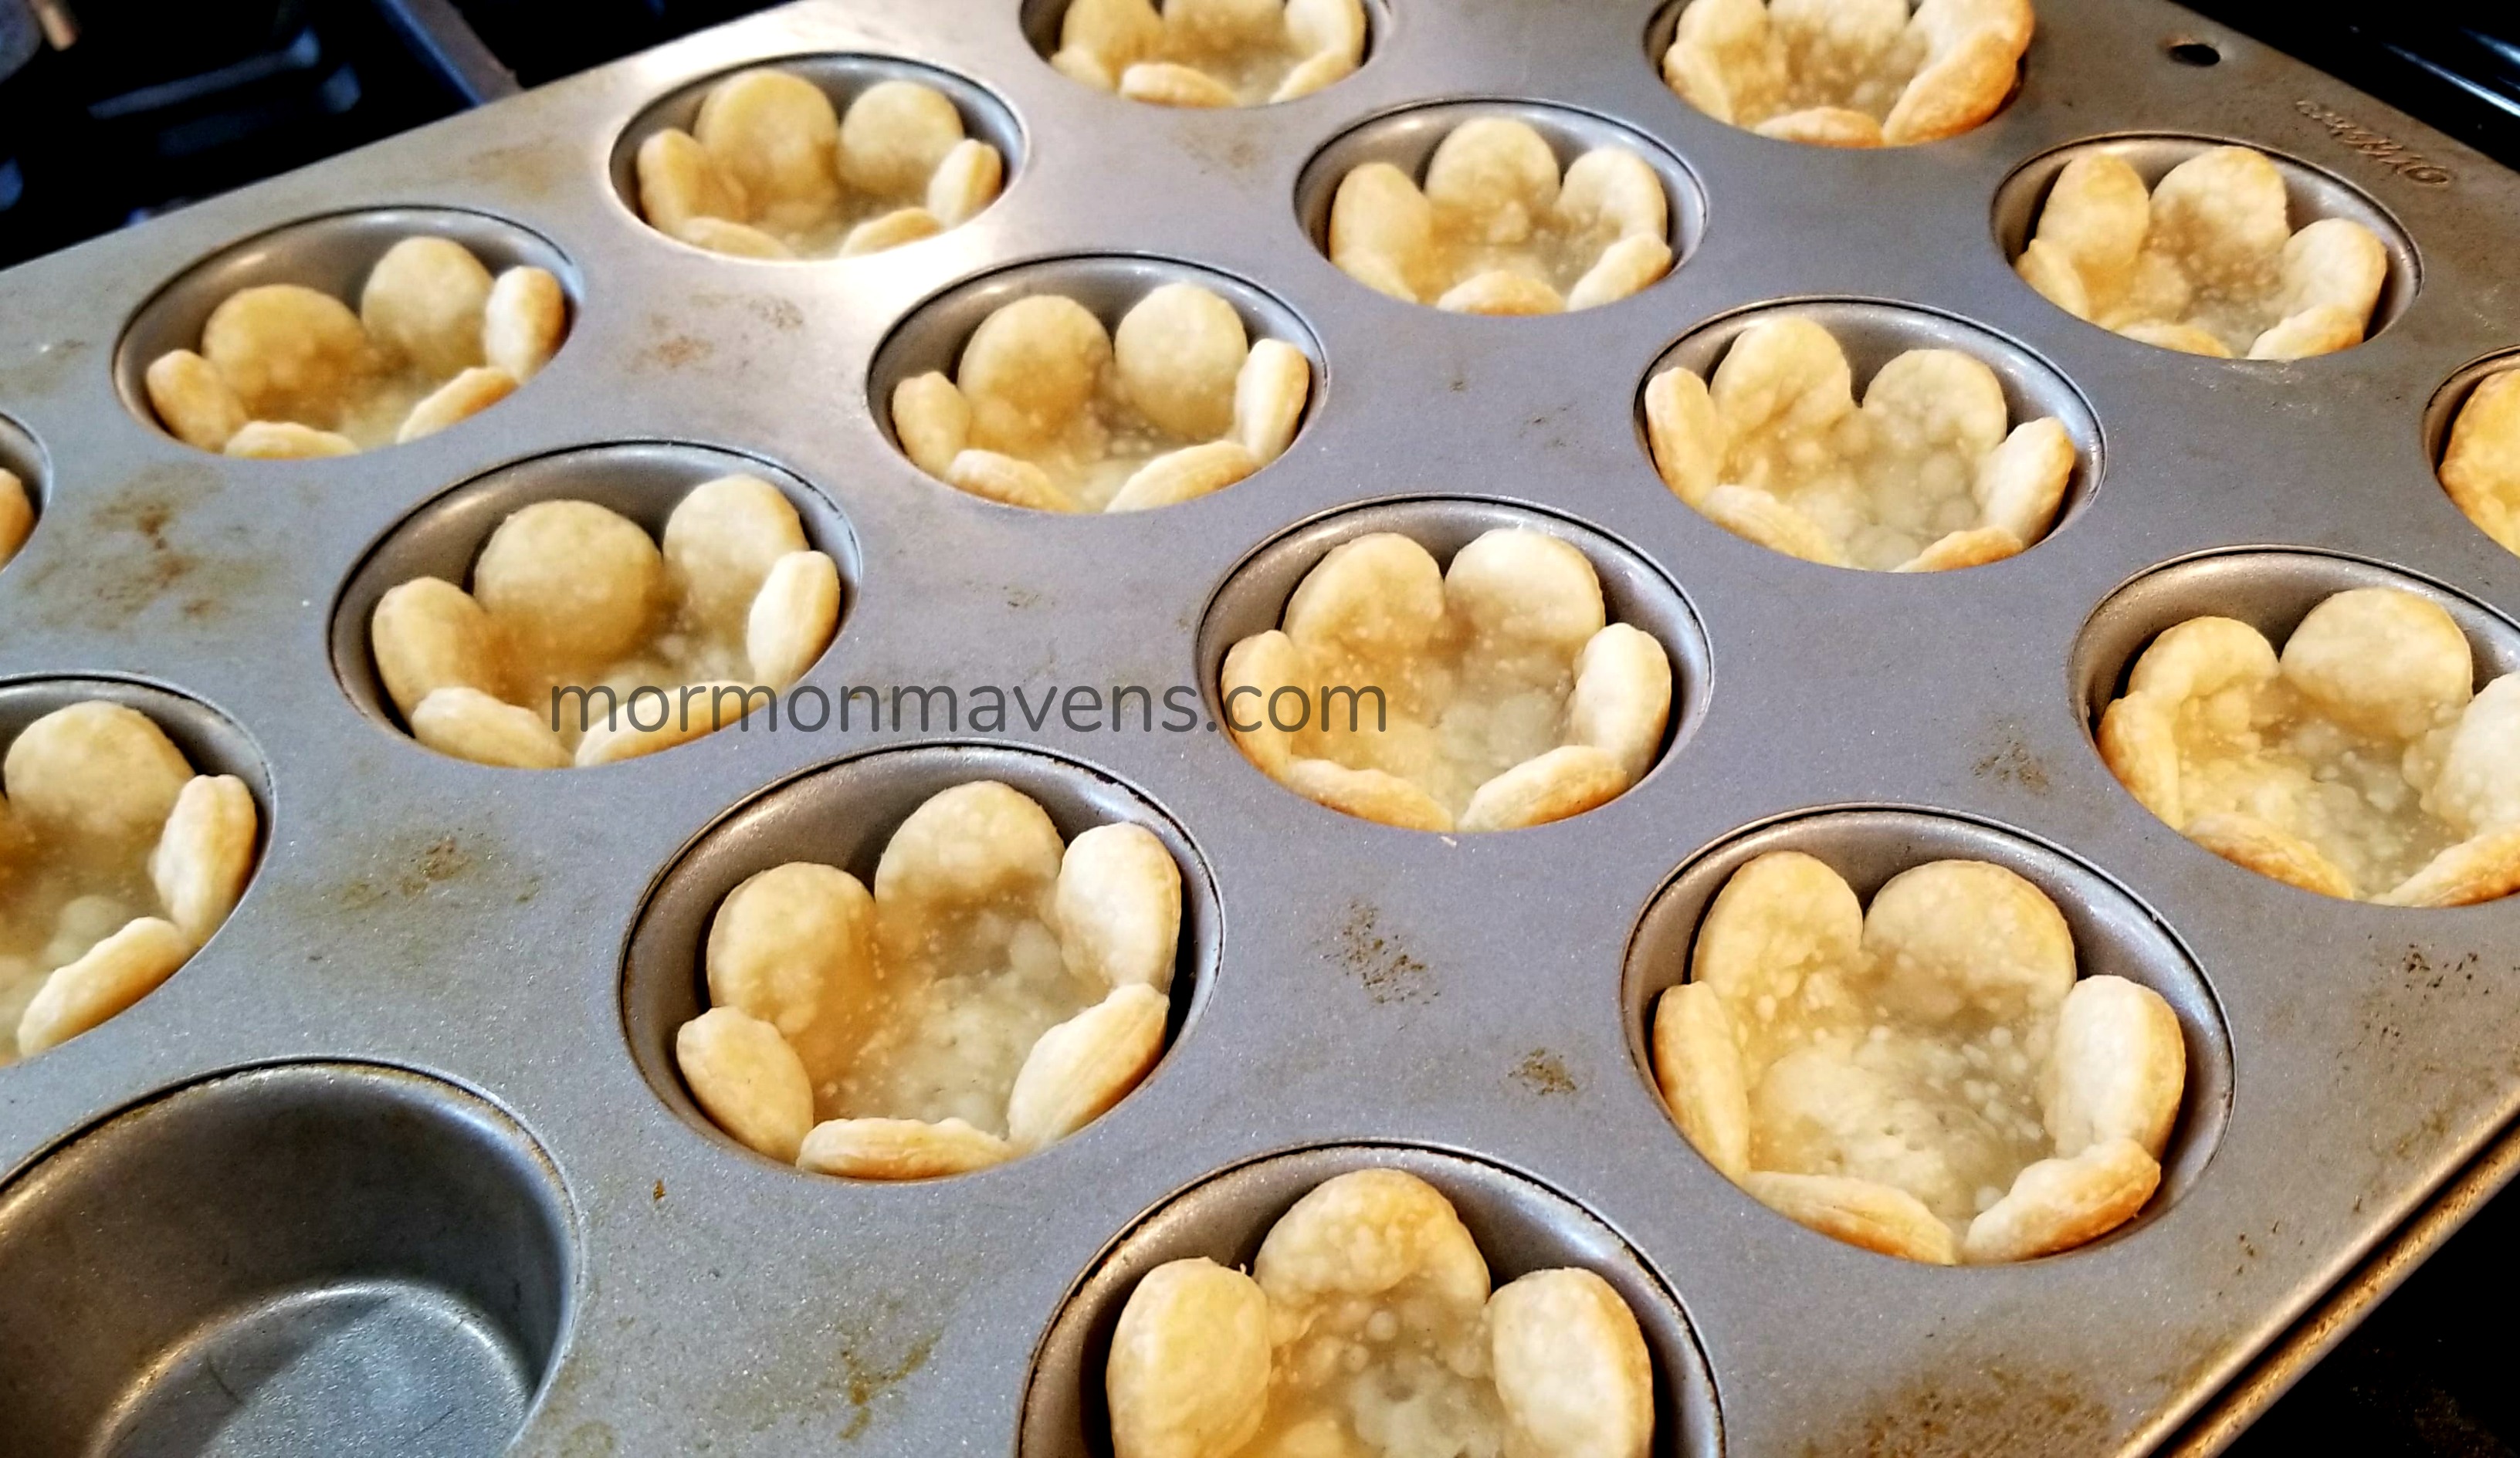
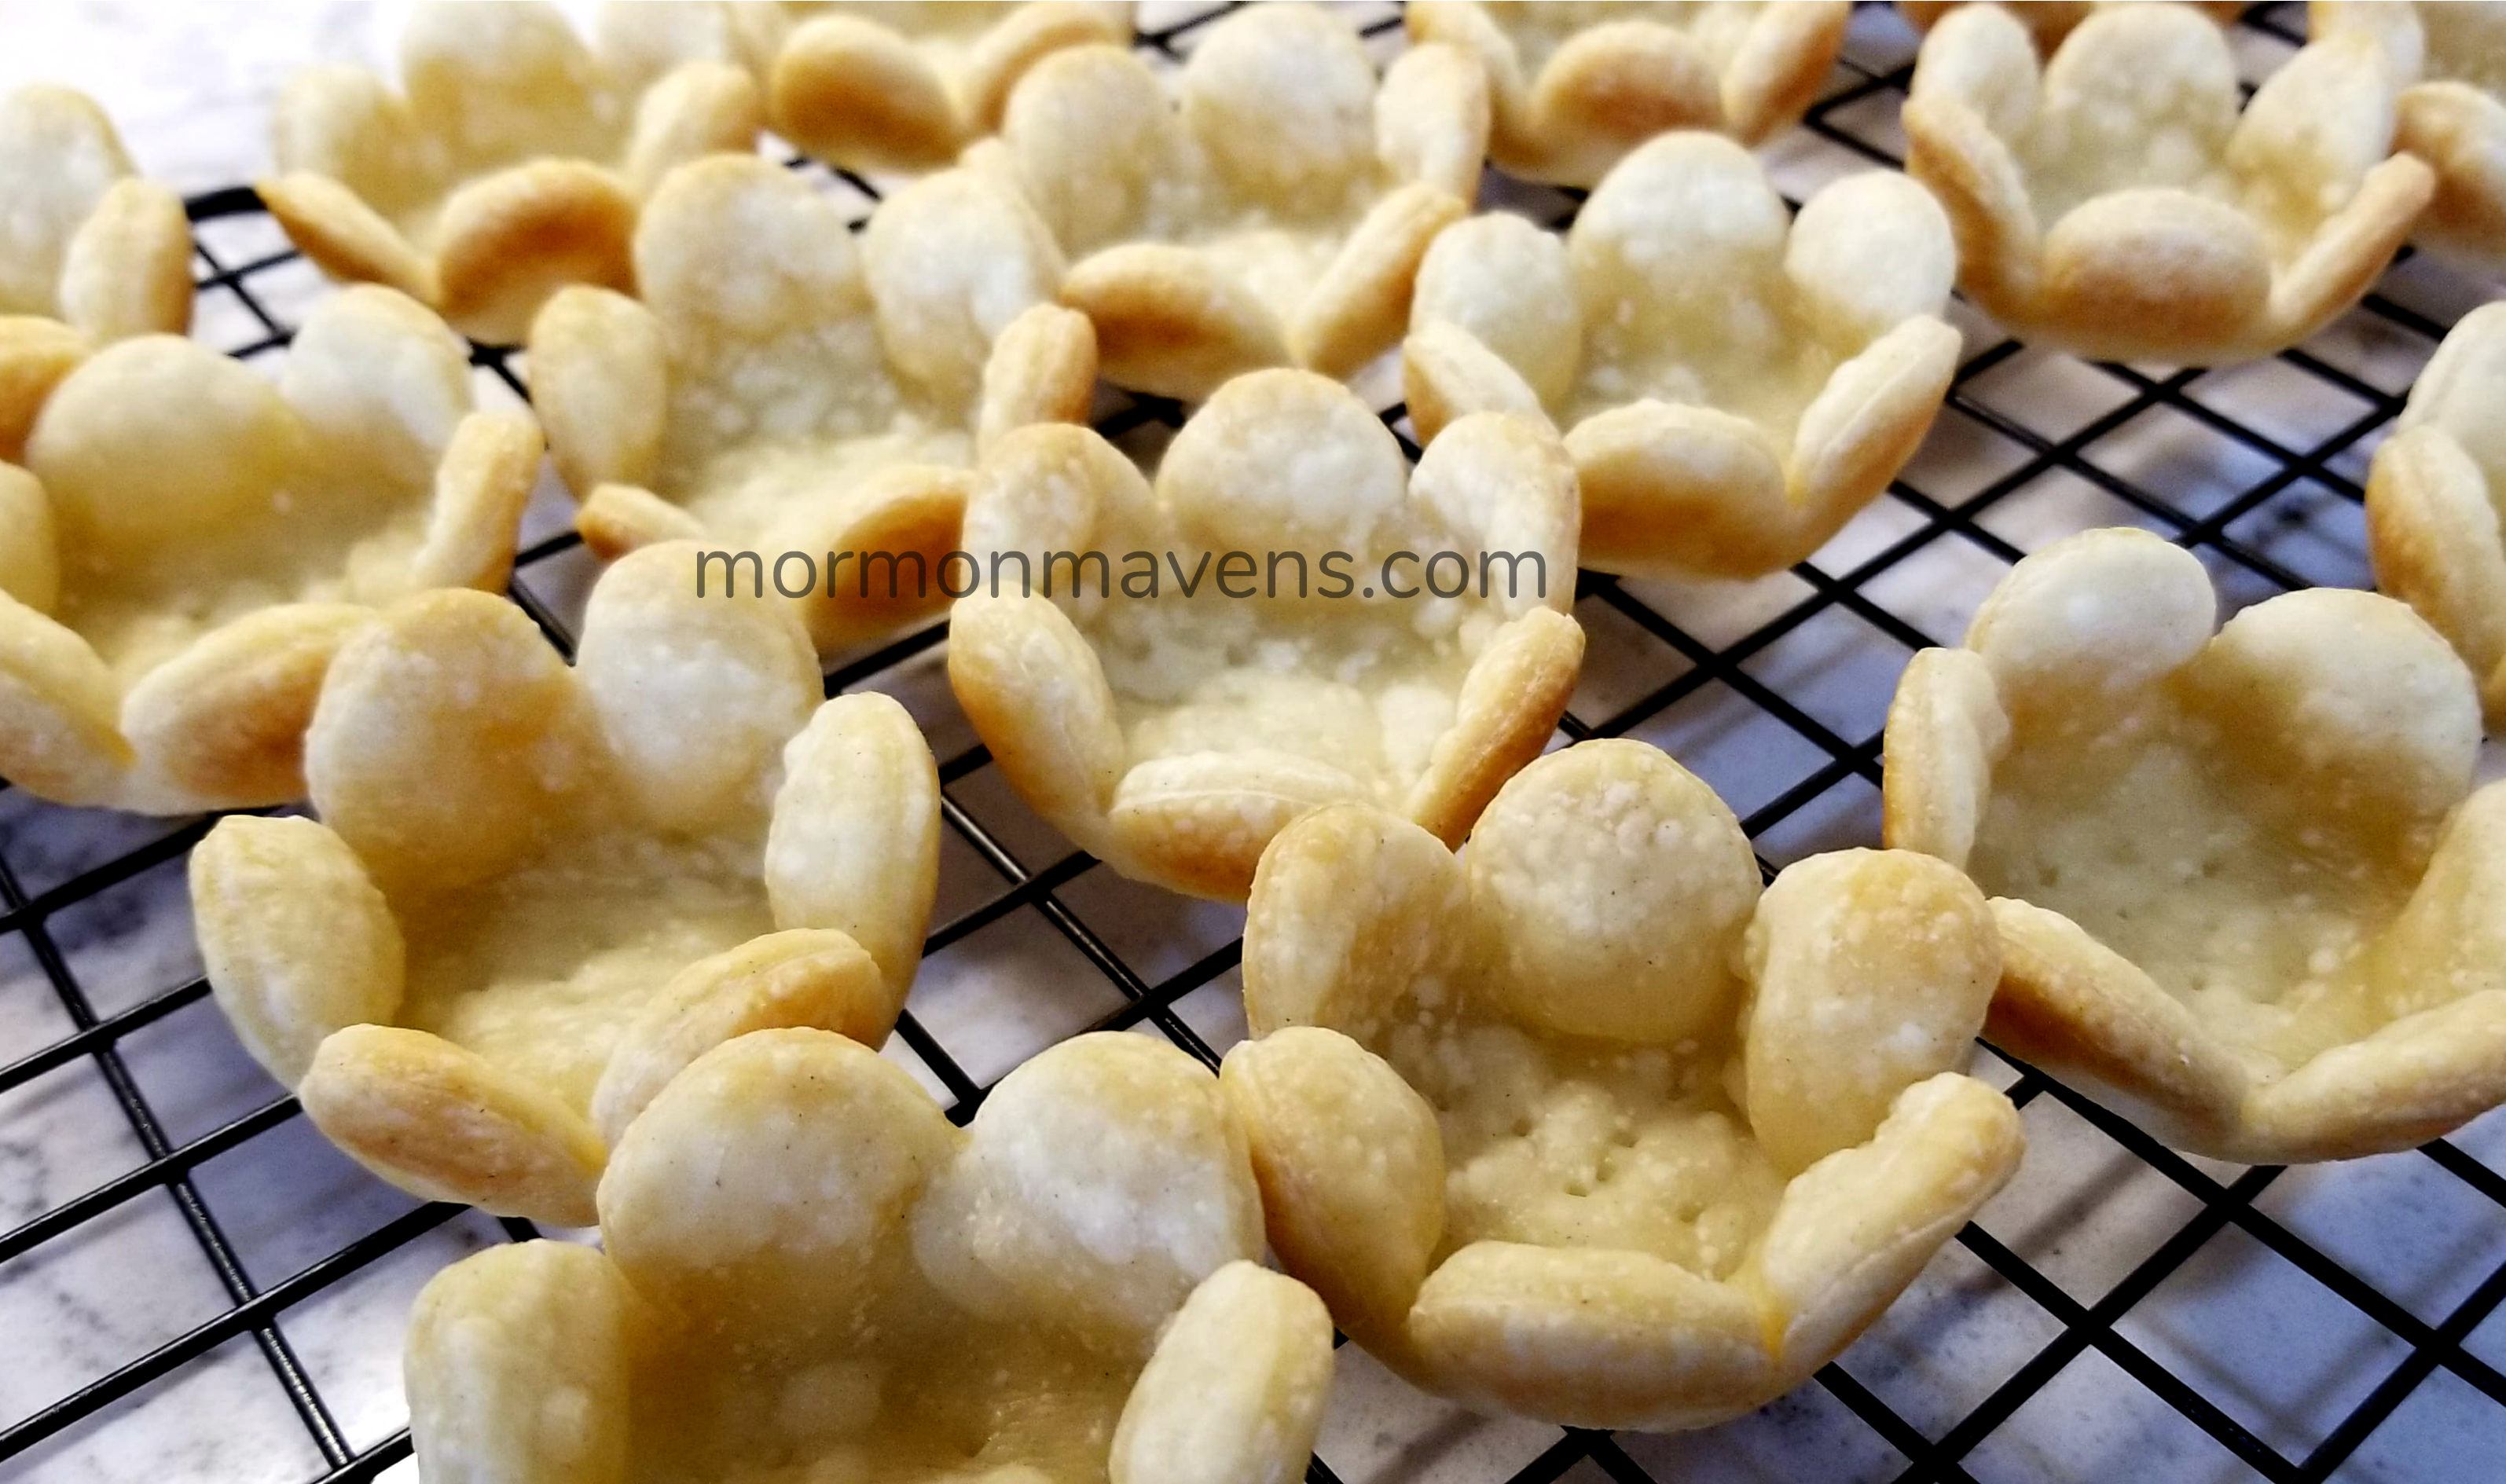
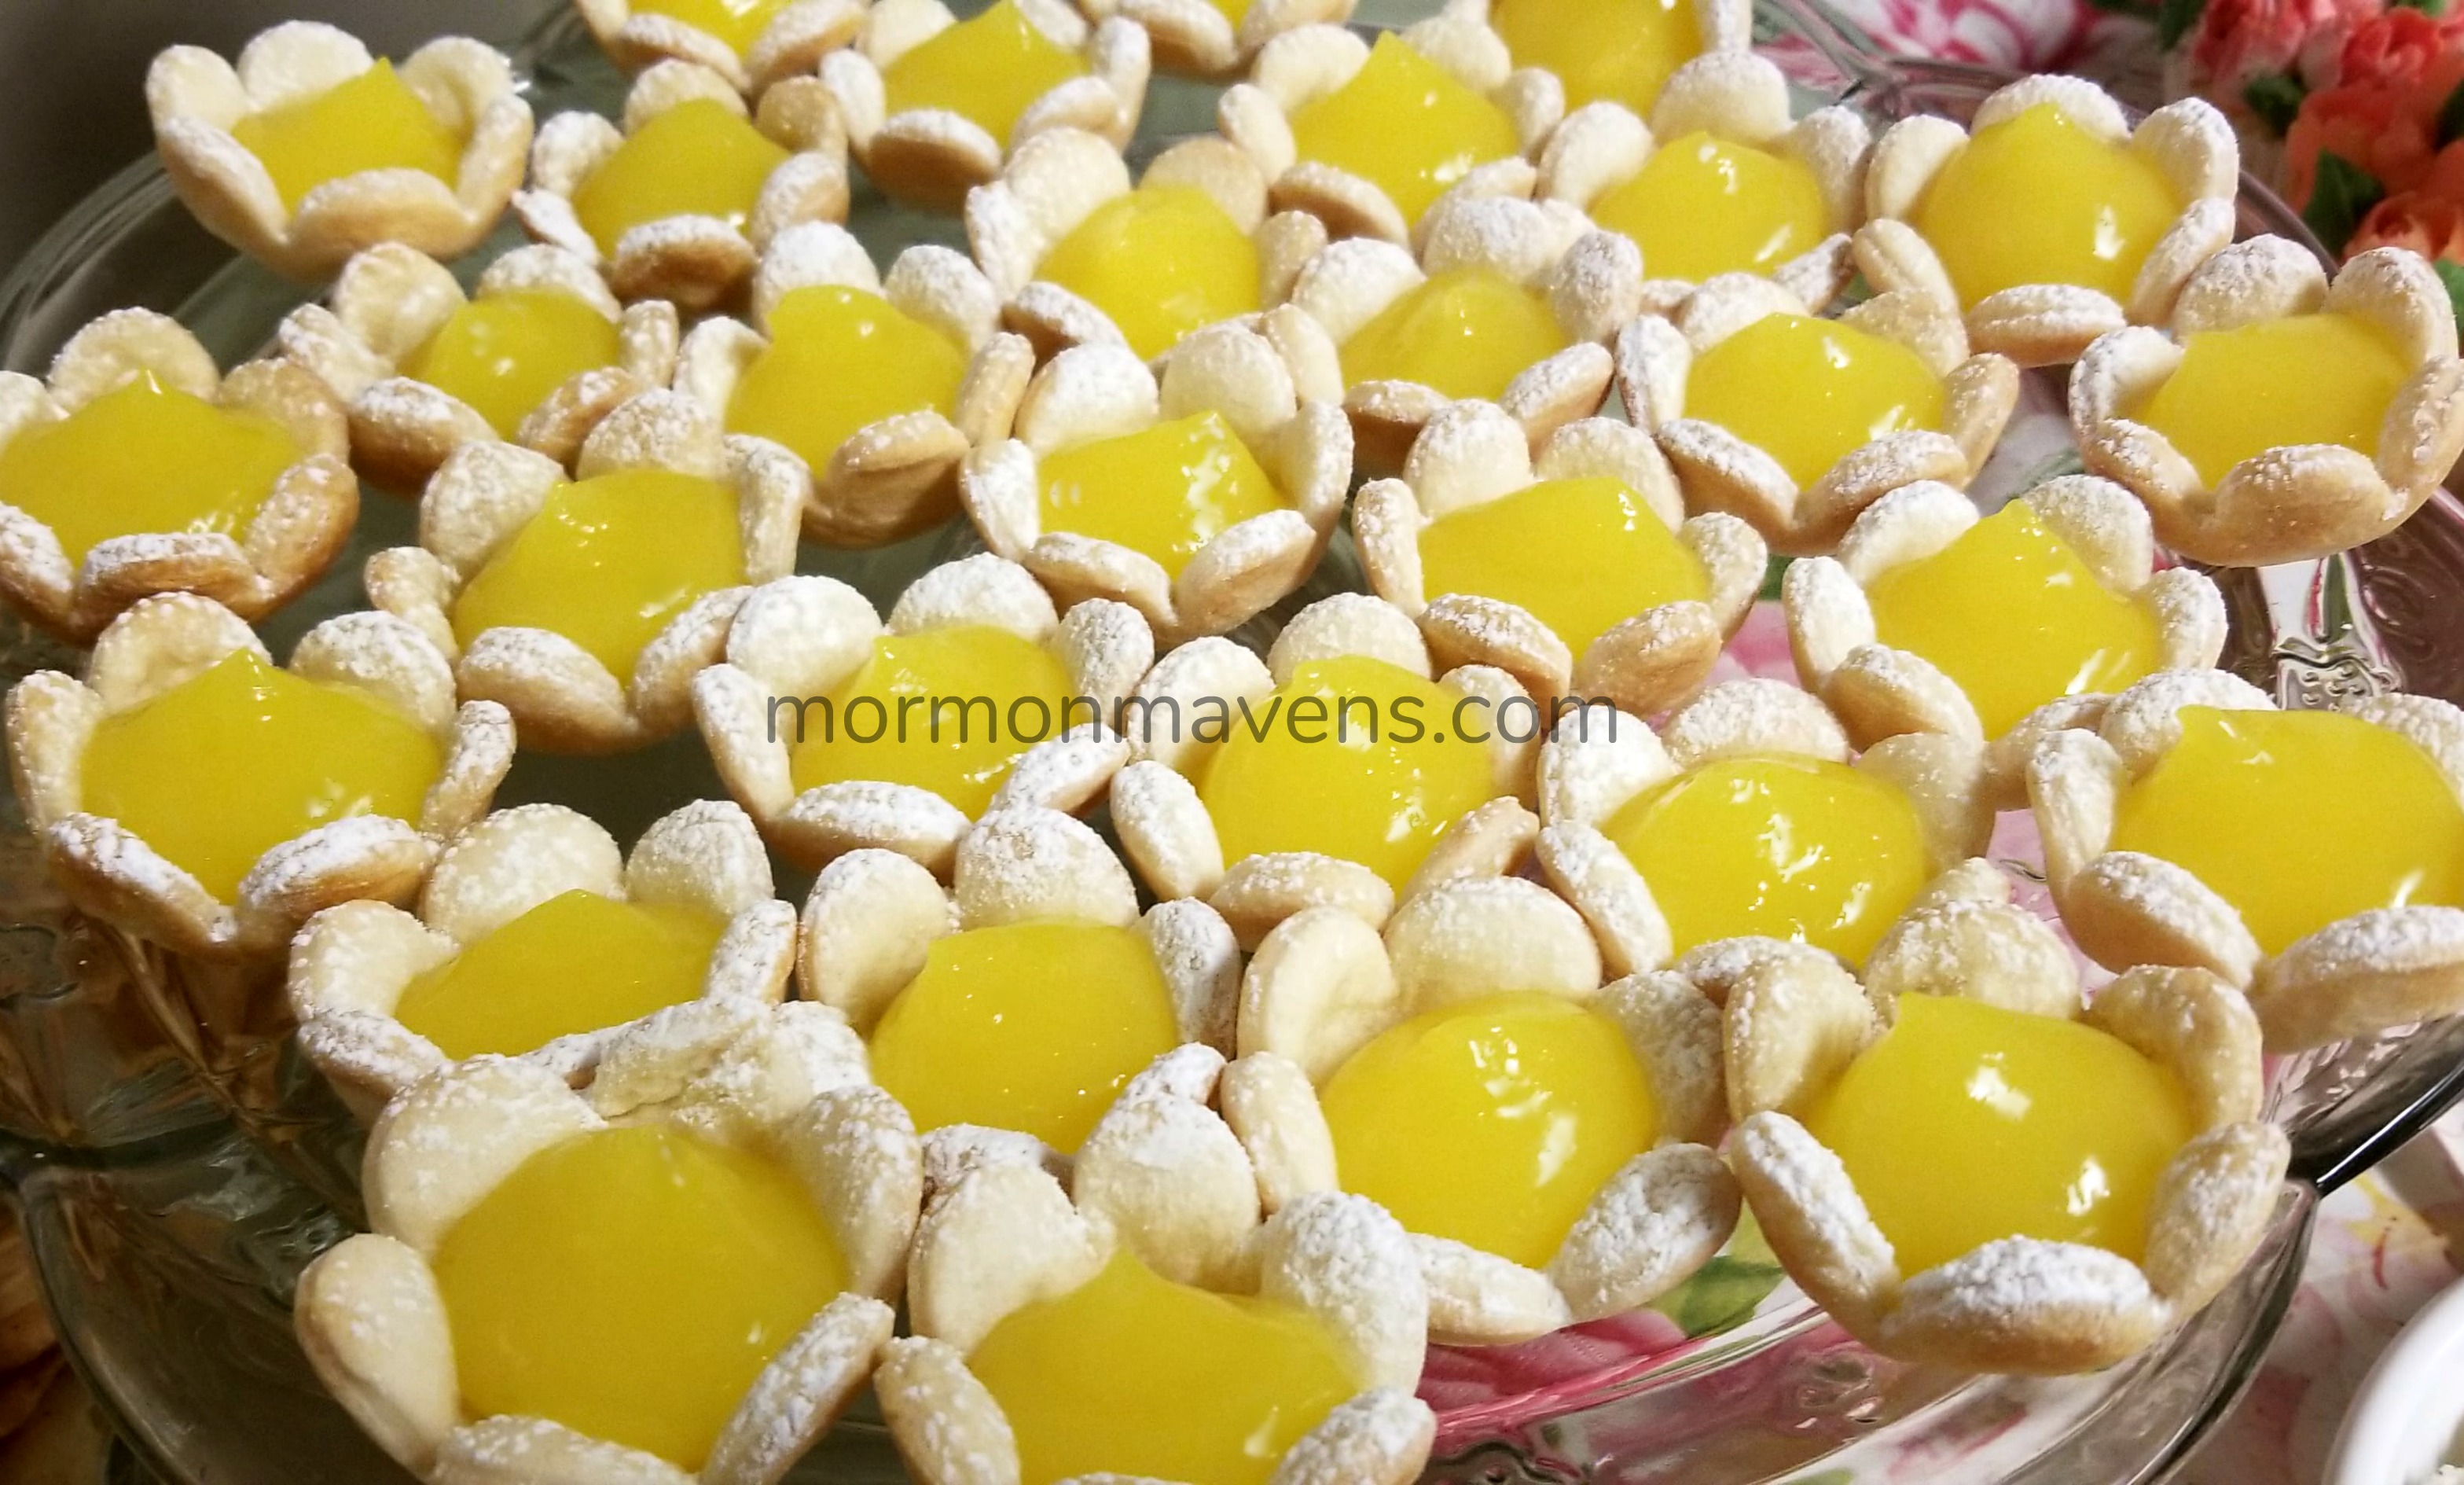
When a recipe is not only easy and quick but also impressive-looking, you know you’ve got a keeper.  And these Lemon Pie Tarts fit the bill.

I had been seeing them on Pinterest but, not being much of a lemon-lover, I kinda ignored them.  But since I had a church event to plan food for, I decided to give them a try since they looked pretty easy.

I’m so glad I did.  These little guys are so easy but so cute!  And I think you could really use any pie filling you wanted to use.  Lemon is a no-brainer because it’s such a pretty pastel color.

The original recipe I found (and several others) used much larger flower cutters.  This requires you to only use every other mini-muffin tin well when baking.  Well, call me lazy, but I really didn’t want to have to take twice as long to bake these suckers up.  So I chose a smaller flower cutter, which I think made the crust-to-filling ration even better!

lemon pie tarts cutting the crust

lemon pie tarts muffin tin

piercing the crust

fresh out of the oven crusts

baked crusts ready for filling

Lemon Pie Tarts
Easy, quick, cute party food.
Write a review
Print
Cook Time
5 min
Cook Time
5 min
Ingredients
  1. 1 box ready-to-bake pie crusts (roll-out type)
  2. 1 can lemon creme (lemon pie filling in the baking aisle)
  3. powdered sugar
Instructions
  1. Set out your pie crusts so that they come to room temperature.
  2. When ready, preheat over to 450 degrees.
  3. Roll out the pie crust, then use your flower cutter to cut out as many flowers as will fit. I got about a dozen flowers using my cutter. It just depends on the size you choose.
  4. Place flower crusts into wells of a mini muffin pan. With smaller flowers, don't press all the way down. You want to have at least the edges of the petals flaring out a bit on the edge.
  5. Pierce the bottoms with a fork to prevent air bubbles.
  6. Bake for 5 minutes, or until lightly golden on the edges. Remove from pan and allow to cool.
  7. When ready to serve, dust the empty shells with powdered sugar. Open the lemon creme and spoon it into a pastry bag. Fill the shells with the filling and serve.
Notes
  1. If you don't have a pastry bag you can use a ziploc bag. Spoon the filling into the bag, seal it, then cut a small corner at the bottom of the bag to fill.
  2. The rolled out pie crusts come two to a box. I got a couple dozen flowers out of one box. Again, it depends on the size cutter you use.
Mormon Mavens https://www.mormonmavens.com/

Tiger Butter Fudge

Ever need to make a treat to take to an event but don’t really want to go to the trouble?  Or maybe you just want a treat for yourself?

With only three ingredients, this recipe is a winner and you’ll be toting/indulging in this treat in no time!

tiger butter fudge

tiger butter fudge prep

Chocolates are melted, peanut butter is about to go into the white chocolate, and the pan is ready.

This is the fun part!

tiger butter fudge

Easy recipe…..peanut butter and chocolate….pretty…..WIN!

Tiger Butter Fudge
With only three ingredients, this recipe is one you can whip up in no time.
Write a review
Print
Prep Time
5 min
Prep Time
5 min
Ingredients
  1. 1 (12 oz) bag of white chocolate chips
  2. 1/2 cup creamy peanut butter
  3. 1/2 cup semisweet chocolate chips
Instructions
  1. Line a 9x13 pan with aluminum foil so that when you are ready to cut and serve, you can easily lift out the fudge.
  2. Place the semisweet chips into a microwave-safe bowl and microwave for 1 minute. Remove and stir. Continue to melt in microwave in 30 second increments until the chips are melted. Set aside.
  3. Repeat this process in a different bowl with the white chocolate chips. Stir peanut butter into the melted white chocolate.
  4. Pour the white chocolate/peanut butter mixture into the pan. Don't worry about spreading it to the edge, just let it spread as far as it will on its own.
  5. Use a spoon or spatula to drop the semisweet chocolate onto the white chocolate mixture in rough lines.
  6. Using a butter knife, run through the fudge in the opposite direction of the semisweet lines, making a marbled pattern. Do this until you get the look you like!
  7. Allow to set at room temperature, or place it in the fridge to set quickly. Lift out the foil and place on a cutting board; cut in pieces.
Mormon Mavens https://www.mormonmavens.com/

Strawberry Pretzel Bark

I love quick and easy recipes.  Especially when they look impressive!

This beautiful, swirly chocolate treat is a fun way to enjoy a little decadence–you could even give this as a gift!  Just remember to keep it cold as the chocolate warms easily to the touch and the freeze dried strawberries will have a better texture cold.

pretzel-bark

(this recipe is also shared in my Thrive Life recipes….hence my Thrive website url)

Strawberry Pretzel Bark
Easy but elegant, sweet and salty.
Write a review
Print
Prep Time
5 min
Cook Time
5 min
Total Time
10 min
Prep Time
5 min
Cook Time
5 min
Total Time
10 min
Ingredients
  1. 12 ounces semisweet chocolate chips
  2. 8 ounces white chocolate for baking (could also use vanilla candy melts)
  3. 1 cup freeze dried strawberry slices (I used Thrive, of course!)
  4. 1/2 cup salted pretzel sticks
  5. sprinkles of your choice
Instructions
  1. Line a baking sheet with waxed paper or parchment paper.
  2. Place the chocolate chips in a microwave safe bowl and melt for 30 seconds at a time, stirring after each time, until the chocolate is smooth and melted completely.
  3. Pour 3/4 of the chocolate onto the paper lined baking sheet. Use an offset spatula to spread the chocolate into a thin, even layer so that it ends up in a rectangle about 9"x 12".
  4. Melt the white chocolate in the microwave in the same way you did the chocolate chips. Drop by spoonfuls onto the chocolate rectangle. Use the remaining melted chocolate chips to drop spoonfuls over top of the white chocolate spoonfuls. Swirl with a toothpick.
  5. Immediately place the pretzel sticks and strawberry slices on the surface, pressing down lightly.
  6. Refrigerate until set. Slide the bark with the paper onto a cutting surface and cut the bark into pieces. Serve right away, or store in the fridge in a covered container.
Notes
  1. You can use different freeze dried fruits--blueberries, raspberries, cranberries. All sorts of combos! And if you like it a little saltier, sprinkle on some sea salt too.
Adapted from Five Heart Home
Mormon Mavens https://www.mormonmavens.com/

Peppermint Bark Rice Krispie Treats

This recipe was originally posted on February 16, 2012.  We thought we would bring it back for the holidays!

These are a tasty rendition of the classic Rice Krispie Treat and are great for any holiday involving chocolate and mint–and they are so pretty!  I have made these for our youth at church and for several family gatherings and they are a big hit.  Personally, I can’t stay away from the platter–so many favorite flavors.

Peppermint Bark Rice Krispie Treats
Write a review
Print
Ingredients
  1. 1 10.5 oz. bag of peppermint mini marshmallows*
  2. 4 tablespoons butter, plus extra to butter the pan
  3. 5-6 oz. krispy rice cereal
  4. 3 tablespoons semi-sweet or dark chocolate chips
  5. 3 tablespoons white chocolate chips
  6. 1/2 teaspoon vegetable oil, divided (I used shortening)
  7. a few drops peppermint extract
  8. 2-3 medium sized candy canes, crushed
Instructions
  1. Line a 9×13 pan with foil and lightly butter bottom of pan and about 1 inch up the sides.
  2. Melt butter in a very large bowl in the microwave. Add marshmallows and stir to coat. Microwave on high for 30 seconds at a time until melted and smooth, stirring as you go.
  3. Add the krispy rice cereal and stir to evenly combine. With buttered hands, press mixture into pan.
  4. Place the white chocolate chips and about 1/2 teaspoon or less of shortening in a small bowl. Heat in microwave in 30 second intervals on 50% power, stirring in between until melted and smooth. Repeat same process with the semi-sweet chocolate chips and add a few drops of peppermint extract.
  5. Drizzle both chocolates on top of the treats and sprinkle with the crushed candy canes–I used those that are more porous, you know, the kind you can stick into a hole in an orange and suck the juice through? Really…have you never tried that? Anyway, let sit until chocolate is set. You can put it in the refrigerator to speed up the process. Cut into squares and oh my goodness….
Notes
  1. * If you can’t find the peppermint marshmallows, use regular and add about 1/4 teaspoon peppermint extract to the melted marshmallow mixture.
Adapted from Our Best Bites
Mormon Mavens https://www.mormonmavens.com/


Easy Toffee

toffee
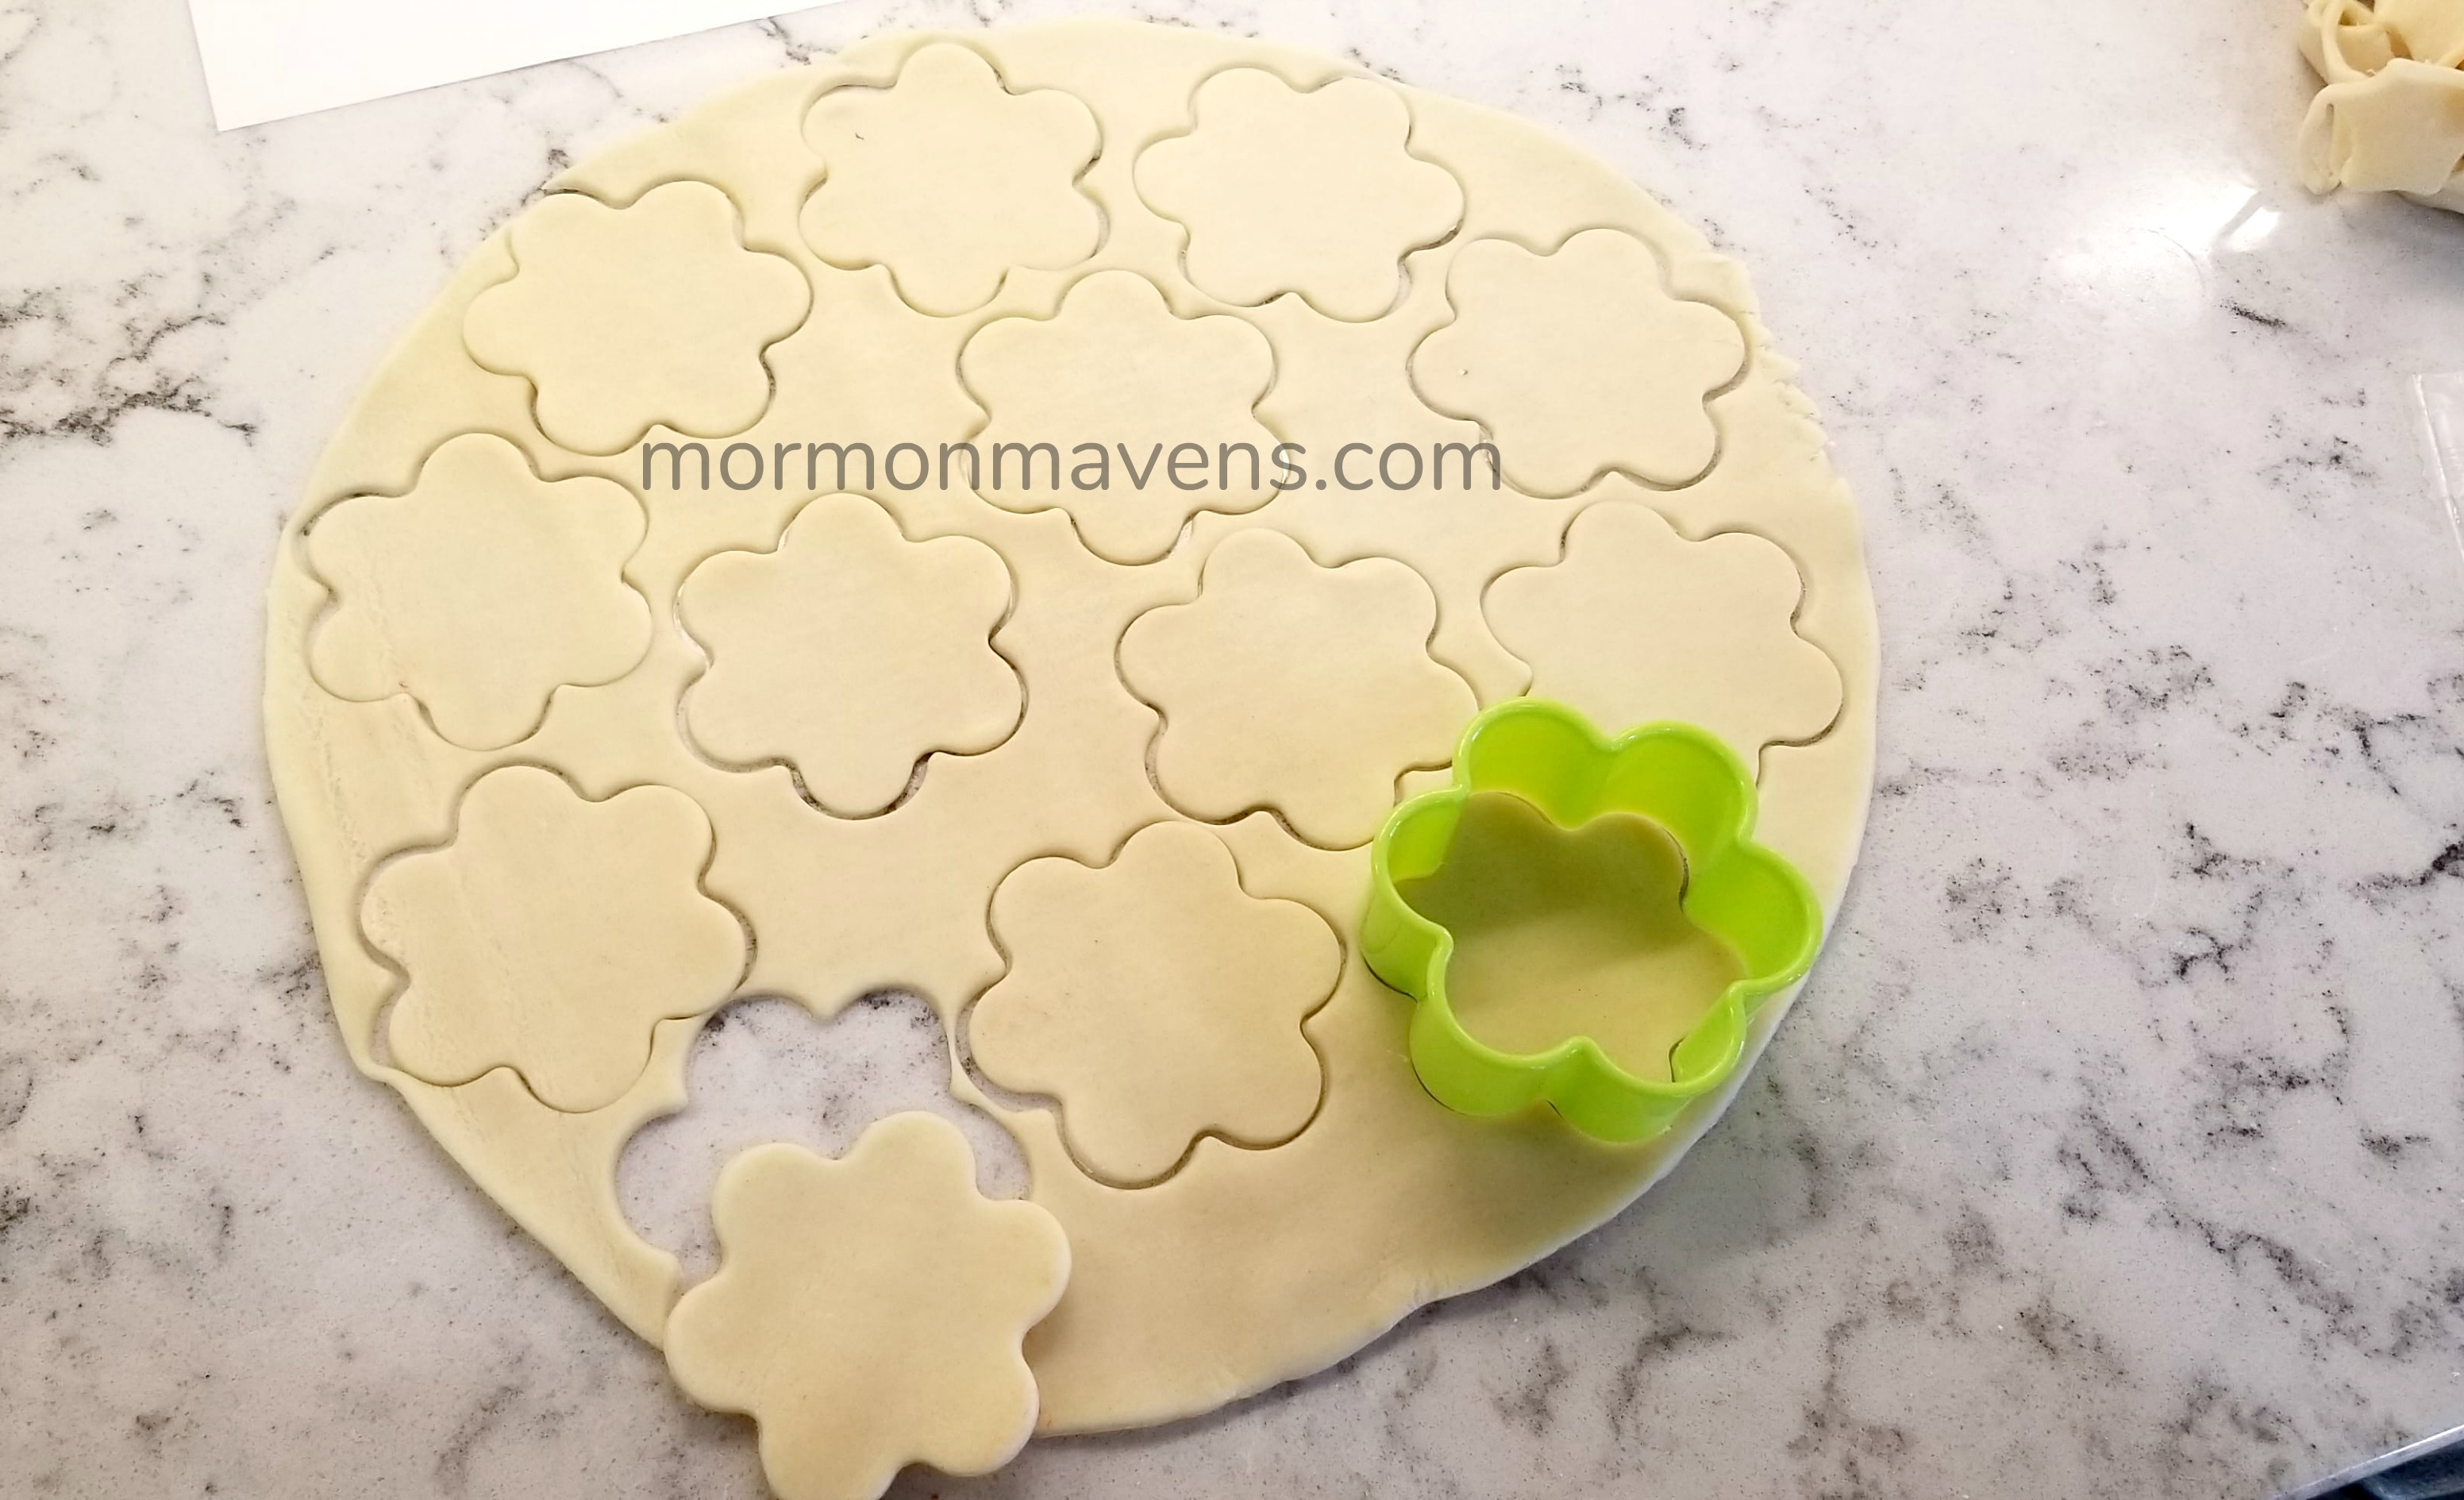
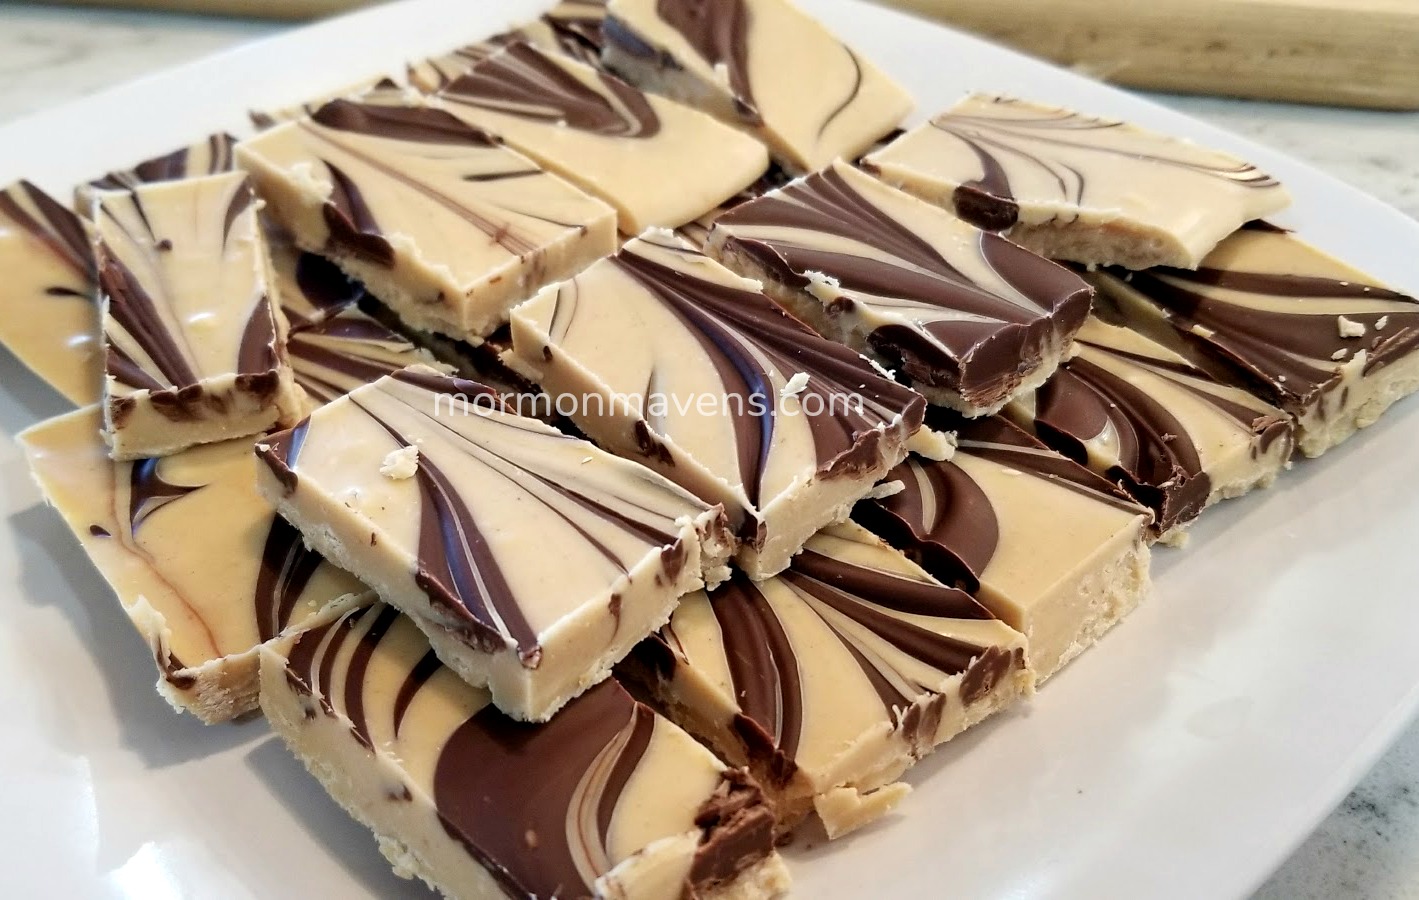
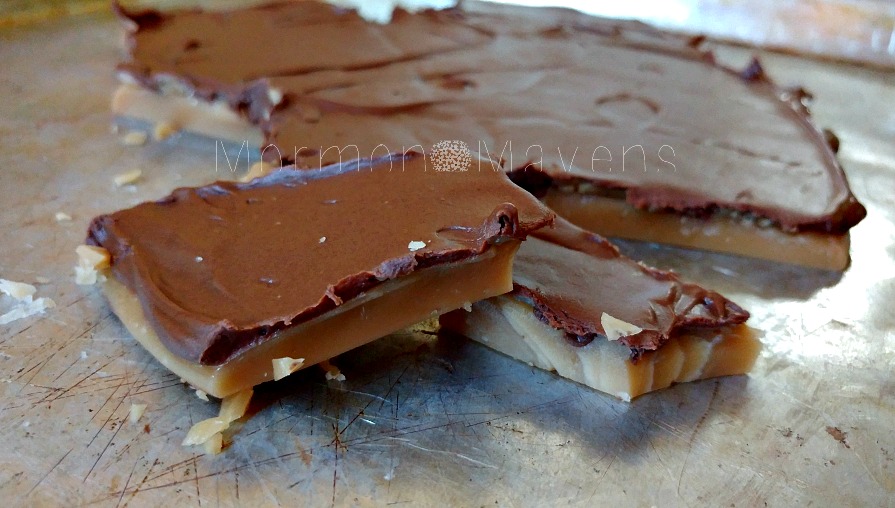
I have a friend who makes THE most amazing toffee.  

Seriously.  It’s total food crack.

And as much as I’ve always thought I would like to know her secret recipe, I actually kinda wish I hadn’t found this recipe (which is super close to hers, although I will always prefer hers!).  

Why?

Because I can’t stop eating it when I make it!

I made three batches to test it in different ways and each time I ate until I was sick!  I seriously have to watch myself around this stuff.

And I’m so happy that this recipe does NOT involve a candy thermometer.  I really hate those things.


toffee-collage

from left to right: just starting, all melted and boiling, beginning to thicken, the right color!, after the vanilla and ready to pour


Easy Toffee
A little salt gives this delicious toffee a beautiful flavor.
Write a review
Print
Prep Time
5 min
Prep Time
5 min
Ingredients
  1. 1 cup butter
  2. 1 cup sugar
  3. 5 Tbsp. water
  4. 1/2 tsp. kosher salt
  5. 2 tsp. vanilla
  6. 1 cup milk chocolate chips
Instructions
  1. Place a baking sheet on top of several towels or a wooden cutting board.
  2. In a cast iron skillet, melt the butter with the sugar and water. Once the butter is melted, adjust the heat until there is a consistent boil. Stir CONSTANTLY.
  3. Continue to adjust heat and stir for 10-15 minutes or until the mixture is caramel colored. Remove from heat.
  4. Add the salt and vanilla and stir well.
  5. Immediately pour onto the baking sheet.
  6. Wait a couple of minutes and then pour the chocolate chips evenly over the top. Allow the chips to melt completely, then spread the chocolate evenly with an offset spatula.
  7. Allow the chocolate to set completely before cutting/breaking up the toffee.
Notes
  1. You need the towels or wooden cutting board as a protection for your countertop. The toffee will make the baking sheet VERY hot!
  2. I tried this twice with milk chocolate block and could never get it to melt smoothly. I highly recommend using milk chocolate chips, which are formulated differently from block chocolate. They melt way better!
Mormon Mavens https://www.mormonmavens.com/

Egg-less Creme Brulee Pie

eggless-creme-brulee-pie-2

Yes, I know.  Eggs are a huge part of Creme Brulee so how can I call it that when there are no eggs?

Because it’s a free country, that’s why!

Okay, all sass aside.  I just can’t get past the creaminess of the pie the brulee-ness of the top layer.

Yes, I know.  Brulee-ness is not a word so how can I call it that when it’s not a word?

Because it’s a free country, that’s why!

Okay, we’re getting off-topic here.  The point is, you need to try this.  It’s such a simple pie and so good!  Even my pickiest eaters loved it!

eggless-creme-brulee-pie

Egg-less Creme Brulee Pie
Serves 12
A really simple but, yet it is so good! You'll be surprised!
Write a review
Print
Prep Time
20 min
Cook Time
35 min
Prep Time
20 min
Cook Time
35 min
Ingredients
  1. 1 Deep Dish Pie Crust, at room temperature
  2. 4 Tbsp. cornstarch
  3. 3/4 cup sugar
  4. 4 Tbsp. butter, melted
  5. 2 1/4 cups heavy cream
  6. 1 Tbsp. vanilla
  7. 4 Tbsp. butter, melted
  8. 1/3 cup cinnamon sugar (mix it to your liking)
Instructions
  1. Preheat your oven to 325 degrees. Use a fork to pierce the bottom of the pie crust. Place it on a baking sheet and bake for 10 minutes. Remove from oven and set aside.
  2. In a small bowl, combine the sugar and cornstarch and mix well with a whisk until thoroughly combined.
  3. In a medium saucepan, melt 4 Tbsp of butter. Then add the cream and the sugar/cornstarch mixture. Whisk well to combine; then continue whisking over medium heat until the mixture is very thick and creamy.
  4. Remove from heat and add the vanilla.
  5. Pour this mixture into the pie crust, spreading out the mixture evenly. Pour the final 4 Tbsp. of melted butter carefully over the top. Then sprinkle evenly with the cinnamon sugar.
  6. Bake at 325 for about 25 minutes. Remove from the oven and turn on the broiler. Set pie under broiler for about a minute. Watch it carefully so it will not burn.
  7. Remove from oven and carefully set the pie tin on a cooling rack to cool. Allow it to cool to room temperature, then refrigerate it for at least an hour so it can set.
  8. Store any leftovers in the fridge.
Notes
  1. It has to be a Deep Dish pie crust. The regular crusts are not big enough to hold it. You can also use refrigerated crusts or make your own. The crust in the pie tin just needs to be at room temperature.
  2. For the cinnamon sugar: I keep a jar of premixed cinnamon and sugar so I'm not sure on the amounts because I go by how it looks! But you could mix 1/3 cup sugar and put in 2-3 teaspoons of cinnamon.
Adapted from The Domestic Rebel
Mormon Mavens https://www.mormonmavens.com/